
Key Takeaway
- Eliminate manual email work with automation: Lightning Email Templates help teams automate repetitive communication, saving hours and ensuring consistency across customer interactions.
- Seamless integration with Salesforce automation: Templates can be connected to Flow Builder and Email Alerts to trigger emails automatically based on record changes or events.
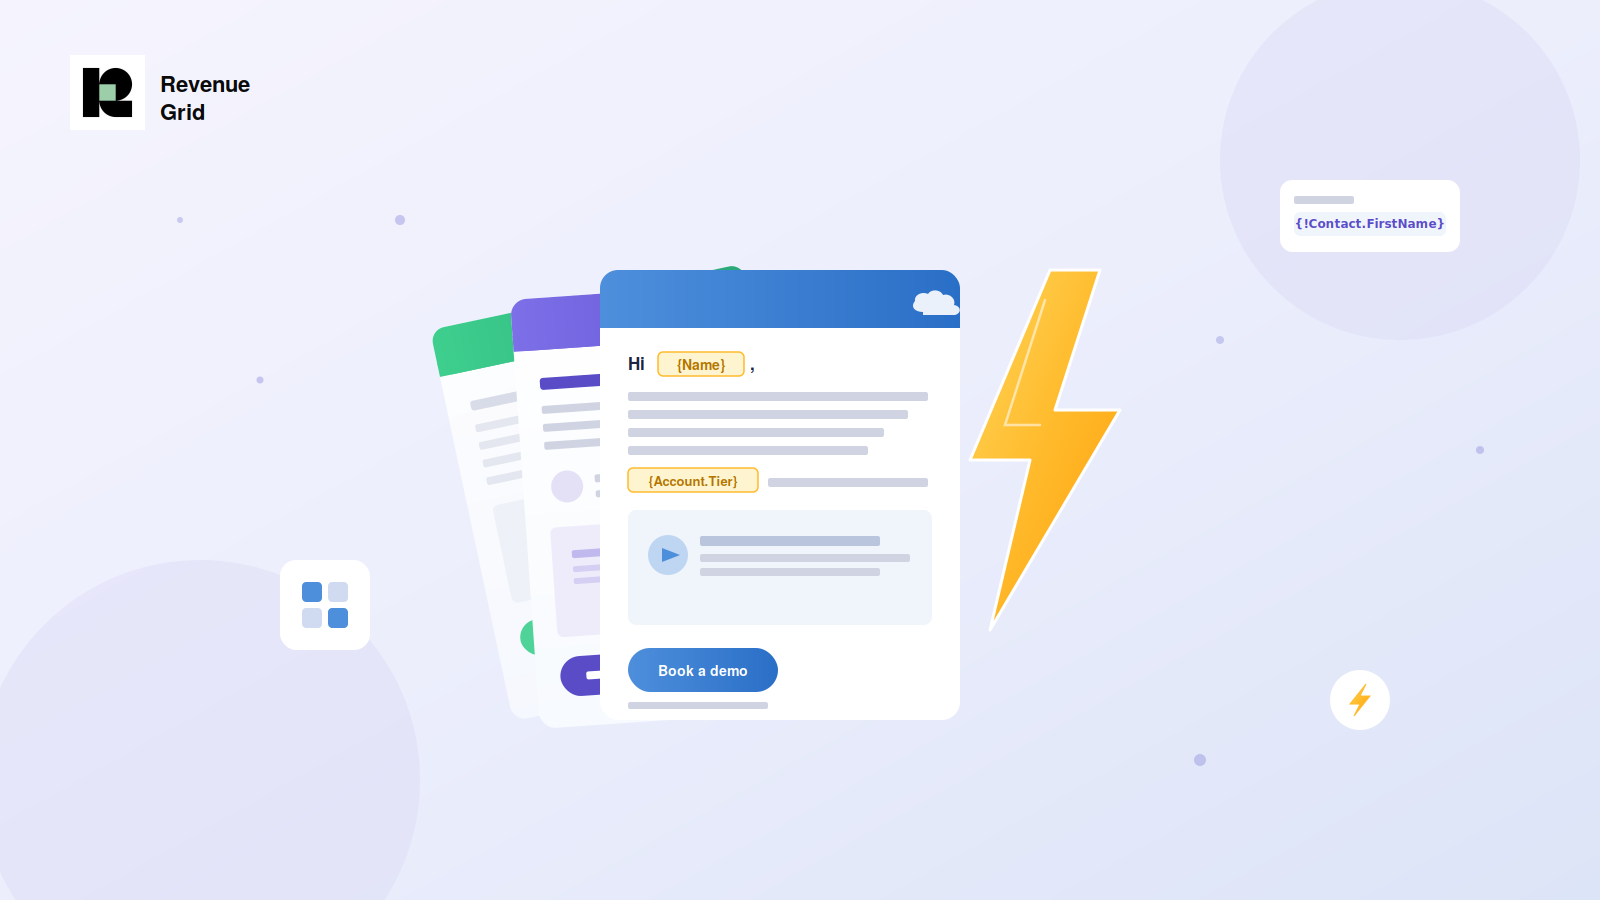
- Personalization at scale with merge fields: Dynamic fields like contact name, opportunity details, and account data enable highly personalized emails without manual effort.
- Structured template library improves scalability: Organizing templates by customer journey (lead, opportunity, customer) ensures relevant and timely communication at every stage.
- Be aware of limitations and plan ahead: Cross-object merge field restrictions and deployment challenges require workarounds like formula fields or Flow variables for smooth implementation.
Picture this: a deal moves to the negotiation stage, and your rep manually copies a follow-up email from a shared Google Doc, swaps in the customer’s name, double-checks the pricing tier, and hits send. Fifteen minutes later, they do it again for the next account. And the next. By the end of the week, that’s hours of repetitive work that should have been automated months ago.
Now multiply that across your entire sales and customer success team. Suddenly, the problem isn’t just inefficiency — it’s inconsistency. Some customers get polished, on-brand communication. Others get something cobbled together at 4:45 PM on a Friday. Neither outcome reflects the experience you’re trying to deliver.
This is the gap that Lightning Email Templates in Salesforce were built to close. When you connect them properly to your Salesforce automation tools, every customer touchpoint becomes consistent, timely, and personalized — without anyone lifting a finger.
But here’s the honest truth: getting Lightning Email Templates to work seamlessly inside your automations isn’t always plug-and-play. There are configuration nuances, merge field limitations, and Flow integration steps that trip up even experienced admins. This guide walks through all of it — from building your first template to wiring it into your workflows — so your team stops sending emails manually and starts scaling communication that actually lands.
What Are Lightning Email Templates — and Why They’re Different
If you’ve worked with Salesforce Classic, you’re familiar with the older email template format. Lightning Email Templates are the modern replacement, and the difference goes beyond aesthetics. They’re built on a richer editing framework, support enhanced merge fields, and integrate directly with Salesforce Sales Cloud automation features like Flow Builder and Email Alerts.
Classic templates were functional but limited. Lightning templates give you a drag-and-drop content builder, letterhead branding, and the ability to embed dynamic content that adjusts based on record data. For teams running structured customer journeys, that flexibility matters enormously.
Here’s what sets Lightning Email Templates apart:
- Enhanced text editor: Rich formatting, inline images, and branded letterheads built directly into the template
- Merge field support: Pull in field values from the related record — contact name, account tier, opportunity stage, and more
- Folder-based organization: Templates live in shared or private folders, making governance and access control straightforward
- Flow and Email Alert compatibility: Templates can be triggered automatically through Salesforce’s native automation layer
- Cross-environment deployment: Templates can be moved between sandboxes and production using Change Sets or the Metadata API
The key distinction to understand upfront: Lightning Email Templates are separate from Classic templates in both location and behavior. You’ll find them under the Email Templates tab in the App Launcher, not under the Classic setup path. This matters when you’re configuring automations, because the wrong template type in the wrong automation tool simply won’t work.
Building a Lightning Email Template: Step-by-Step
Before you can use Lightning Email Templates in Salesforce automations, you need a well-structured template to work with. Rushing this step creates problems downstream — broken merge fields, off-brand formatting, or templates that render poorly on mobile.
Here’s how to build one correctly from the start:
Step 1: Navigate to Email Templates
From the App Launcher, search for Email Templates and open the tab. You’ll see a list of existing templates organized by folder. To create a new one, click New Email Template in the top right.
Step 2: Set the Template Properties
Give your template a clear, descriptive name — something your team will recognize when selecting it inside a Flow or Email Alert. Set the folder to a shared location if multiple team members or automations will use it. A template buried in a private folder won’t be accessible to your automation tools.
- Template Name: Use a naming convention that reflects the use case (e.g., “Opportunity — Stage Advance Notification”)
- Folder: Assign to a shared folder for automation access
- Related Entity Type: Select the object the template will pull merge fields from (Contact, Lead, Opportunity, etc.)
- Description: Add context so other admins understand when and where this template is used
Step 3: Choose a Letterhead (Optional but Recommended)
If your organization has a configured letterhead, apply it here. Letterheads enforce brand consistency — logo placement, color scheme, footer — across every automated email that uses this template. Without one, your automated emails look like plain text messages, which undermines the professionalism you’re trying to project.
Step 4: Build the Email Body
Use the rich text editor to compose your message. Keep the copy focused and action-oriented. Automated emails that read like newsletters get ignored. The best-performing templates are concise, relevant, and direct.
To insert a merge field, click Insert Merge Field from the toolbar. Select your field category and the specific field you want to pull in. Common merge fields include:
- {{Contact.FirstName}} — personalizes the greeting
- {{Opportunity.Name}} — references the specific deal
- {{Account.Name}} — pulls in the company name
- {{User.FirstName}} — signs off with the rep’s name
- {{Organization.Name}} — references your company
Step 5: Preview and Save
Before saving, use the Preview option to see how the template renders with sample data. Check that merge fields resolve correctly, the layout holds on mobile, and the letterhead displays as expected. Save the template once everything looks right.
A well-built template at this stage saves significant troubleshooting time when you connect it to your automations.
How to Use Lightning Email Templates in Salesforce Flow
Salesforce workflow automation through Flow Builder is where Lightning Email Templates become genuinely powerful. Instead of relying on reps to send follow-ups manually, Flow triggers the right email at the right moment — when a record changes, a deadline approaches, or a customer hits a specific milestone.
Here’s how to wire a Lightning Email Template into a Flow:
Step 1: Open Flow Builder
Navigate to Setup → Process Automation → Flows and click New Flow. Choose your flow type based on the trigger you need:
- Record-Triggered Flow: Fires when a record is created, updated, or deleted — the most common choice for email automation
- Scheduled-Triggered Flow: Runs on a time-based schedule, useful for renewal reminders or follow-up sequences
- Platform Event-Triggered Flow: Responds to external system events through the Salesforce platform
Step 2: Configure the Trigger
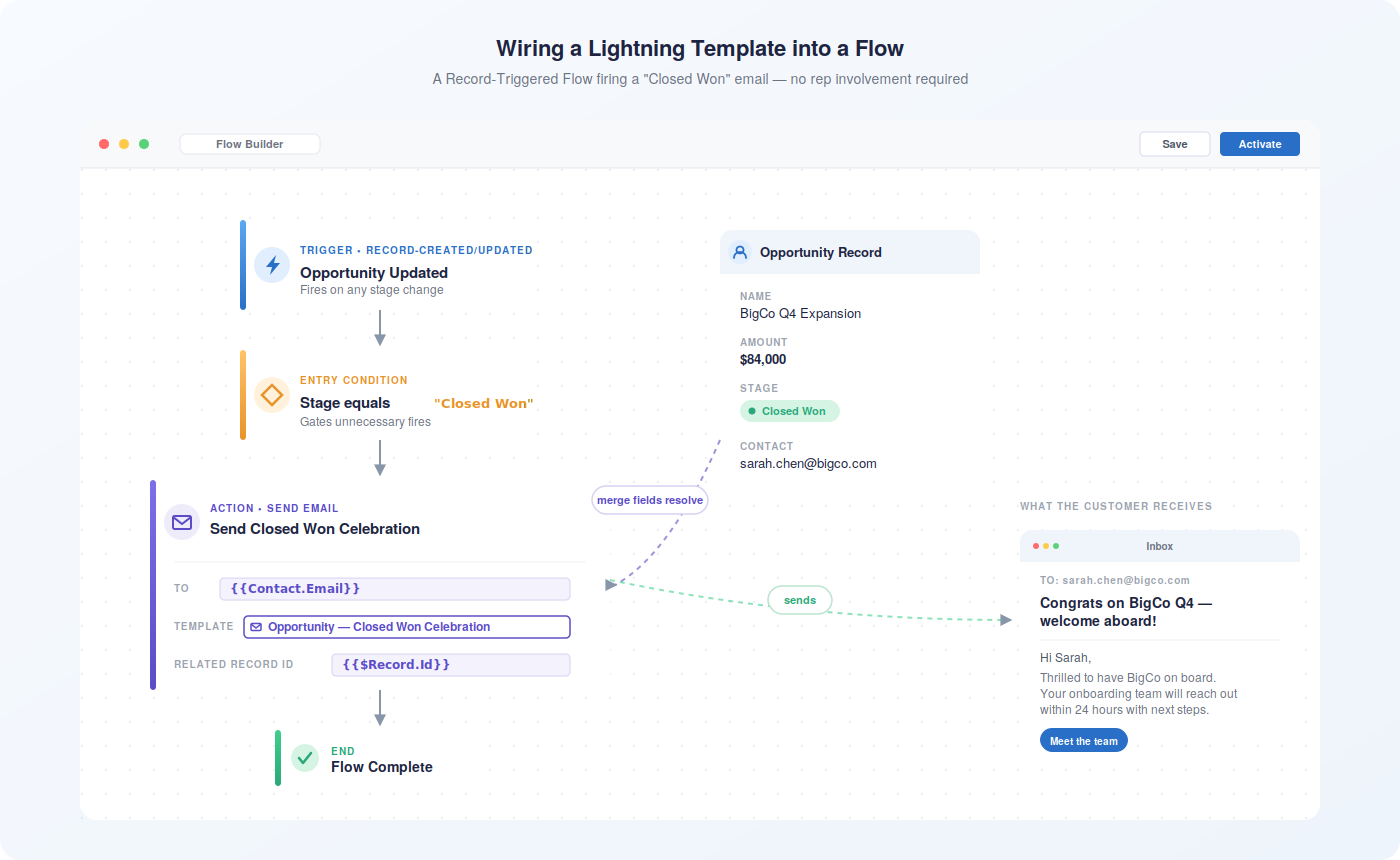
For a Record-Triggered Flow, select the object (e.g., Opportunity), define when it fires (created, updated, or both), and set your entry conditions. For example: trigger when Stage equals Closed Won. This precision prevents the flow from sending emails on every record change — only the ones that matter.
Step 3: Add a Send Email Action
Click the + icon to add a new element, then select Action. In the action search, look for Send Email. This is the native Salesforce action that connects directly to Lightning Email Templates.
In the action configuration panel:
- Set the To field using a merge field that references the contact’s email address
- Under Email Template, search for and select your Lightning Email Template by name
- Map the Related Record ID to the triggering record — this tells the template which record to pull merge field data from
Step 4: Test in Sandbox Before Activating
Always test your flow in a sandbox environment first. Run the flow manually against a test record and verify that the email sends, merge fields populate correctly, and the recipient address resolves as expected. Check the Debug log in Flow Builder if anything fails — it surfaces exactly where the issue occurred.
Step 5: Activate the Flow
Once testing confirms everything works, click Activate. The flow is now live and will trigger automatically based on your configured conditions.
Using Lightning Email Templates with Email Alerts
A single template rarely serves every scenario. A prospect in early evaluation needs different messaging than a customer approaching renewal. Building a template library — organized by journey stage and use case — is what separates a functional setup from a genuinely effective one.
Here’s a practical framework for structuring your template library:
For Lead Nurturing
- Initial inquiry acknowledgment — triggered when a Lead is created from a web form
- Content follow-up — sent 3 days after lead creation if status remains “Open”
- Meeting confirmation — triggered when a Lead status changes to “Meeting Scheduled”
For Opportunity Progression
- Stage advance notification — sent to the contact when an Opportunity moves forward
- Proposal sent confirmation — triggered when a document is sent via integrated tools
- Closed Won celebration — a personalized congratulations that reinforces the relationship
For Customer Notifications
- Onboarding welcome — triggered when a new customer account is created
- Renewal reminder — scheduled 60 and 30 days before contract end date
- Support case update — sent automatically when a Case status changes
Each template in this library should have a clearly defined trigger condition, a mapped related record for merge fields, and a designated folder. When your sales engagement workflows are built on a structured template library, scaling communication across hundreds of accounts becomes manageable rather than chaotic.
Flow Builder isn’t the only path. Email Alerts — part of Salesforce’s older but still widely used automation layer — also support Lightning Email Templates, and they’re worth understanding if your org uses Workflow Rules or Approval Processes.
To create an Email Alert that uses a Lightning Email Template:
- Go to Setup → Process Automation → Email Alerts
- Click New Email Alert
- Select the object the alert applies to
- In the Email Template field, search for your Lightning template by name
- Define the recipients — you can specify field-based recipients (e.g., the record owner’s email) or static addresses
- Save the alert, then reference it inside your Workflow Rule or Approval Process
One thing to keep in mind: Email Alerts reference templates by name, and if a template is renamed or moved to a different folder, the alert may break. Establish a naming convention early and treat template names as stable identifiers once they’re in production.
Personalizing Templates Across Different Customer Journeys
A single template rarely serves every scenario. A prospect in early evaluation needs different messaging than a customer approaching renewal. Building a template library — organized by journey stage and use case — is what separates a functional setup from a genuinely effective one.
Here’s a practical framework for structuring your template library:
For Lead Nurturing
- Initial inquiry acknowledgment — triggered when a Lead is created from a web form
- Content follow-up — sent 3 days after lead creation if status remains “Open”
- Meeting confirmation — triggered when a Lead status changes to “Meeting Scheduled”
For Opportunity Progression
- Stage advance notification — sent to the contact when an Opportunity moves forward
- Proposal sent confirmation — triggered when a document is sent via integrated tools
- Closed Won celebration — a personalized congratulations that reinforces the relationship
For Customer Notifications
- Onboarding welcome — triggered when a new customer account is created
- Renewal reminder — scheduled 60 and 30 days before contract end date
- Support case update — sent automatically when a Case status changes
Each template in this library should have a clearly defined trigger condition, a mapped related record for merge fields, and a designated folder. When your sales engagement workflows are built on a structured template library, scaling communication across hundreds of accounts becomes manageable rather than chaotic.
Cross-Object Merge Fields: The Limitation You Need to Know
Here’s where many admins hit a wall. Lightning Email Templates support merge fields from the primary object — the record that triggers the automation. But pulling in fields from related objects is more restricted than it was in Classic templates.
For example: if your template is triggered from an Opportunity, you can easily merge in Opportunity fields. But if you want to pull in the Account’s billing address or the Contact’s job title from the related Contact record, you’re working against a native limitation.
There are three practical workarounds:
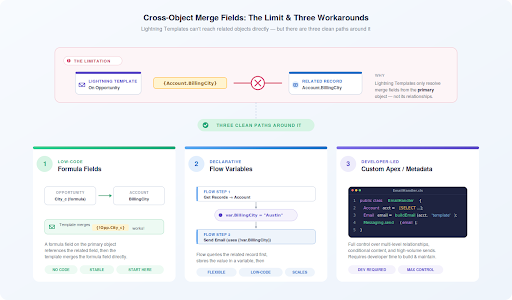
1. Formula Fields on the Primary Object
Create a formula field on the triggering object that references the related field you need. For instance, a formula field on Opportunity that pulls Account.BillingCity. Once that formula field exists on the Opportunity, you can merge it into your template like any other field. It’s an extra setup step, but it’s reliable and doesn’t require custom code.
2. Flow Variables
In Flow Builder, you can query related records before the Send Email action and store the values in flow variables. Those variables can then be passed into the email body as text. This approach requires more configuration but gives you flexibility to pull data from virtually any related object.
3. Custom Metadata or Apex
For complex scenarios — multi-level relationships, conditional content, or high-volume automations — custom Apex email handlers give you full control over what data populates the template. This is a developer-level solution, but it’s worth knowing it exists when native options fall short.
Understanding these limitations upfront prevents the frustration of building a template, wiring it into a flow, and then discovering mid-testing that the field you need simply won’t resolve. Plan your merge field strategy before you build.
Deploying Lightning Email Templates Across Environments
If your organization follows a proper development lifecycle — sandbox to UAT to production — you’ll need a reliable way to move Lightning Email Templates between environments. This is an area where Salesforce’s native tooling has some gaps worth understanding.
Lightning Email Templates are metadata components, which means they can be deployed using:
- Change Sets: Navigate to Setup → Outbound Change Sets, add the Email Template component, and deploy to the target environment. Note that letterhead assignments may not carry over cleanly and may need to be reassigned manually in the target org.
- Salesforce CLI (SFDX): Retrieve the template metadata using sf project retrieve start and deploy using sf project deploy start. This approach gives you version control and is preferred for teams using Git-based deployment pipelines.
- Managed Packages: For ISVs or teams distributing templates across multiple orgs, packaging templates as part of a managed package ensures consistent deployment with version tracking.
One consistent challenge: letterhead assignments don’t always survive the deployment process. After deploying a template to a new environment, verify the letterhead is correctly assigned by opening the template in the target org and checking the Letterhead field. Reassign manually if needed.
For teams managing Salesforce integrations across multiple environments, building a deployment checklist that includes template verification saves time and prevents silent failures in production.
What Good Email Automation Actually Looks Like in Practice
It’s one thing to configure templates and flows correctly. It’s another to build an automation layer that genuinely improves how your team communicates with customers. The difference usually comes down to a few design decisions that separate functional setups from high-performing ones.
Teams that get the most out of Lightning Email Templates tend to share a few common practices:
- They treat templates as living assets. Templates get reviewed quarterly, updated when messaging changes, and retired when they’re no longer relevant. A stale template sending outdated pricing or old product names does more damage than no automation at all.
- They build for the recipient, not the sender. The best automated emails don’t feel automated. They’re specific, timely, and written in a voice that matches the relationship — not a generic blast that could have gone to anyone.
- They track what’s working. Using Salesforce reporting tools to monitor email engagement — open rates, click-throughs, response rates — gives you the data to improve templates over time rather than guessing.
- They connect email to the broader journey. Automated emails work best when they’re part of a coordinated sequence, not isolated triggers. A Closed Won email that’s followed by an onboarding flow, a check-in at 30 days, and a renewal reminder at 11 months creates a customer experience that feels intentional.
- They keep humans in the loop where it matters. Not every communication should be automated. High-stakes moments — a deal at risk, a customer escalation, a major renewal — deserve a personal touch. Good automation handles the routine so your team has bandwidth for the moments that count.
When your email and calendar integration is aligned with your automation layer, the entire communication workflow becomes coherent. Reps see what was sent automatically, customers receive consistent messaging, and nothing falls through the cracks between systems.
Where Native Salesforce Automation Reaches Its Limits
Salesforce’s native tools take you a long way. For straightforward use cases — a welcome email when a lead is created, a notification when a deal closes — Lightning Email Templates wired into Flow Builder work well. But as your automation needs grow more complex, the gaps become harder to ignore.
Cross-object merge field limitations mean some personalization requires workarounds that add maintenance overhead. Template performance data lives outside the CRM unless you build custom reporting. And coordinating multi-step email sequences across different objects and time delays requires increasingly complex flow logic that’s difficult to maintain as your team scales.
Teams running high-volume sales engagement programs or managing sophisticated customer journeys often find that native Salesforce automation handles the mechanics but doesn’t give them the visibility or intelligence to optimize what’s actually happening. You can see that an email was sent. You can’t easily see whether it influenced the deal, when the contact engaged with it, or how it fits into the broader relationship context.
That’s the gap worth thinking about as your automation program matures — not whether the emails are going out, but whether they’re doing the work you need them to do.
The Future of Email Automation with Salesforce
Salesforce continues to invest in its automation layer, and the trajectory is clear: more intelligence, less manual configuration. Recent releases have expanded Flow’s email capabilities, improved template rendering across devices, and introduced tighter connections between automation tools and Einstein AI features.
A few developments worth watching:
- Einstein Generative AI in templates: Salesforce is building AI-assisted content generation directly into the template editor, which will allow admins to draft template copy using prompts rather than starting from scratch
- Improved cross-object merge field support: The Salesforce community has been vocal about this limitation for years, and incremental improvements are appearing in recent releases
- Unified engagement tracking: Salesforce is working toward a more connected view of email engagement data within the CRM, reducing the need for external analytics tools
- Flow enhancements: Each Salesforce release adds new Flow capabilities, including more sophisticated email scheduling, conditional branching based on engagement signals, and better error handling
For teams invested in Salesforce Marketing Cloud or planning deeper integration across their tech stack, these developments point toward a future where email automation is less about configuring triggers and more about defining outcomes and letting the platform figure out the mechanics.
The teams that will benefit most are the ones building strong foundations now — clean template libraries, well-structured flows, and clear ownership of the automation layer. When the platform evolves, they’ll be positioned to adopt new capabilities quickly rather than retrofitting a tangled legacy setup.
Conclusion: Build the Automation Layer Your Team Actually Needs
Lightning Email Templates in Salesforce automations aren’t a set-it-and-forget-it feature. They’re a foundation. When built thoughtfully — with clear naming conventions, well-structured merge fields, tested flows, and a template library organized around your customer journey — they eliminate hours of manual work and ensure every customer interaction reflects the experience you intend to deliver.
The steps are straightforward: build templates with purpose, connect them to the right automation triggers, understand the merge field limitations before they surprise you, and treat your template library as something that needs ongoing care rather than a one-time project.
Where teams often get stuck isn’t in the configuration — it’s in the gap between emails going out and knowing whether those emails are actually moving the needle. That’s where having the right tools around your Salesforce environment makes a real difference.
Revenue Grid extends what Salesforce’s native automation can do — capturing engagement signals, surfacing relationship context, and giving your team visibility into what’s happening across every customer touchpoint. If you’re building out your email automation program and want to see how that layer of intelligence fits in, book a demo and see it in action.
How can I preview a Lightning Email Template in Salesforce?
Open the template from the Email Templates tab in the App Launcher. In the template detail view, click the Preview button in the top right corner. Salesforce will render the template with sample merge field data so you can see how it will look when sent. To preview with specific record data, you can also open the template from within a record — navigate to the record, open the Send Email action, select your template, and the preview will populate with that record’s actual field values. This is the most reliable way to catch merge field issues before your template goes live in an automation.
Can Lightning Email Templates be deployed across different environments?
Yes, Lightning Email Templates are metadata components and can be moved between environments using Change Sets, Salesforce CLI (SFDX), or managed packages. The most common approach for admin-led deployments is Change Sets — navigate to Setup → Outbound Change Sets, add the Email Template component, and deploy to your target org. One important caveat: letterhead assignments frequently don’t carry over cleanly through Change Sets. After deployment, open the template in the target environment and manually verify — and reassign if needed — the letterhead under the template’s properties. Teams using SFDX with Git-based pipelines have more control over this process and can script post-deployment steps to handle letterhead reassignment automatically.
What are the steps to add and auto-fill email templates in Salesforce?
To add a Lightning Email Template to an automation and have it auto-fill with record data, follow these steps:
- Build your template in the Email Templates tab with the appropriate merge fields for your target object
- In Flow Builder, create or open a Record-Triggered Flow on the relevant object
- Add a Send Email action element to the flow canvas
- In the action configuration, set the To field using a merge field that references the recipient’s email address (e.g., the contact’s email from the triggering record)
- In the Email Template field, search for and select your Lightning template by name
- Map the Related Record ID to the triggering record’s ID — this is what tells the template which record to pull merge field values from
- Save and test in a sandbox before activating
When the flow fires, Salesforce automatically resolves all merge fields in the template using the data from the mapped record. No manual input required.
What are common challenges faced when using Lightning Email Templates and how can they be overcome?
A few challenges come up consistently:
- Cross-object merge fields not resolving: Lightning Templates have limited support for pulling fields from related objects. The most practical fix is creating formula fields on the primary object that reference the related field values, then merging those formula fields into your template.
- Templates not appearing in Flow Builder: This usually means the template is stored in a private folder. Move it to a shared folder that your automation user has access to.
- Letterhead not displaying correctly after deployment: Letterhead assignments don’t always survive Change Set deployments. Manually reassign the letterhead in the target environment after deploying.
- Merge fields rendering as blank: This typically happens when the Related Record ID isn’t correctly mapped in the Send Email action, or when the field referenced in the merge tag doesn’t have a value on the triggering record. Check both the flow configuration and the record data.
- Mobile rendering issues: Use the Preview function and test on multiple devices before activating. Keep template layouts simple — single-column designs render most reliably across email clients and screen sizes.
How do Lightning Email Templates integrate with Salesforce Automation tools?
Lightning Email Templates connect to Salesforce’s automation layer in two primary ways. First, through Flow Builder — you add a Send Email action to any flow type (Record-Triggered, Scheduled, or Platform Event-Triggered) and reference the template by name. The flow passes the triggering record’s ID to the template, which uses it to resolve all merge fields automatically. Second, through Email Alerts — you create an Email Alert that references the Lightning template and define the recipients, then attach that alert to a Workflow Rule or Approval Process step. Both approaches support the same Lightning templates, so a single well-built template can be reused across multiple automation tools without duplication. For teams using Salesforce Outlook integration or Gmail integration, Lightning templates are also accessible directly from the email compose window, giving reps a consistent set of approved templates whether they’re sending manually or through automation.