How to Configure Salesforce Lightning Scheduler Adapter Version 2
[LSA version 2]
For users on:


Important
So far, this feature is implemented only for EWS users and is not available for MS Graph users
This article provides the steps on how to configure Salesforce Lightning Scheduler Adapter version 2 (further referred to as “LSA”) with RG Email Sidebar.
For instructions on configuring LSA version 1 (without Salesforce widgets), refer to this article.
The setup process consists of the following steps:
- Install Revenue Grid managed package
- Install a dedicated Salesforce managed package
- Configure the LSA managed package
- Connect Lightning Scheduler Adapter
- Configure instant creation of calendar items in email server calendar
- Configure the necessary Salesforce flows (auxiliary)
Tip
See this article for more information on using Salesforce Scheduler and this article for tips on using Revenue Grid’s Lightning Scheduler Adapter.
Refer to this article to learn how the underlying API endpoints work.
Prerequisites for managed packages installation
Using Lightning Scheduler Adapter (LSA) requires:
-
Setting up Salesforce Lightning Scheduler, as described in this Salesforce article
-
Setting up My Domain name for your Salesforce Org and deploying it for the users. Follow the instructions in this Revenue Grid article to learn how to do that
-
Enabling the setting Publish Appointments as Platform Events in Salesforce Scheduler Settings:
- Switch to Lightning Experience
- Open Salesforce Setup menu
- In the Quick Search field, enter "Scheduler Settings"
- Click on Salesforce Scheduler Settings
- Enable the setting Publish Appointments as Platform Events

Step 1: Install Revenue Grid managed package
This prerequisite is required for further configuring LSA with Salesforce widgets.
1. Open package installation link:
Package for regular use both in Salesforce Production and Sandbox
Learn more about the specifics of installing packages in a Sandbox in this Salesforce help article
2. Log in to your Salesforce account (it must have Admin permissions in your Org)
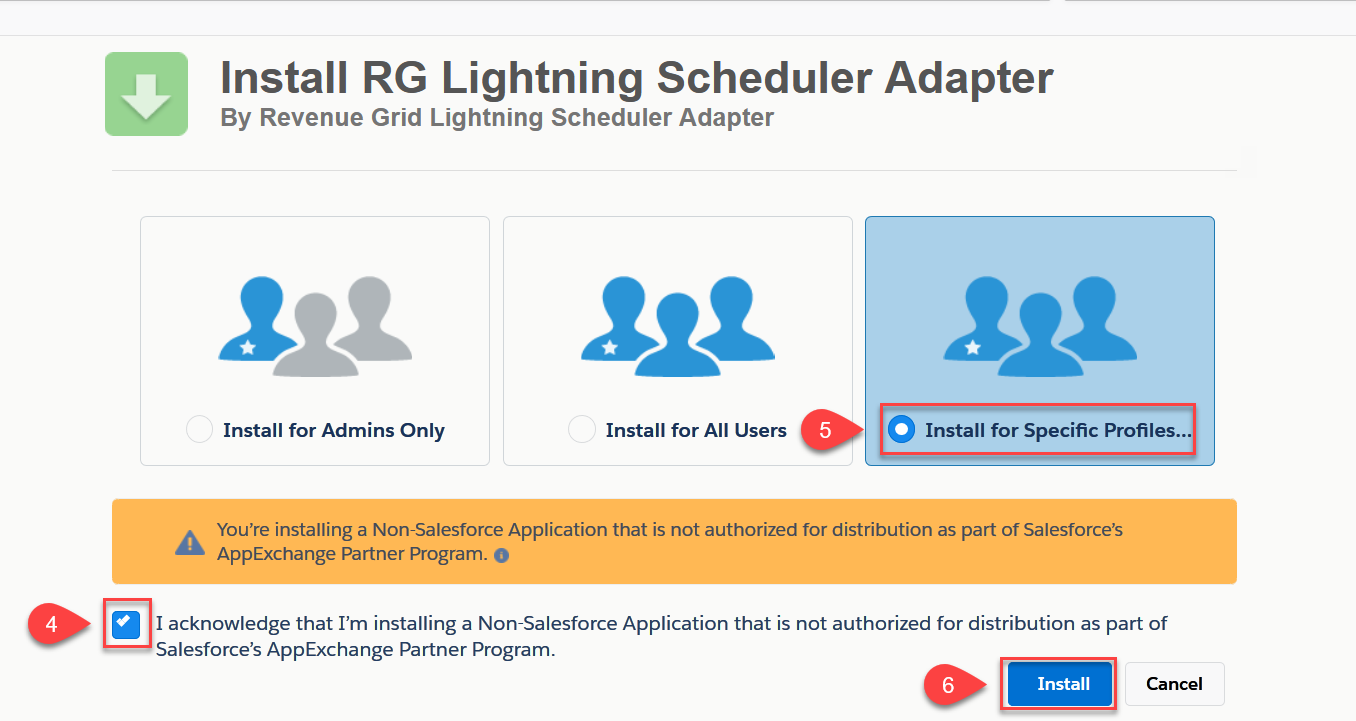
3. Indicate if you want to install the package for:
- All users in your Org
- (recommended) Only for specific users who will be using Lightning Scheduler integration
- Only for the Admins
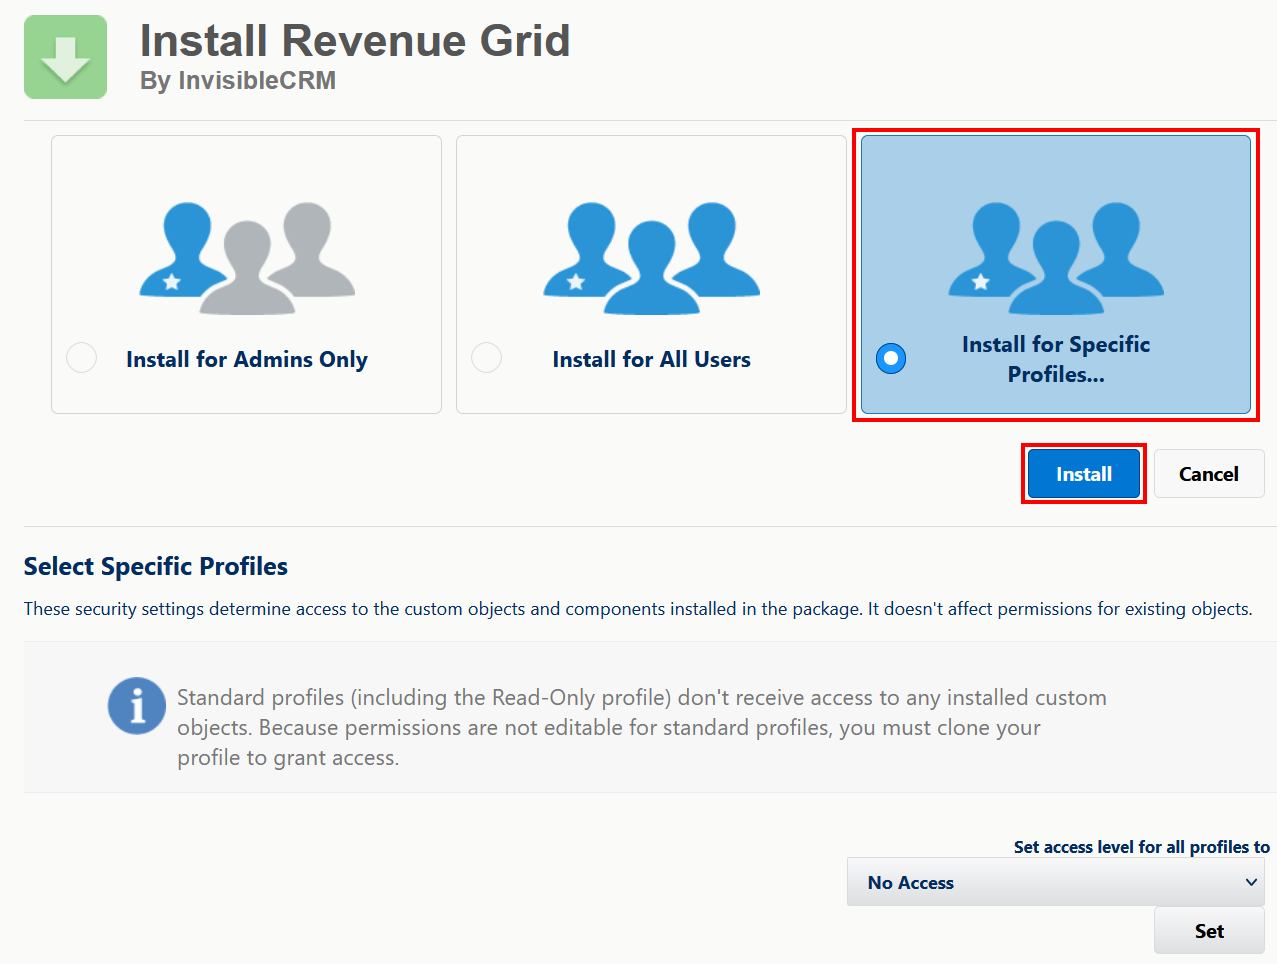
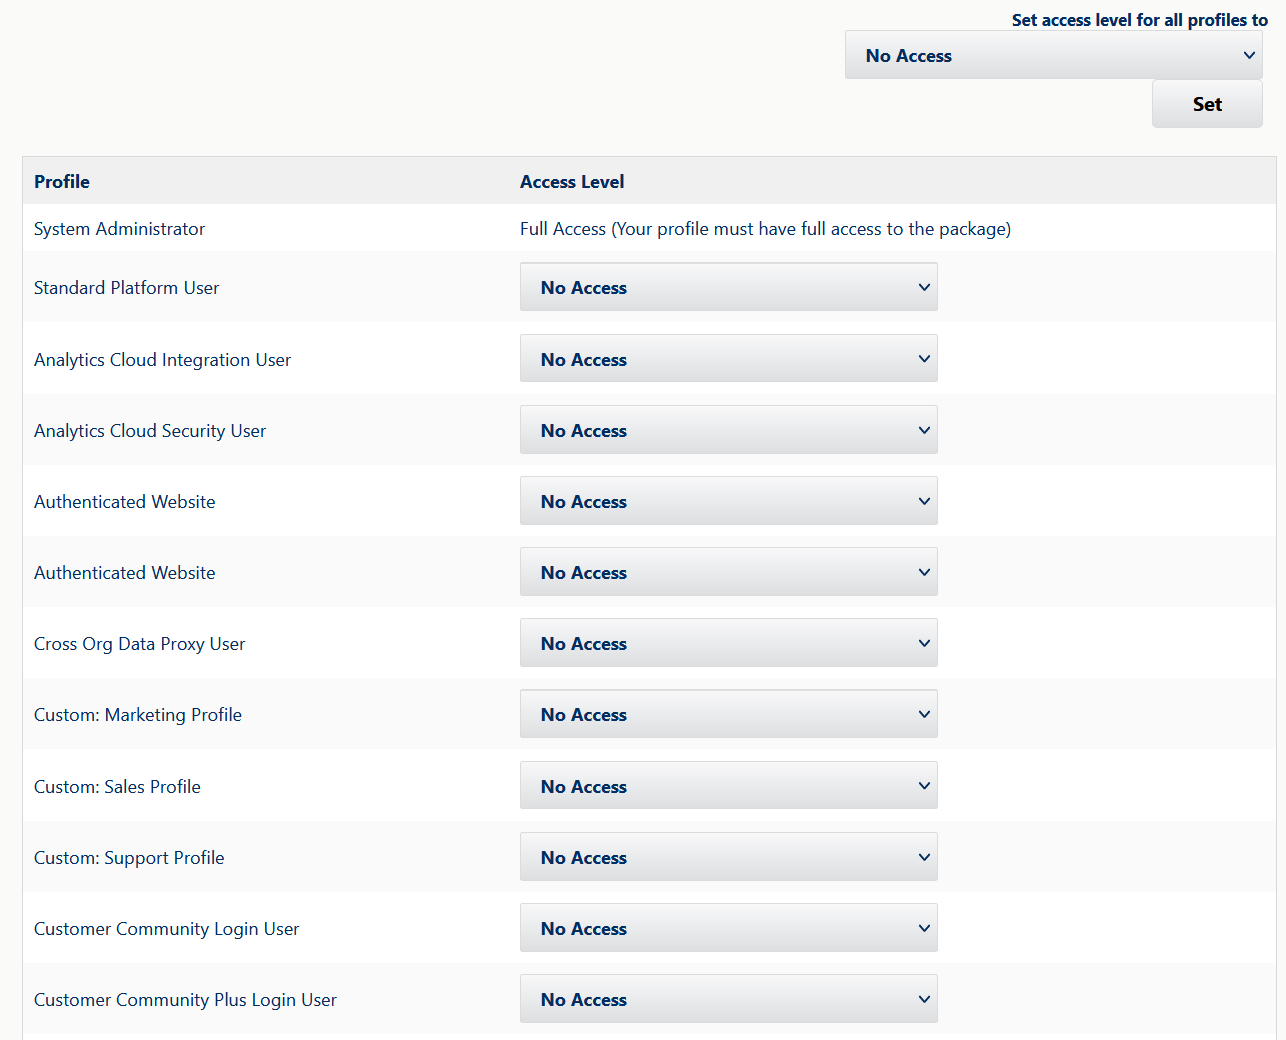
4. If you chose Install for specific Profiles, set the needed profiles scope using the controls underneath. Also see the relevant Salesforce guide for details
>>> Click to see the controls' screenshots <<<
5. Click Install underneath
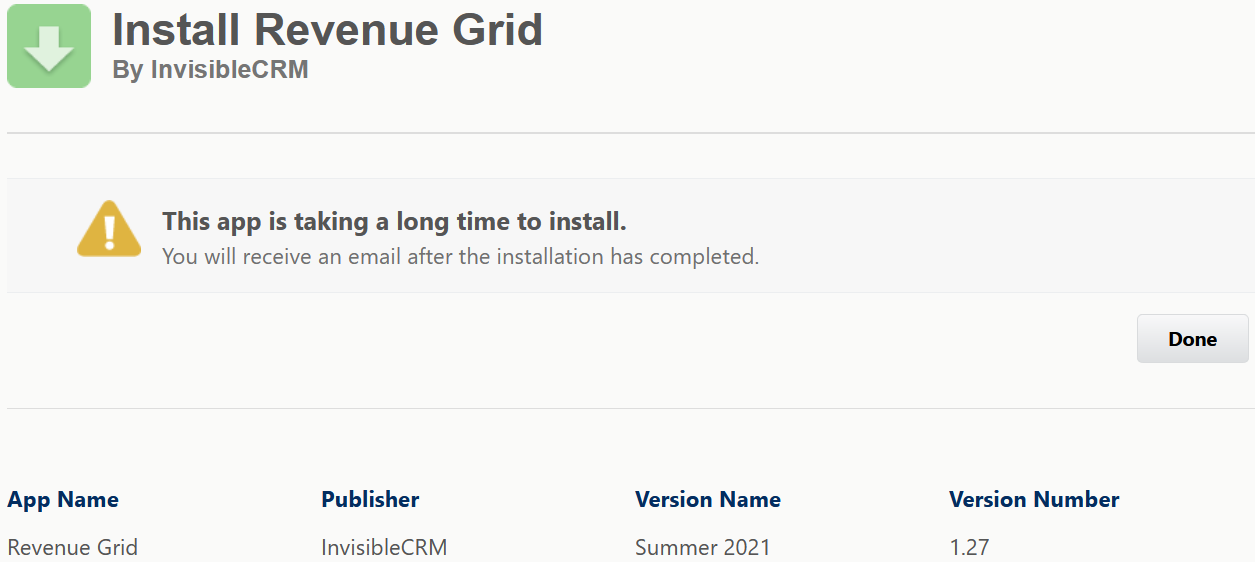
6. Next, you will see the following notification, click the Done button, and soon you will receive an email message from Salesforce confirming that the package was installed
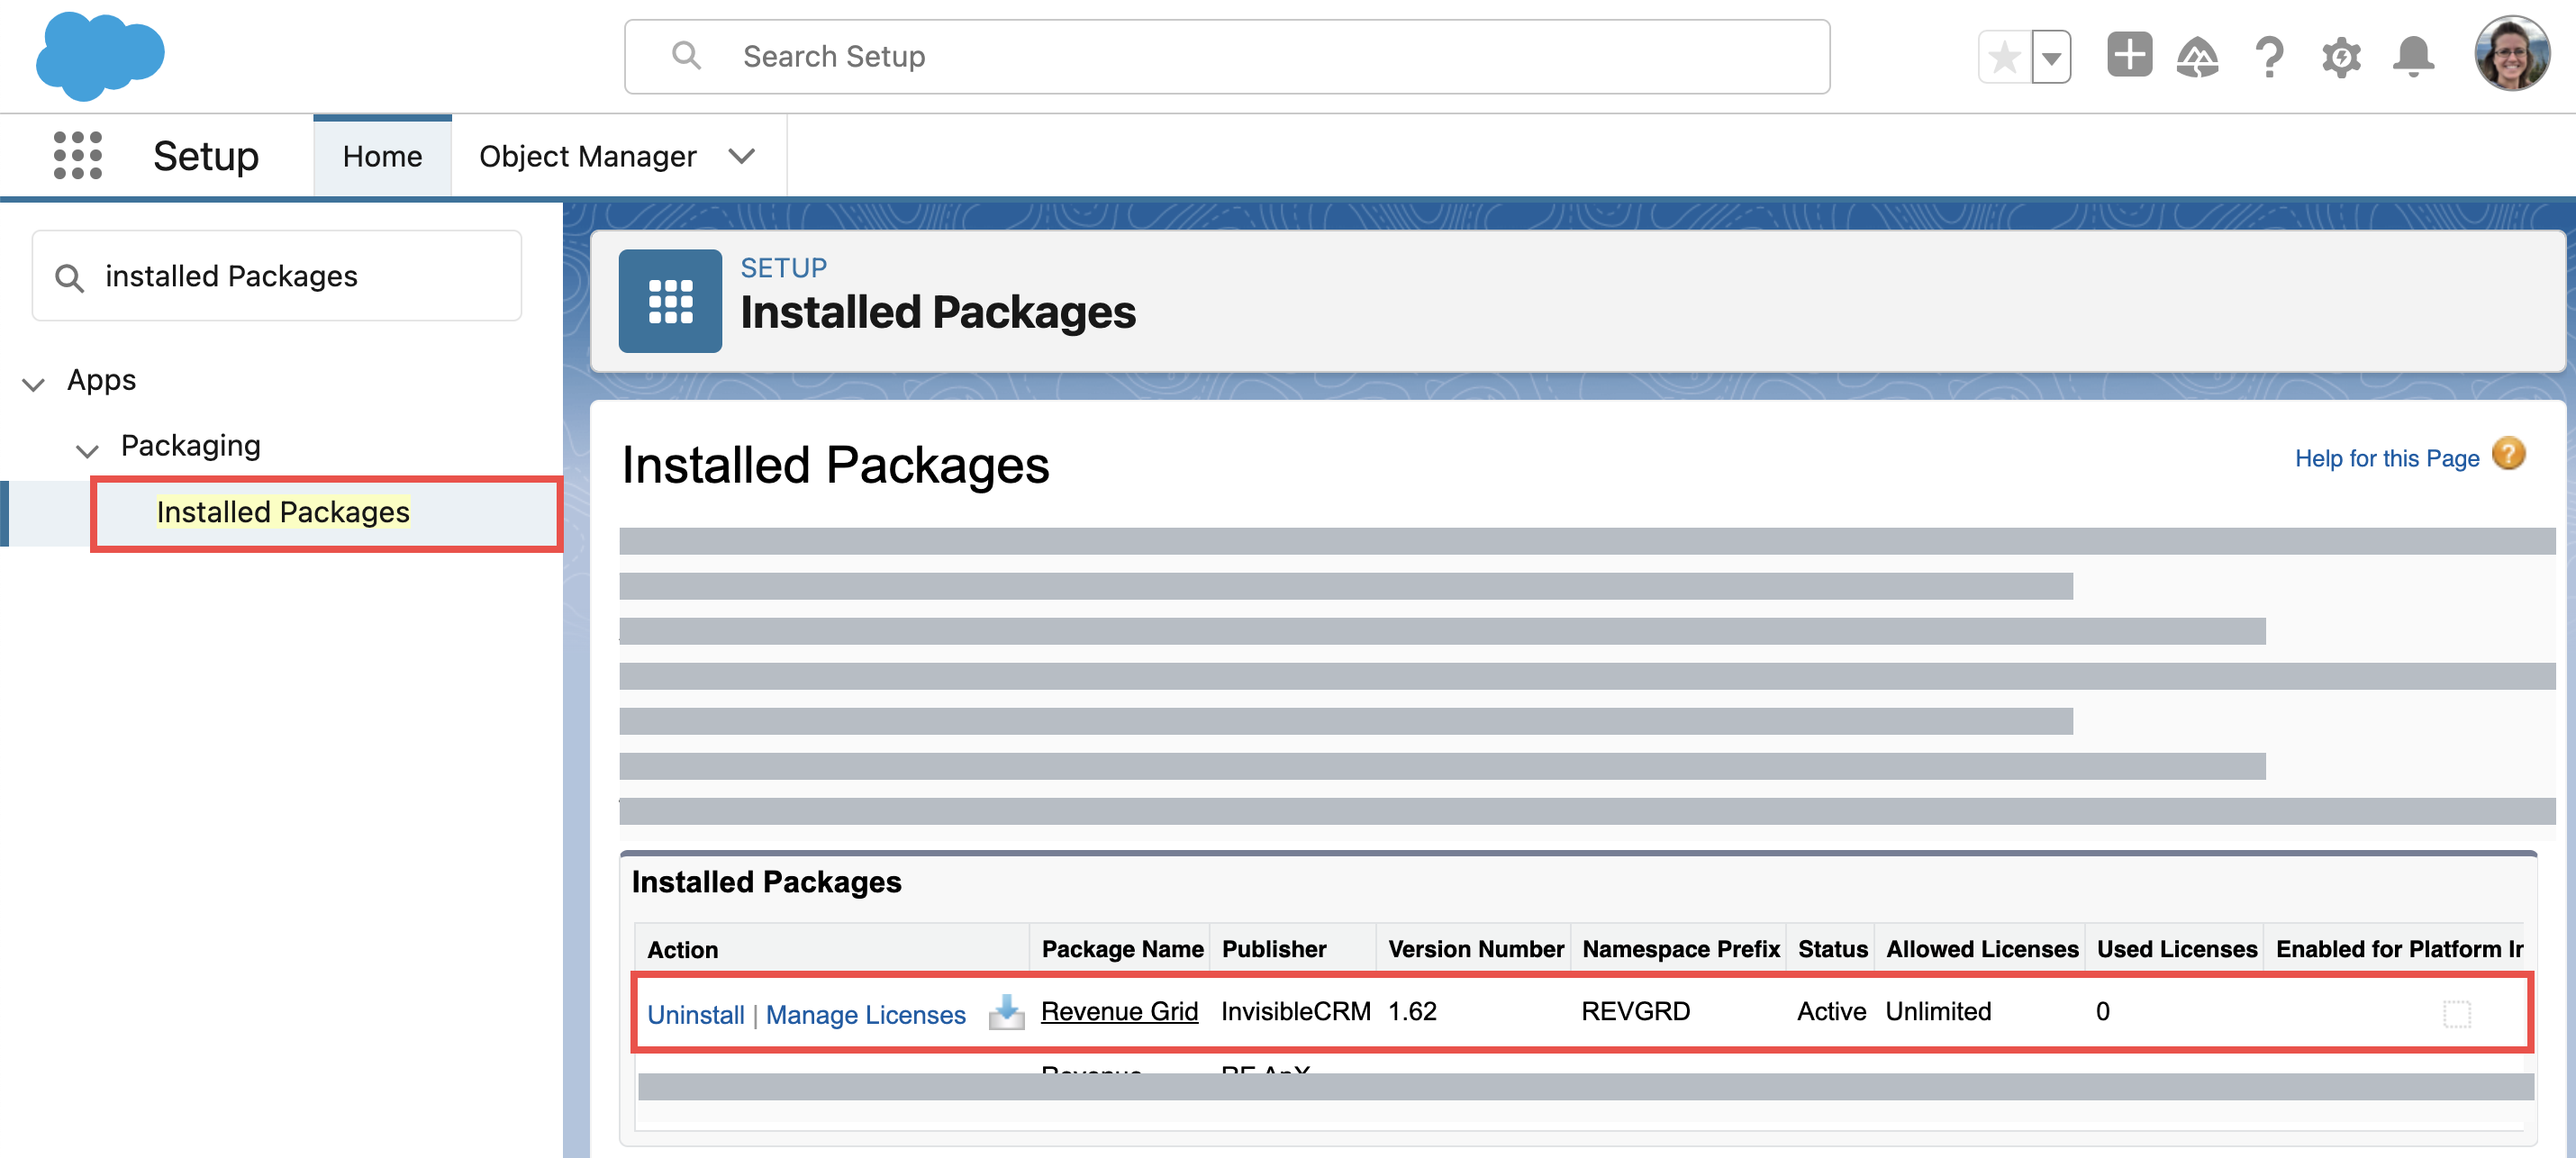
7. After Revenue Grid Salesforce managed package is successfully installed, you can access it in the Salesforce Navigation panel: Platform tools > Apps > Packaging > Installed Packages
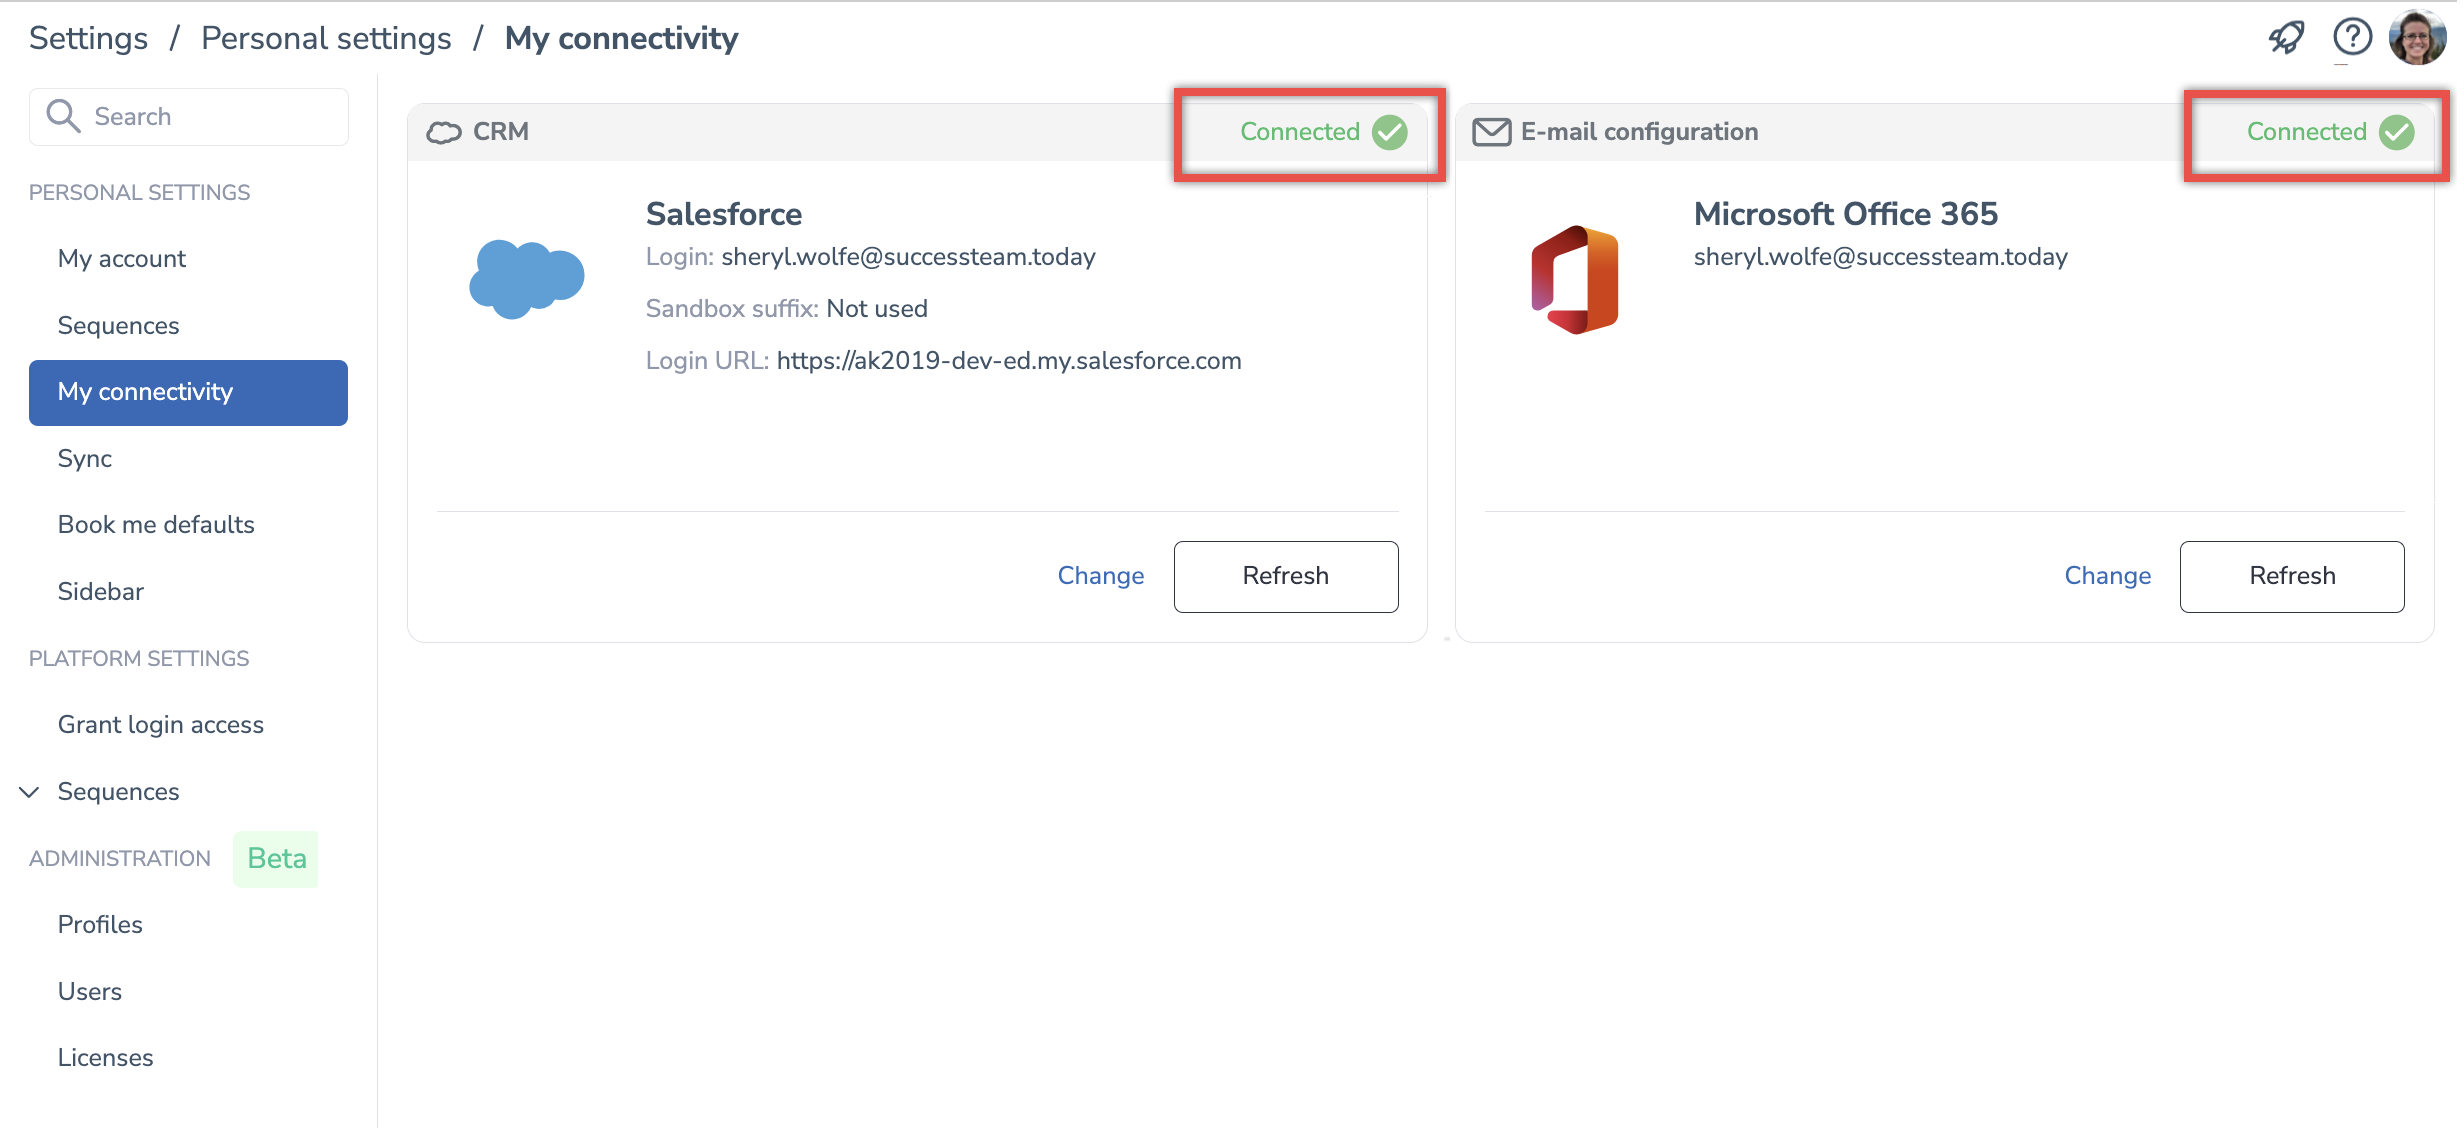
Configure the app in Salesforce
Important
For completing Revenue Grid app configuration, you will need to generate tenant URLs. Learn how to generate RevenueGridTenantUrl and ServerSyncTenantUrl in this Revenue Grid article or contact our Support team
After the managed package has been installed, you can proceed to configuring the Revenue Grid app in Salesforce.
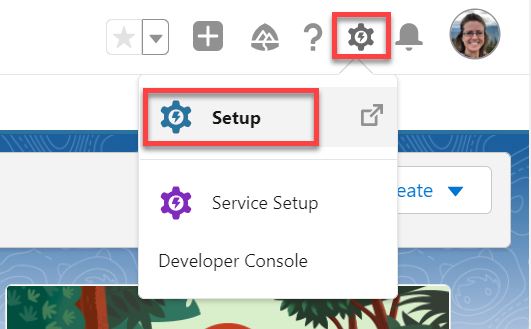
1. Click on the Gear ⚙ icon and select Setup
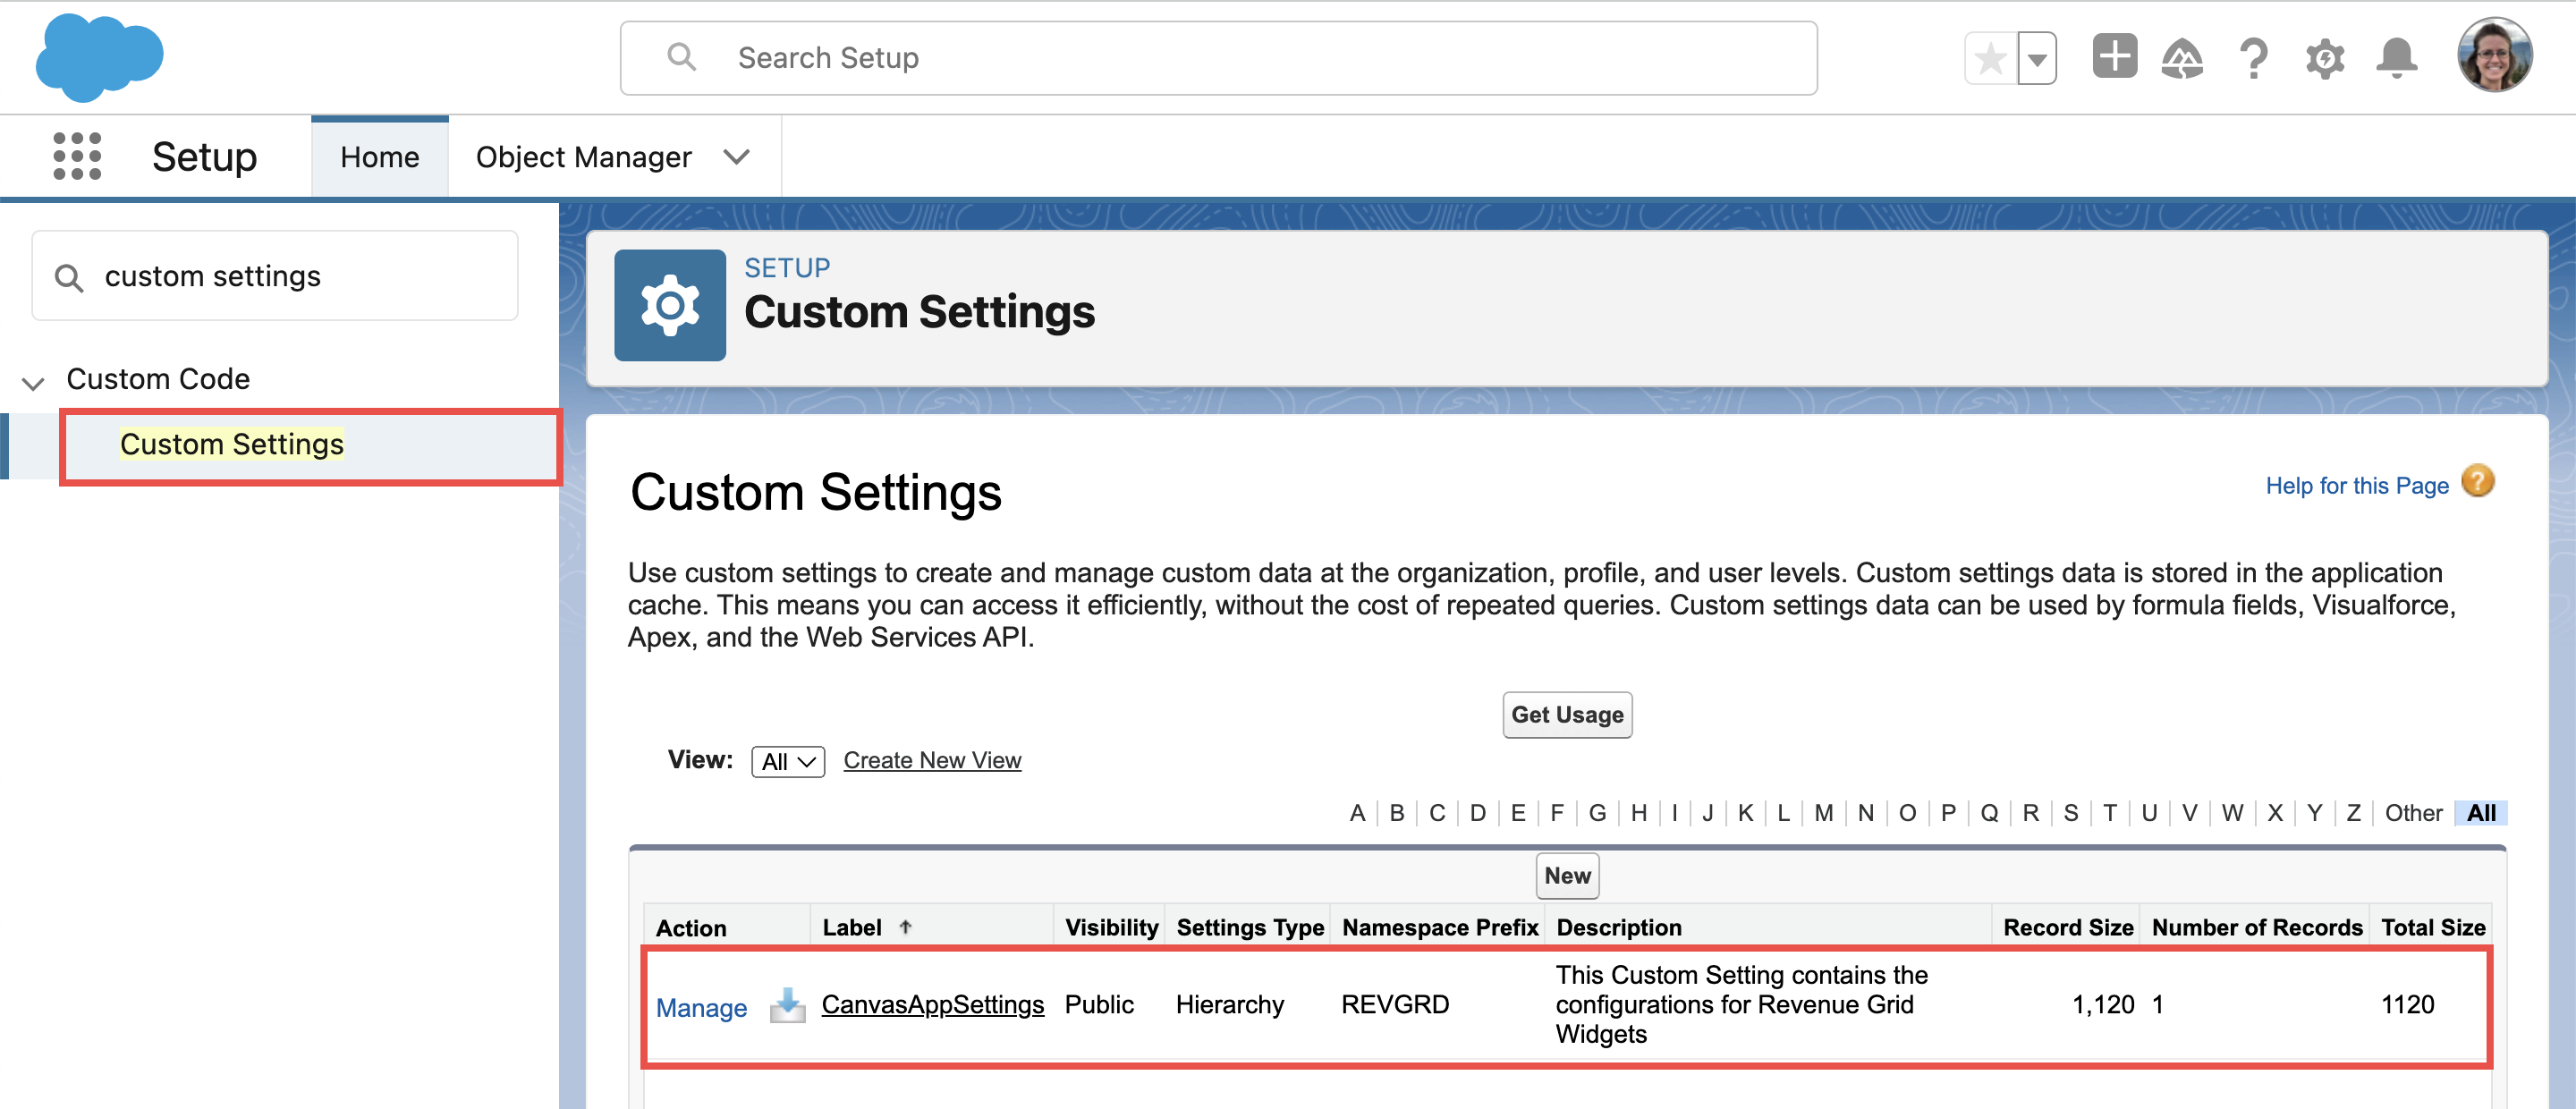
2. In the Quick Search field, enter “Custom Settings” to quickly find and open the necessary setting
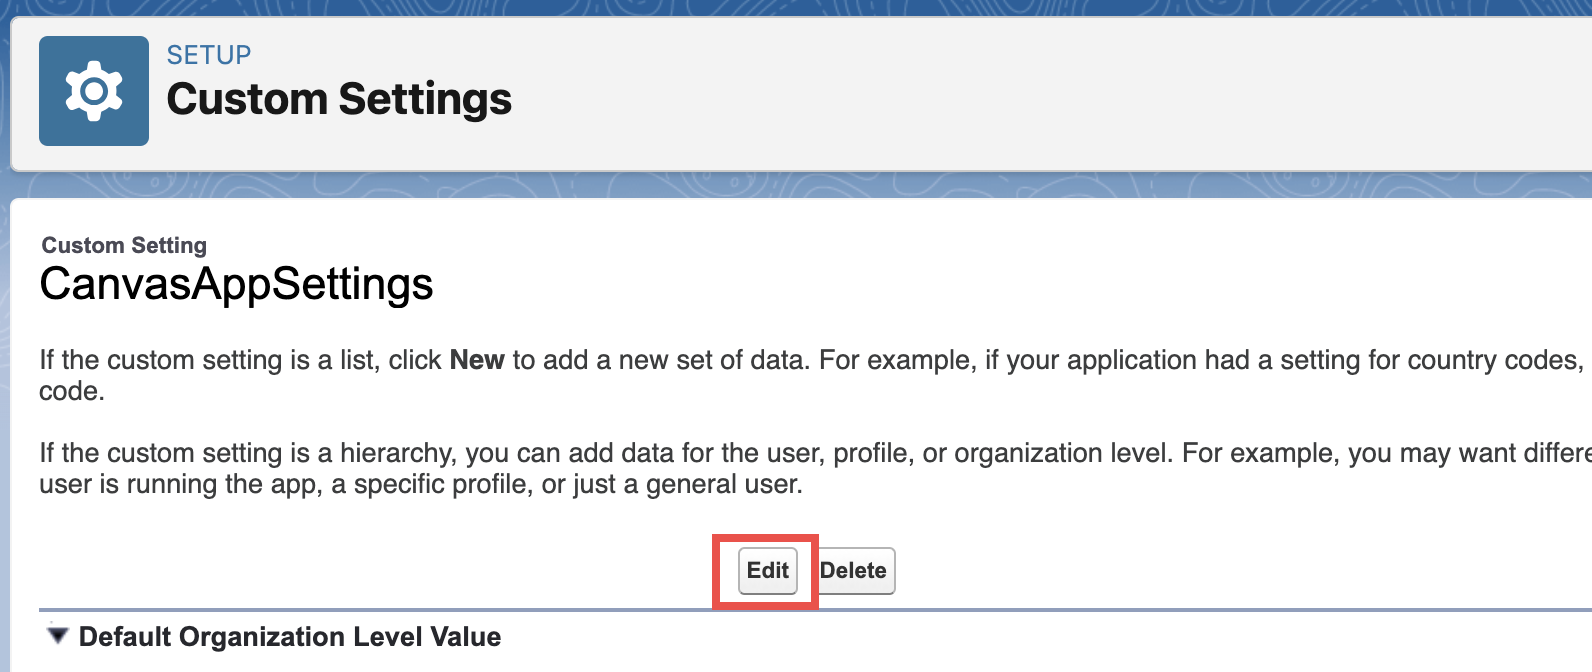
3. Click on Manage next to the CanvasAppSettings label with the Namespace Prefix REVGRD
4. Click Edit
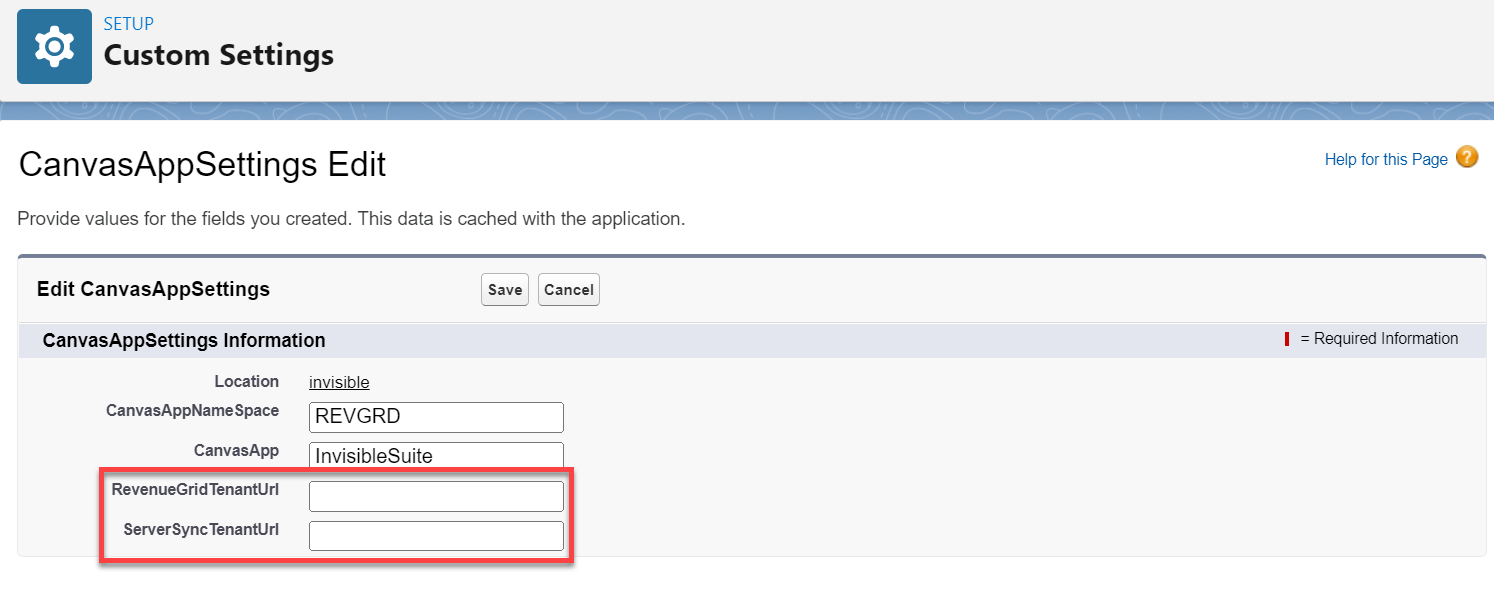
5. On the newly opened CanvasAppSettings Edit page, enter the tenant URLs RevenueGridTenantUrl and ServerSyncTenantUrl value fields. Make sure the URLs start with https. After entering the URLs into the relevant fields, click Save
>>> Click to see an animation <<<
6. Next, to set up user authorization policies, go to Platform Tools > Apps > App Manager (1).
7. Click on the down arrow on Revenue Inbox for Salesforce (2) app and select Manage (3)
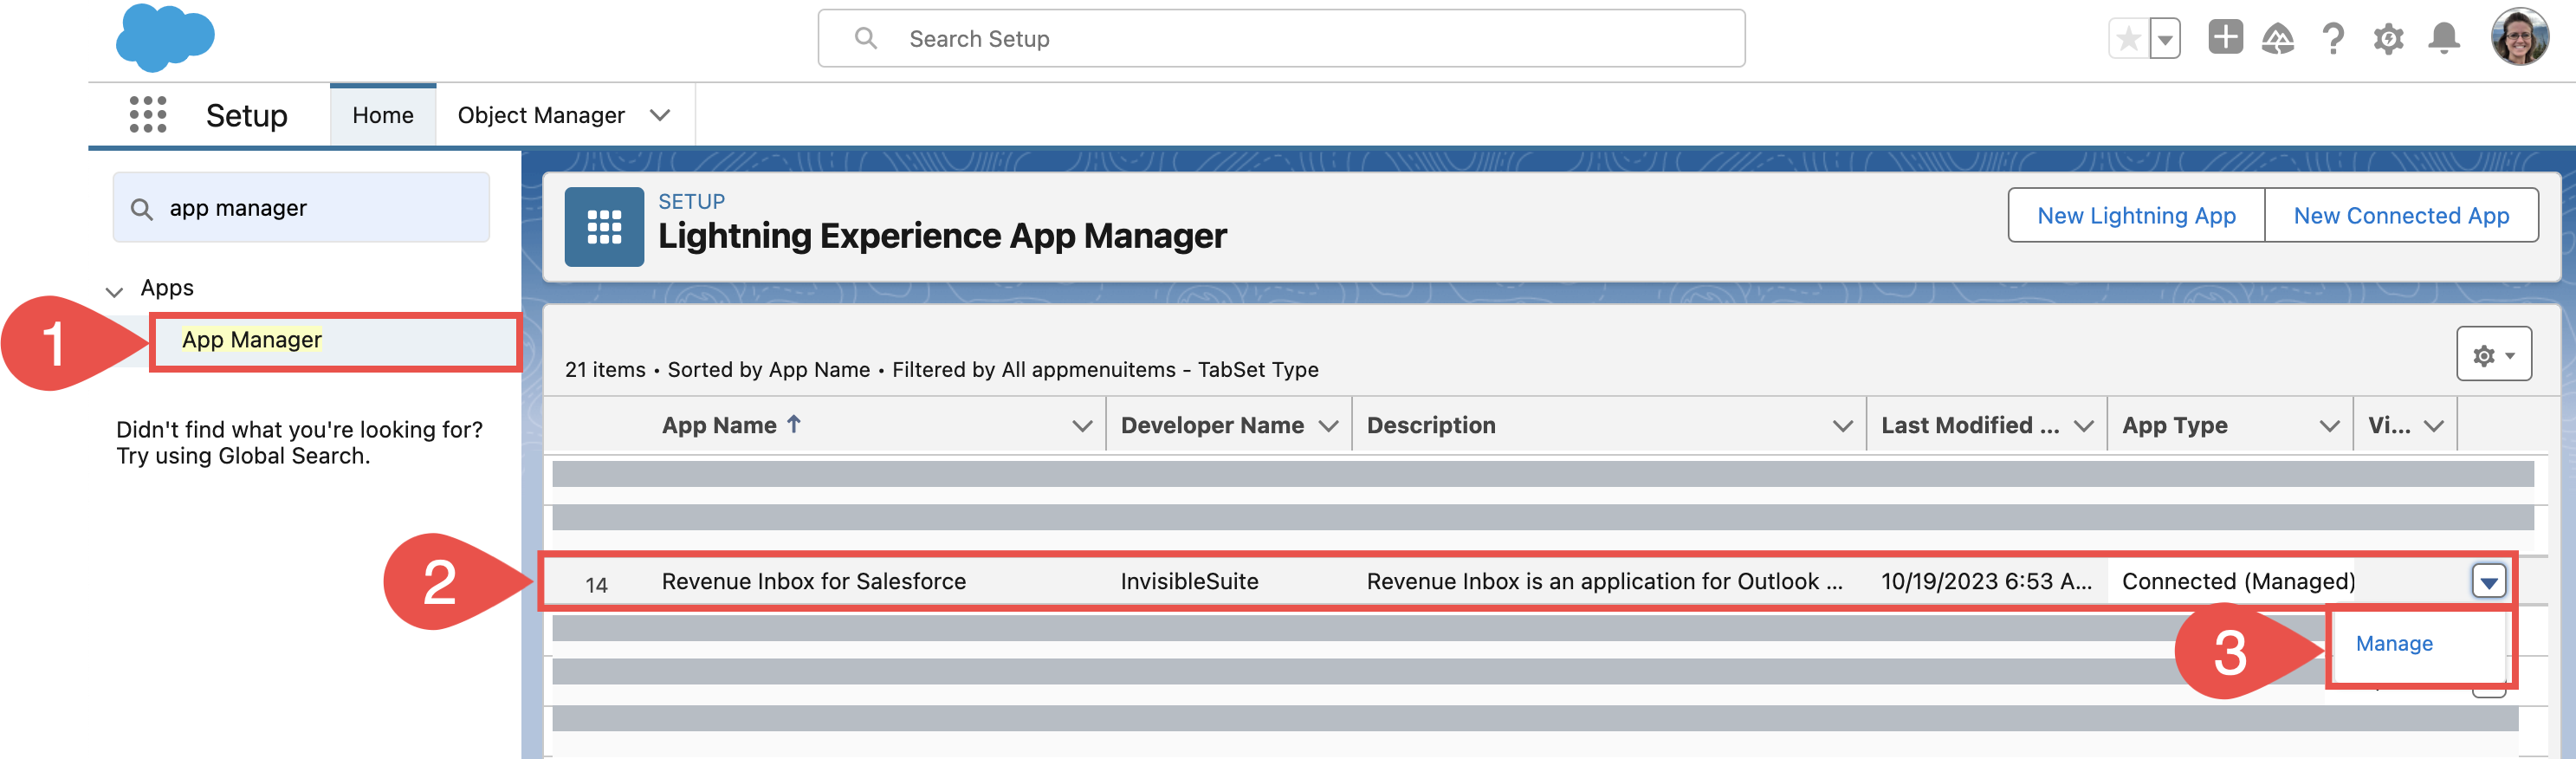
8. On the newly opened page, click the Edit Policies button
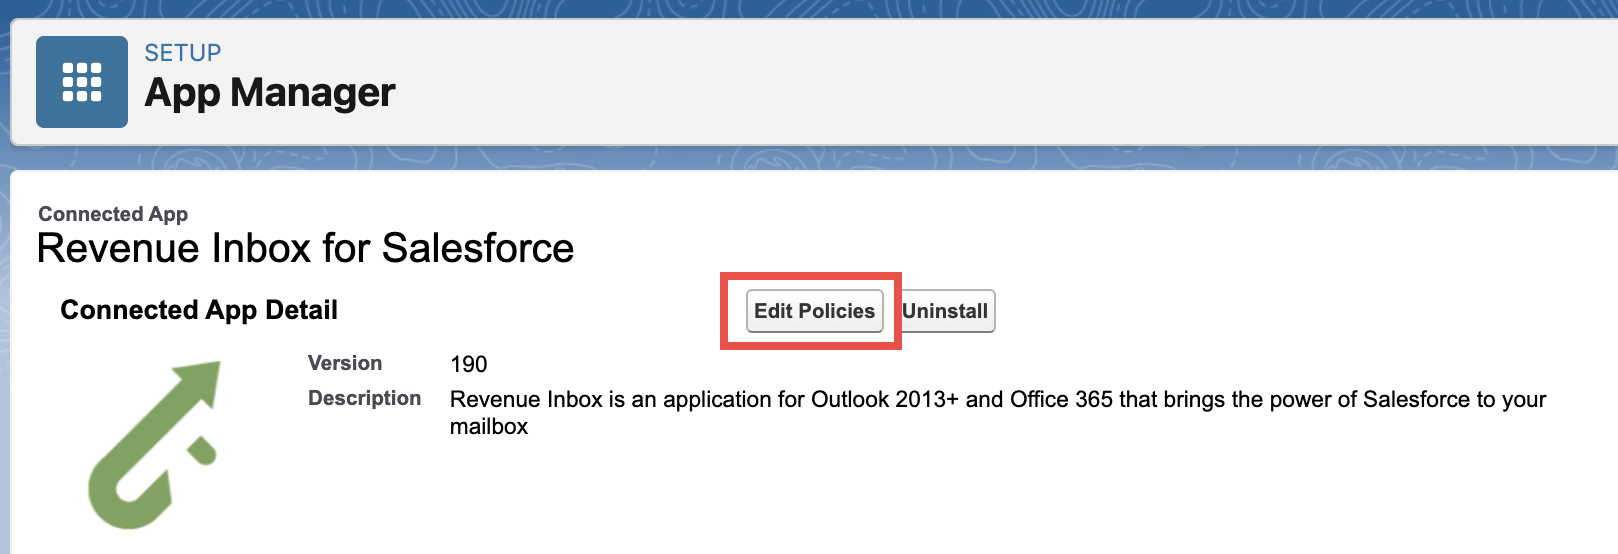
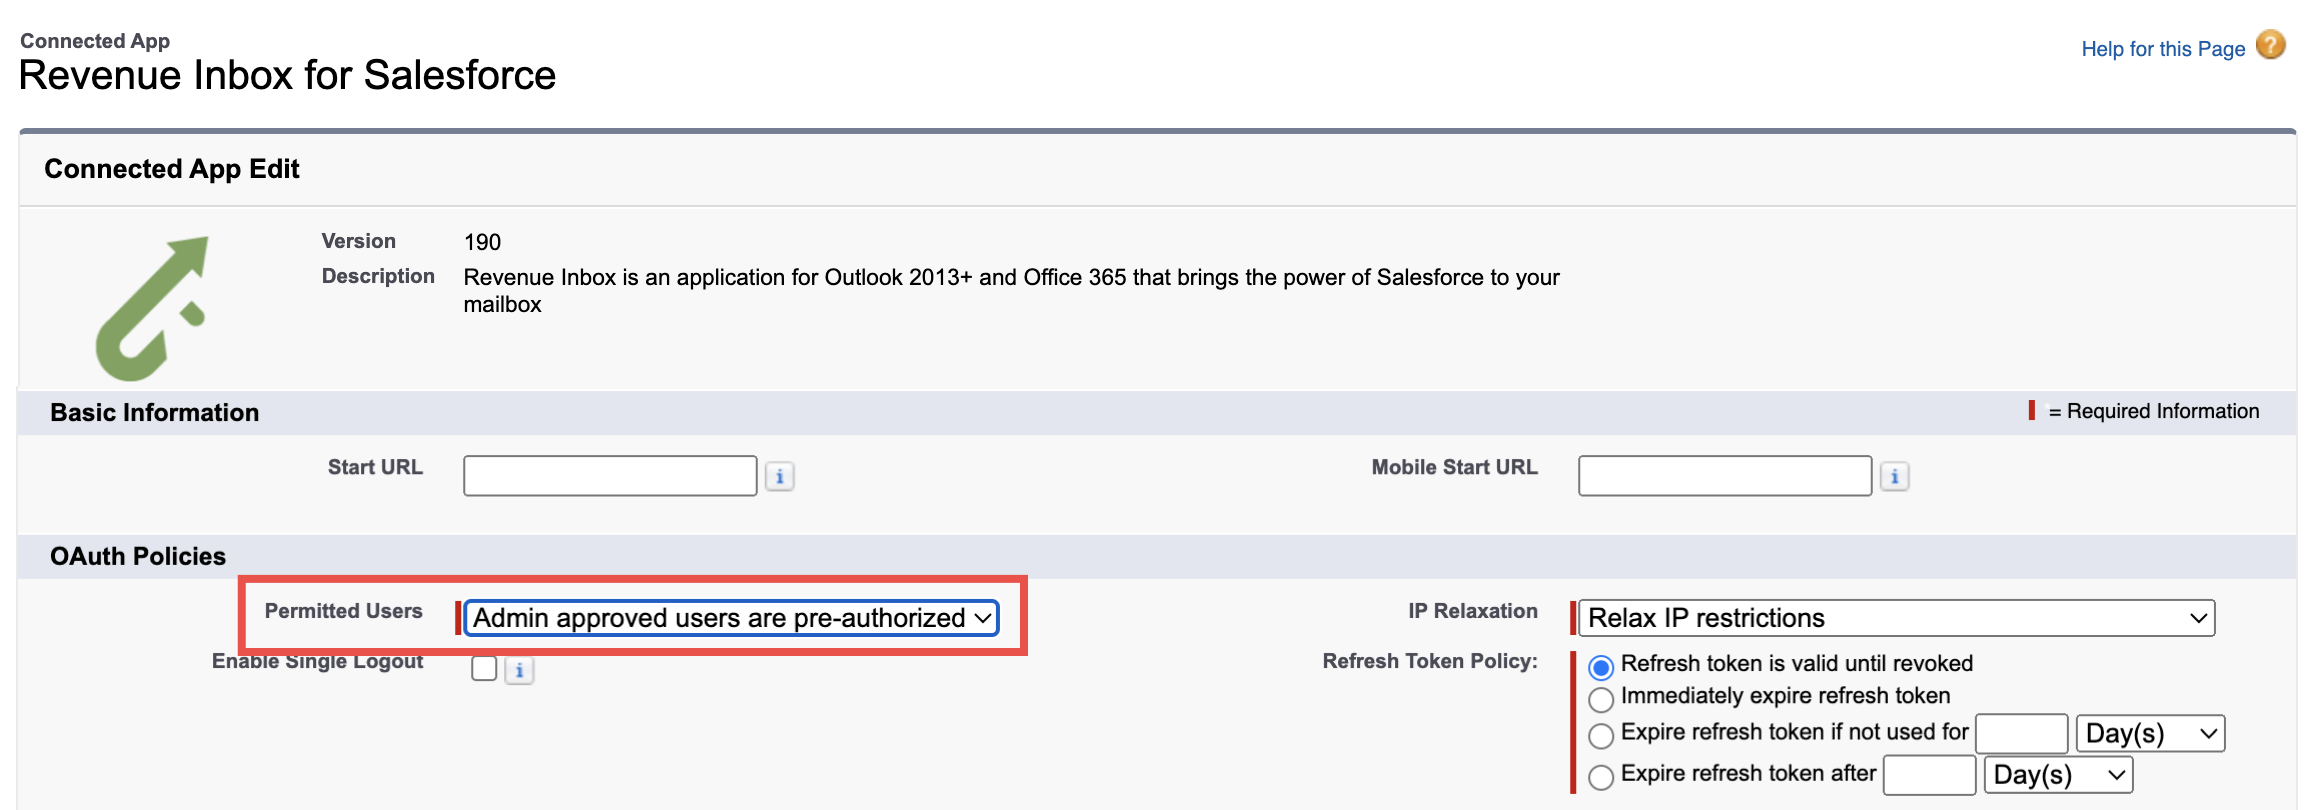
9. In Permitted Users field choose Admin approved users are pre-authorized and confirm it in the pop-up window. Click Save button to apply the changes
After you click the Save button, you will automatically return to the Connected App page.
10. On the Connected App page, click Manage Profiles
11. Choose User Profiles for which the application will be installed. Normally, standard users would be the targeted profiles among other profiles. It’s recommended to choose system administrators as well.
12. Save changes after selecting relevant User Profiles
>>> Click to see an animation <<<

Step 2: Dedicated LSA managed package installation
Running Salesforce Lightning Scheduler integration requires a set of special Salesforce objects and classes. Revenue Grid created a special Salesforce managed package that includes all required assets to facilitate the integration setup process. The managed package is guaranteed to be secure, confidential, and free of any malicious content, under Revenue Grid Privacy & Security policies
Install the integration package RG Lightning Scheduler Adapter as described in this Salesforce article or as described below:
2.1. Install the managed package
2.1.1. Open package installation link:
https://login.salesforce.com/packaging/installPackage.apexp?p0=04t09000000zXFW
2.1.2. Log in to your Salesforce account (it must have Admin permissions in your Org)
2.1.3. Select the checkbox I acknowledge that I’m installing a Non-Salesforce Application that is not authorized for distribution as part of Salesforce’s AppExchange Partner Program to permit installation
2.1.4. Indicate if you want to install the package for:
- All users in your Org
- (recommended) Only for specific users who will be using Lightning Scheduler integration
- Only for the Admins
2.1.5. Click the Install button in the lower right corner of the page
You’ll see a notification “Installing and Granting Access to Specific Users…”, then receive an email message that the package has been installed successfully.
Step 3: Configure the LSA managed package
3.1. Set the custom Apex class
In order to accurately retrieve occupied Lightning Scheduler hours spans from Salesforce, a custom Apex Class included in the managed package must be set in Salesforce Scheduling policy settings. Follow the steps below to do that:
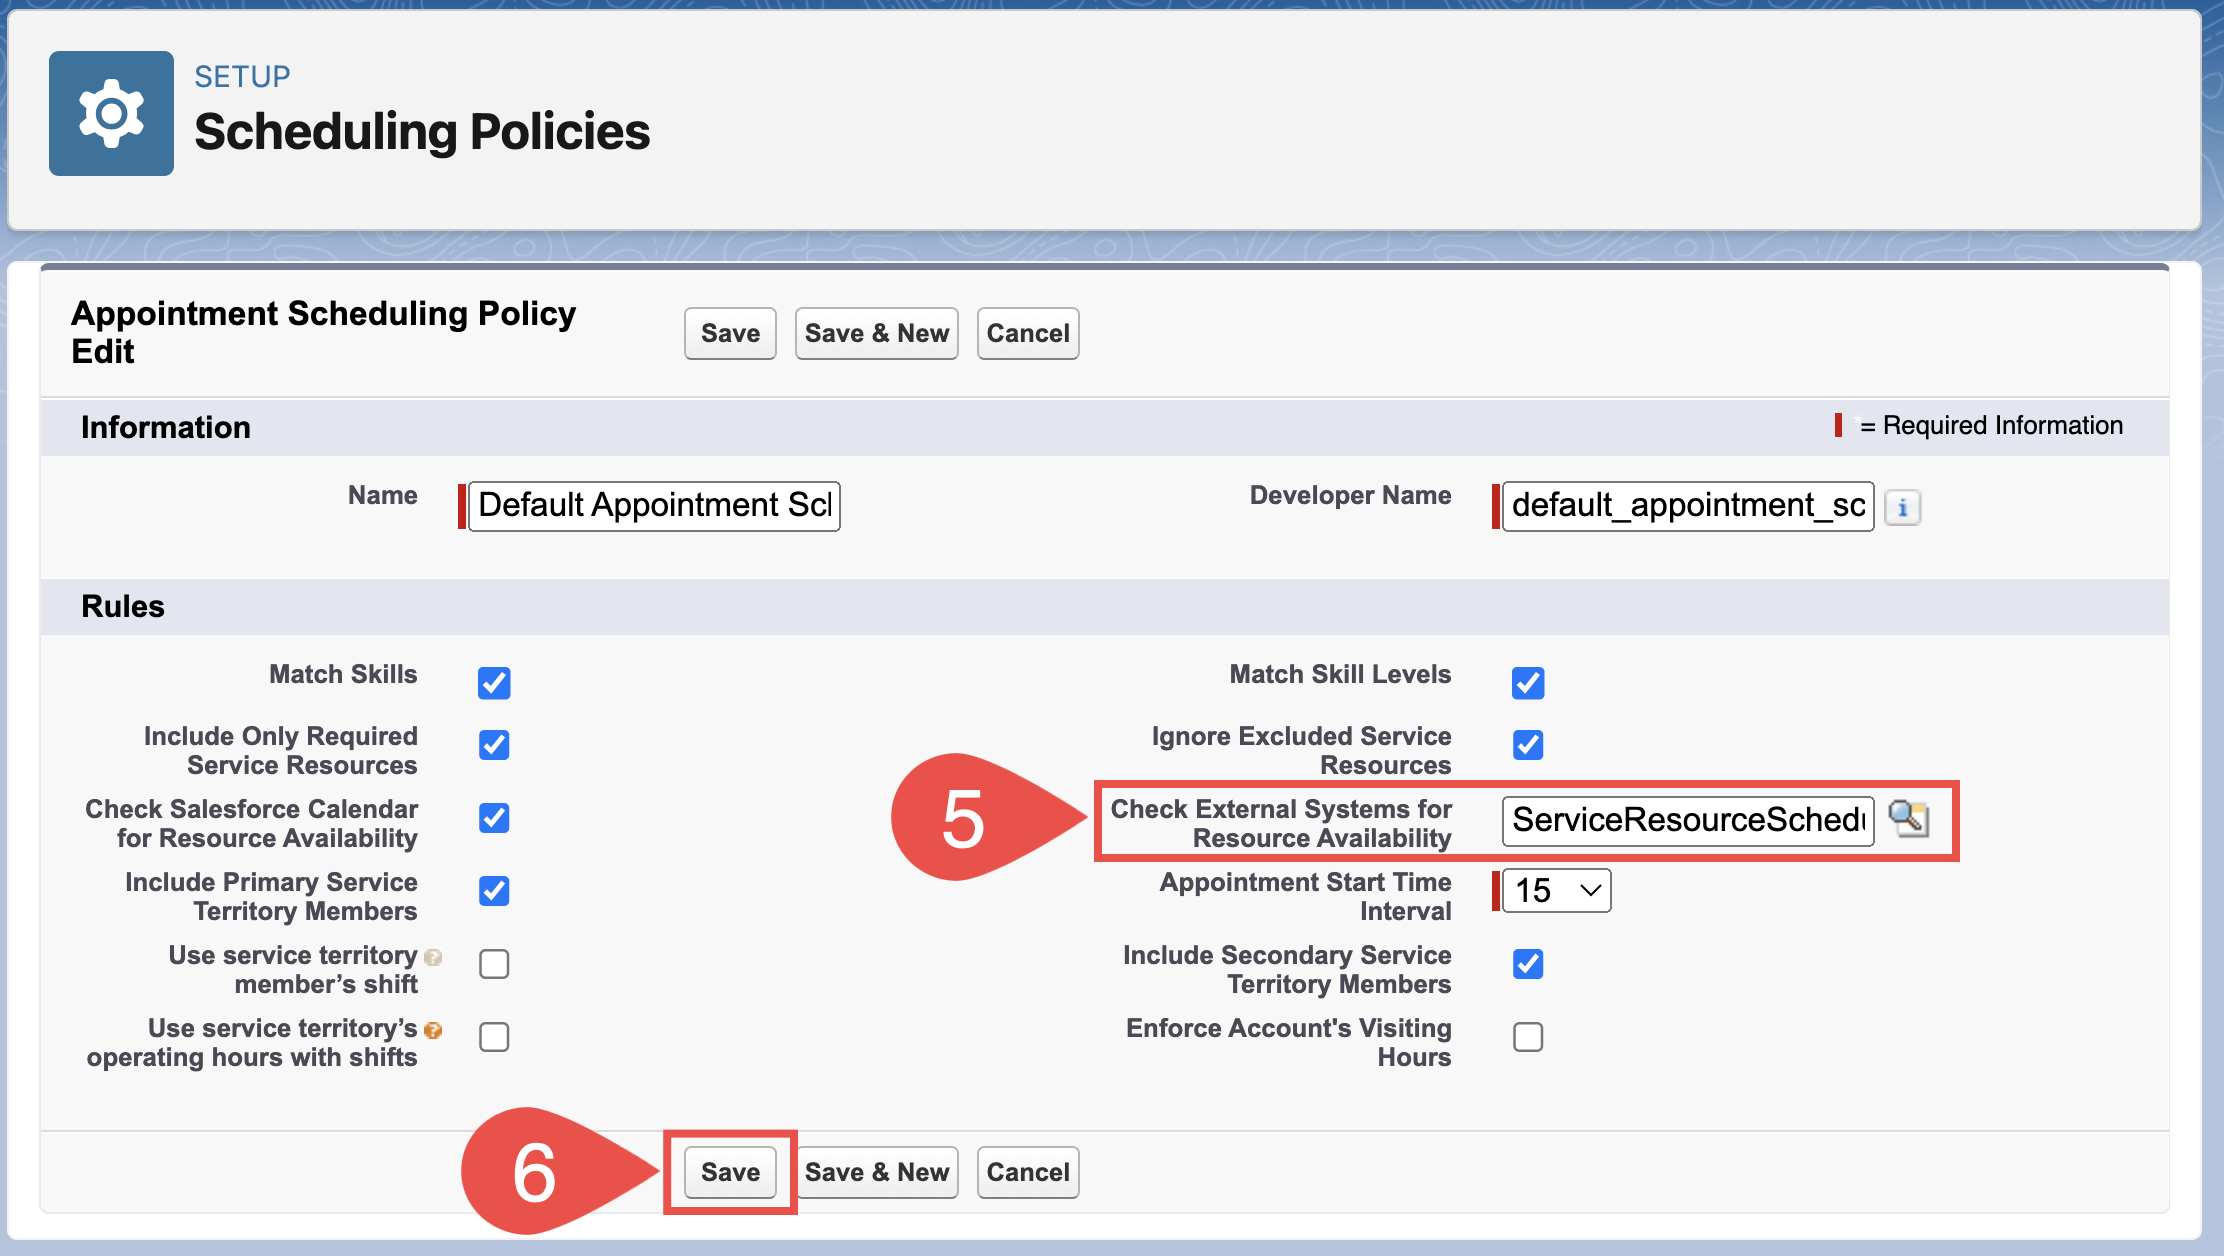
3.1.1. Open Salesforce Setup Menu
3.1.2. In the Quick Find field, enter “Scheduling policies”
3.1.3. Click on Scheduling policies in the navigation pane on the left. You will see the list of policies in the main pane
3.1.4. In the Scheduling Policies dialog, click Edit next to Default Appointment Scheduling Policy
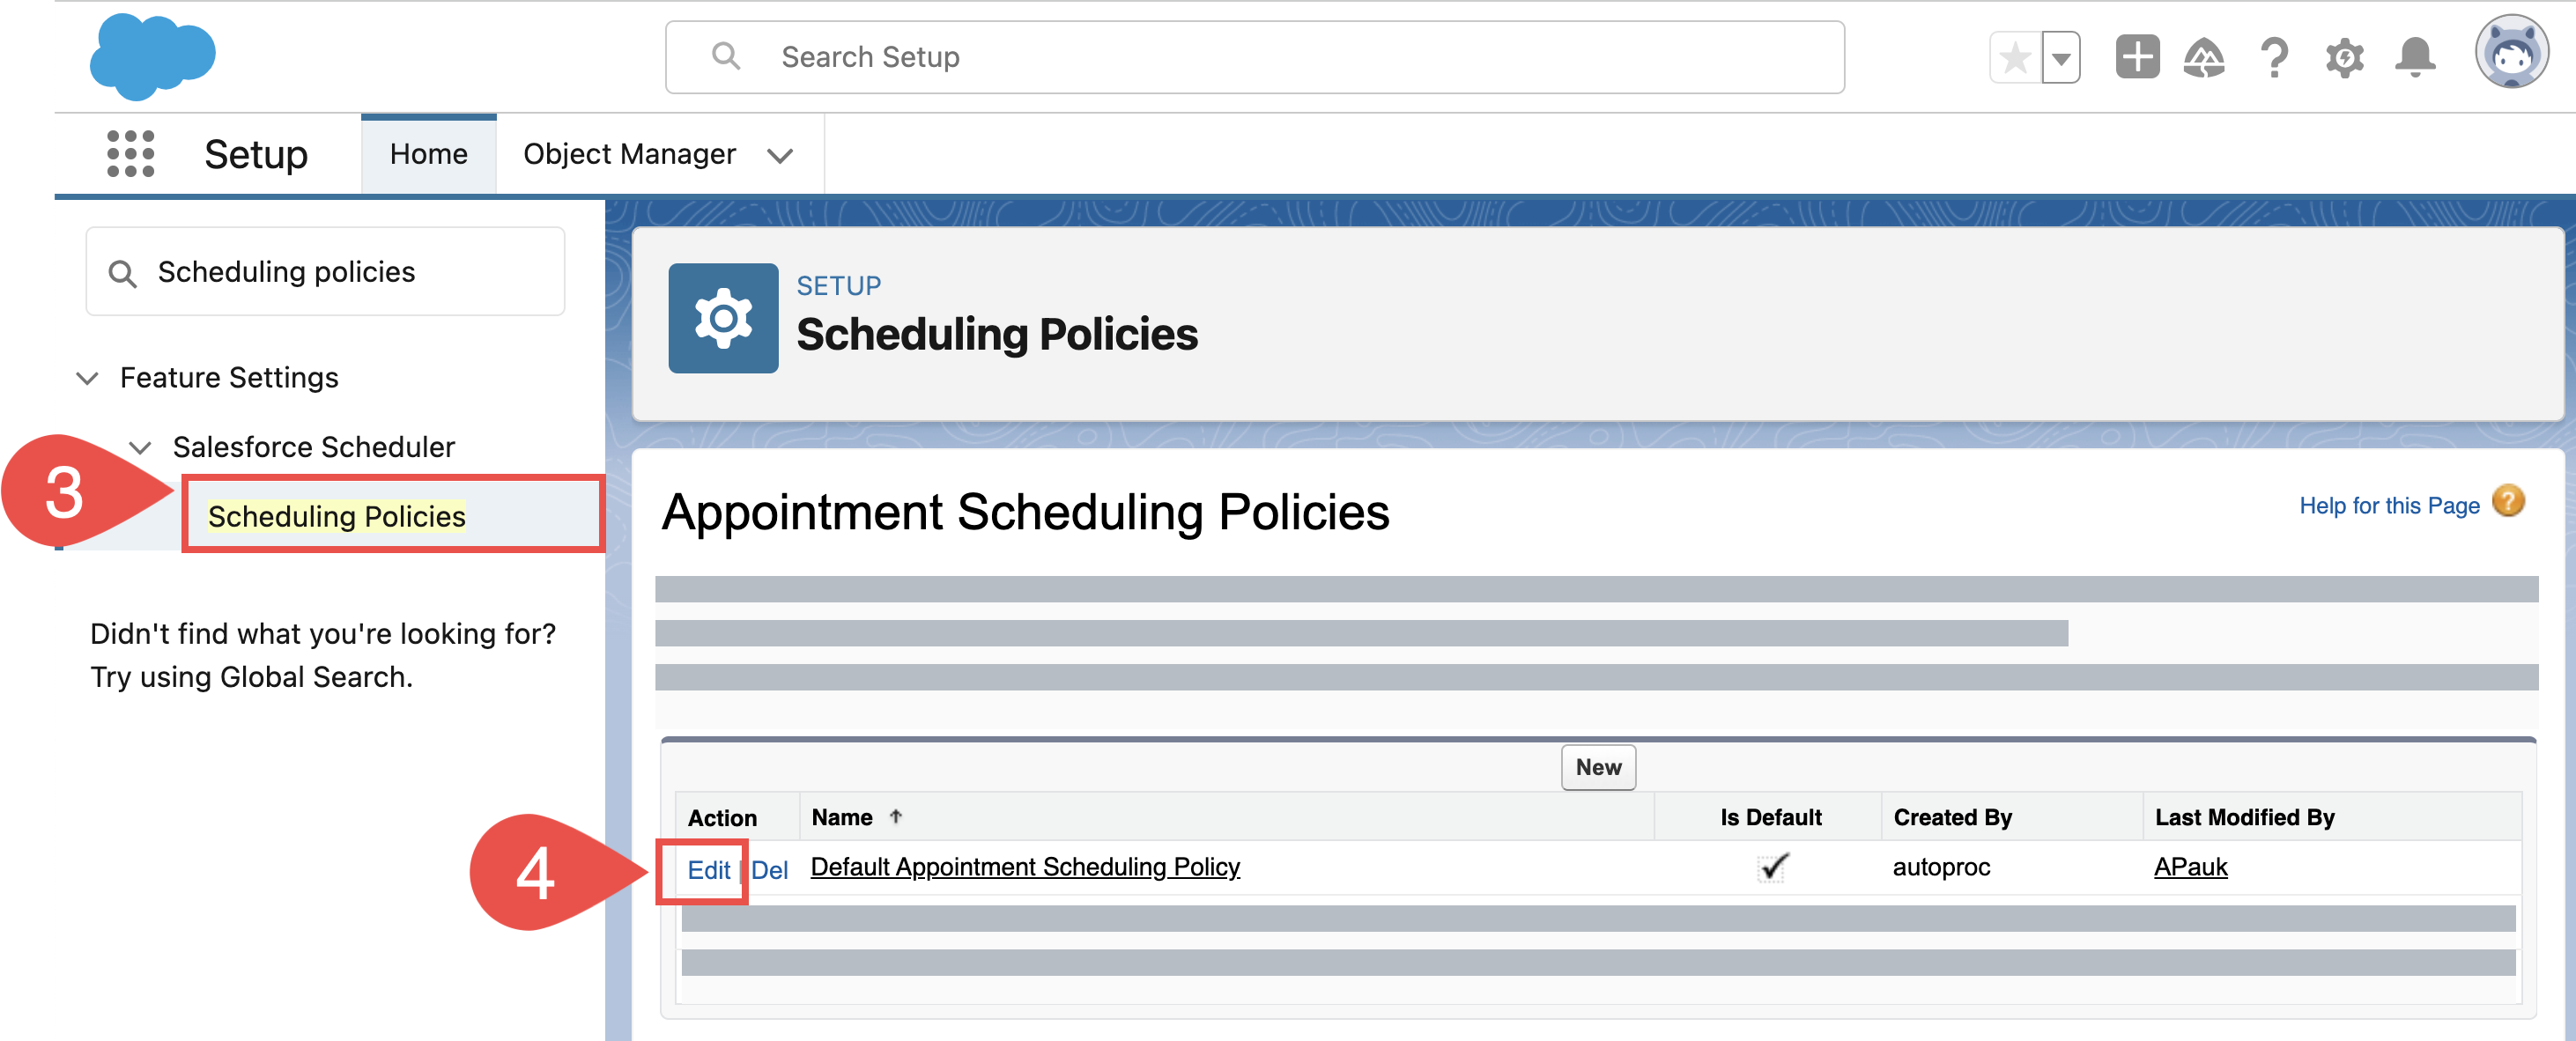
3.1.5. In the field Check External Systems for Resource Availability, enter the value ServiceResourceScheduleHandlerImpl; it is a dedicated Apex class included in the managed package
3.1.6. Click Save
3.2. Add a new remote site
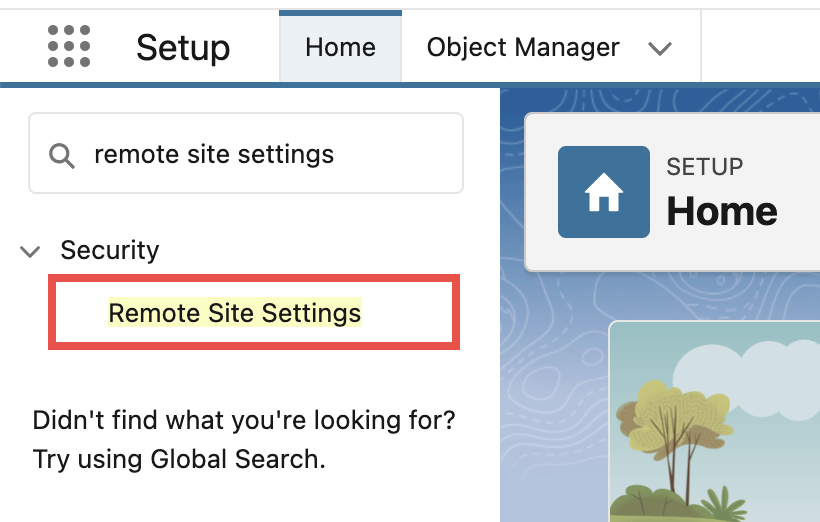
3.2.1. In the Quick Find field, enter “Remote site settings“
3.2.2. Click on Remote Site Settings in the navigation pane on the left; you will see the list of remote sites configured for your Org in the main pane
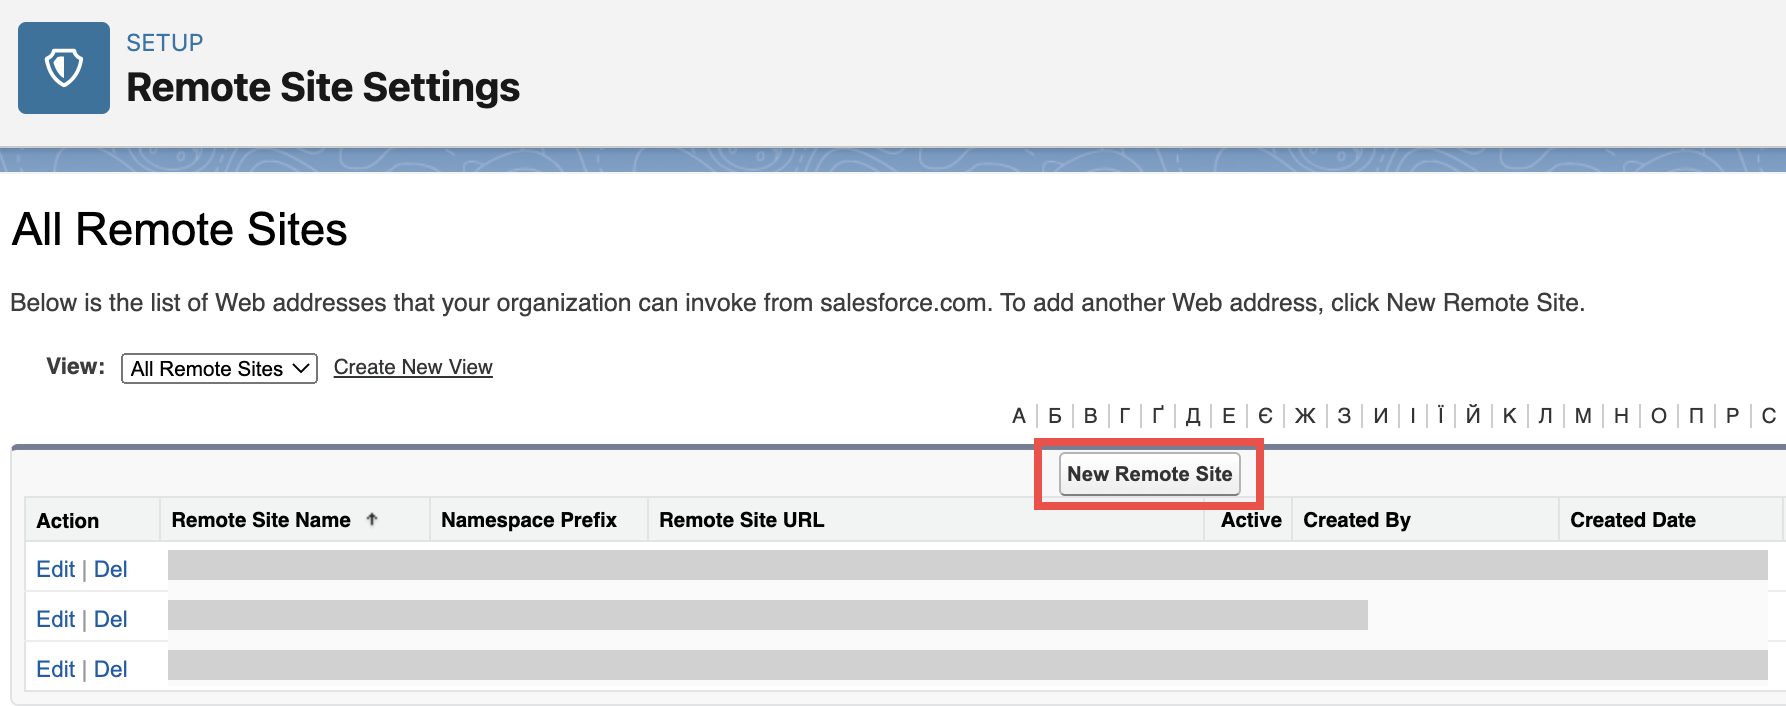
3.2.3. Click the New Remote Site button
3.2.4. Fill in the necessary info on the Remote Site Edit page:
- Enter “LSA” in the Remote Site Name
- Enter the Sync URL provided by Revenue Grid support team for your Org, e.g. https://sample-sync.revenuegrid.com in the Remote Site URL
- Make sure that the Active checkbox is enabled
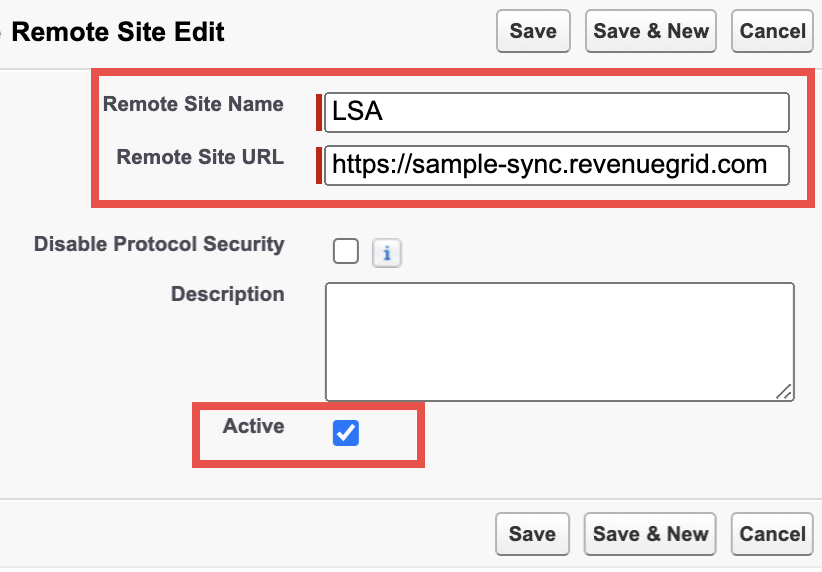
3.2.5. Click Save
Step 4: Connect Lightning Scheduler Adapter
Important
Before proceeding with this step, you should create a Salesforce Integration User for connecting to Revenue Grid’s Lightning Scheduler Adapter
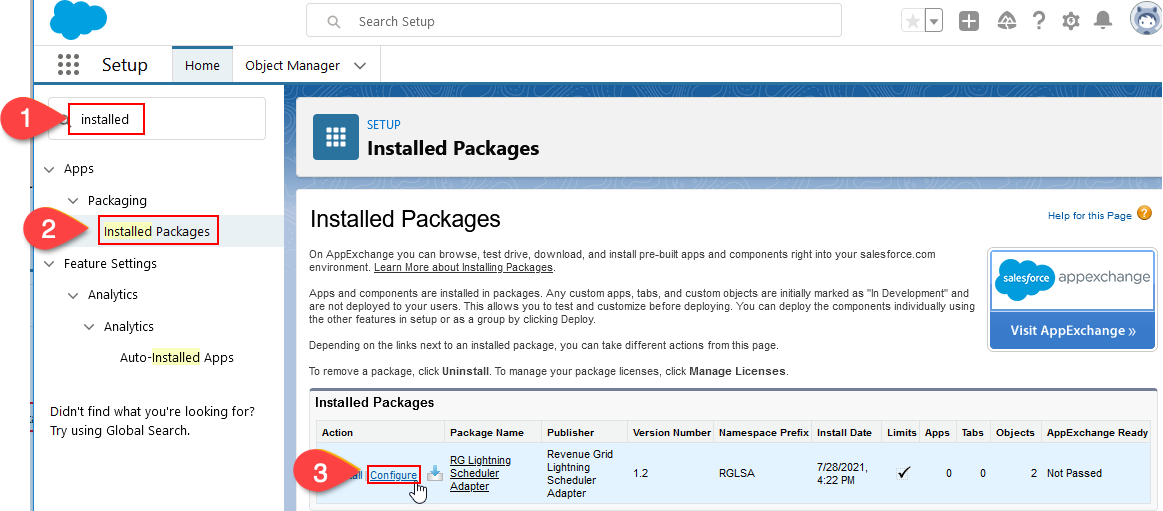
4.1. In the Quick Find field, enter “Installed packages“
4.2. Click on Installed packages in the navigation pane on the left; you will see the list of Managed packages installed in your Org in the main pane
4.3. Click Configure next to RG Lightning Scheduler Adapter package
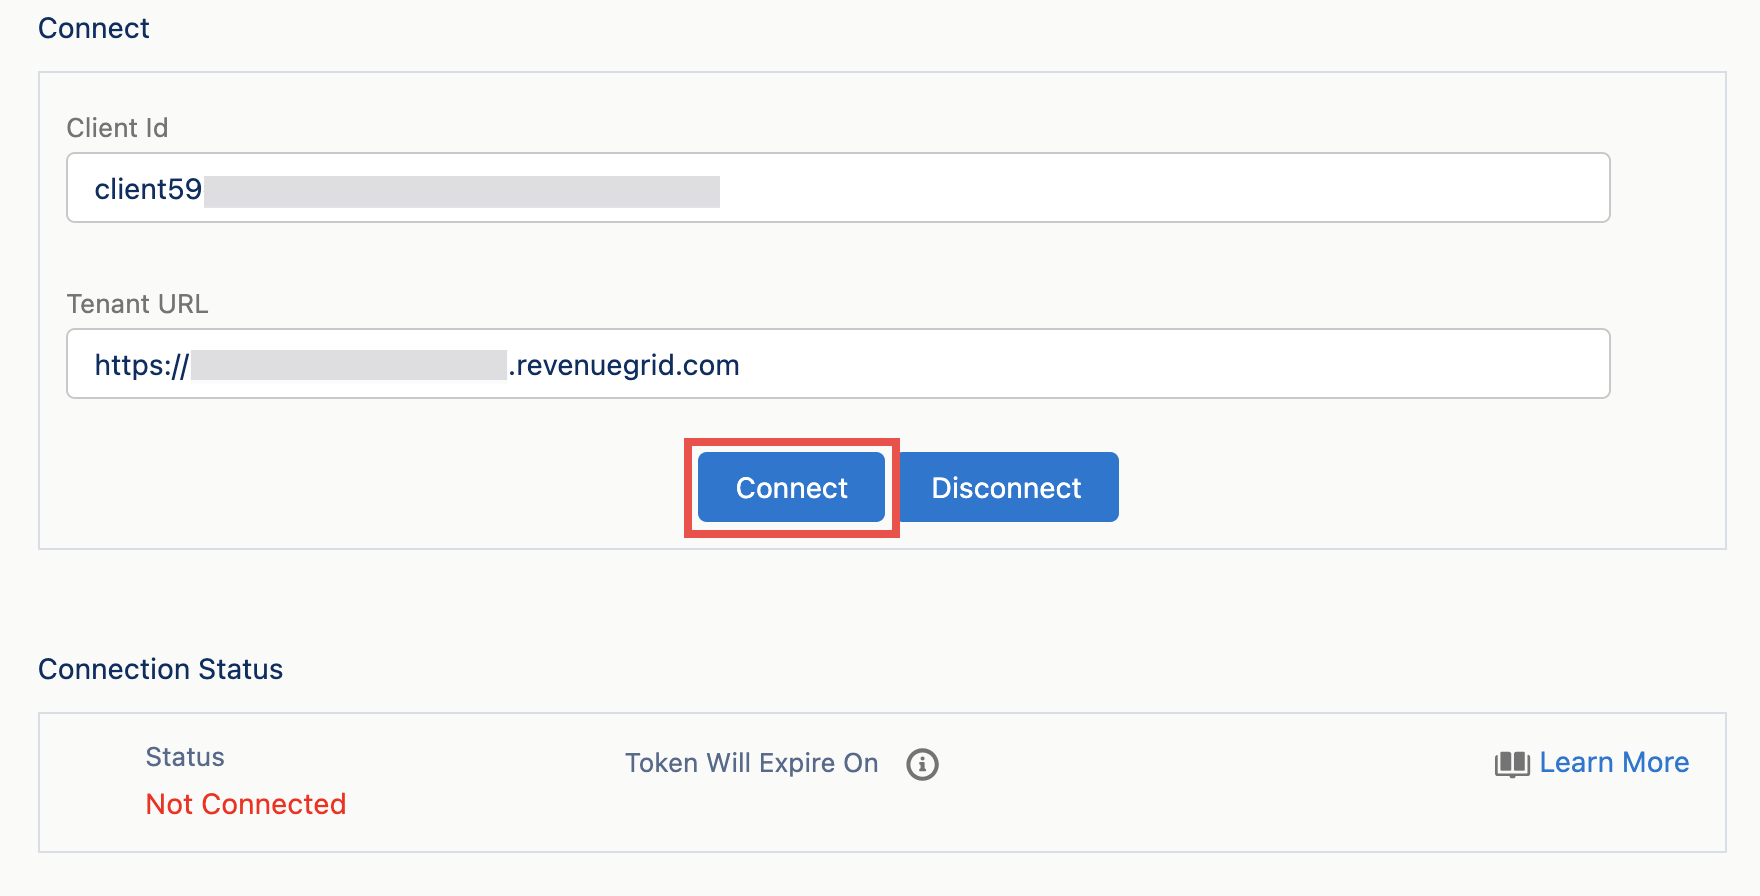
4.4. On the page that appears, enter the Client ID provided by [Revenue Grid support team] for your Org
4.5. Enter the Sync URL provided by Revenue Grid support team for your Org, e.g., https://sample-sync.revenuegrid.com, into the designated field
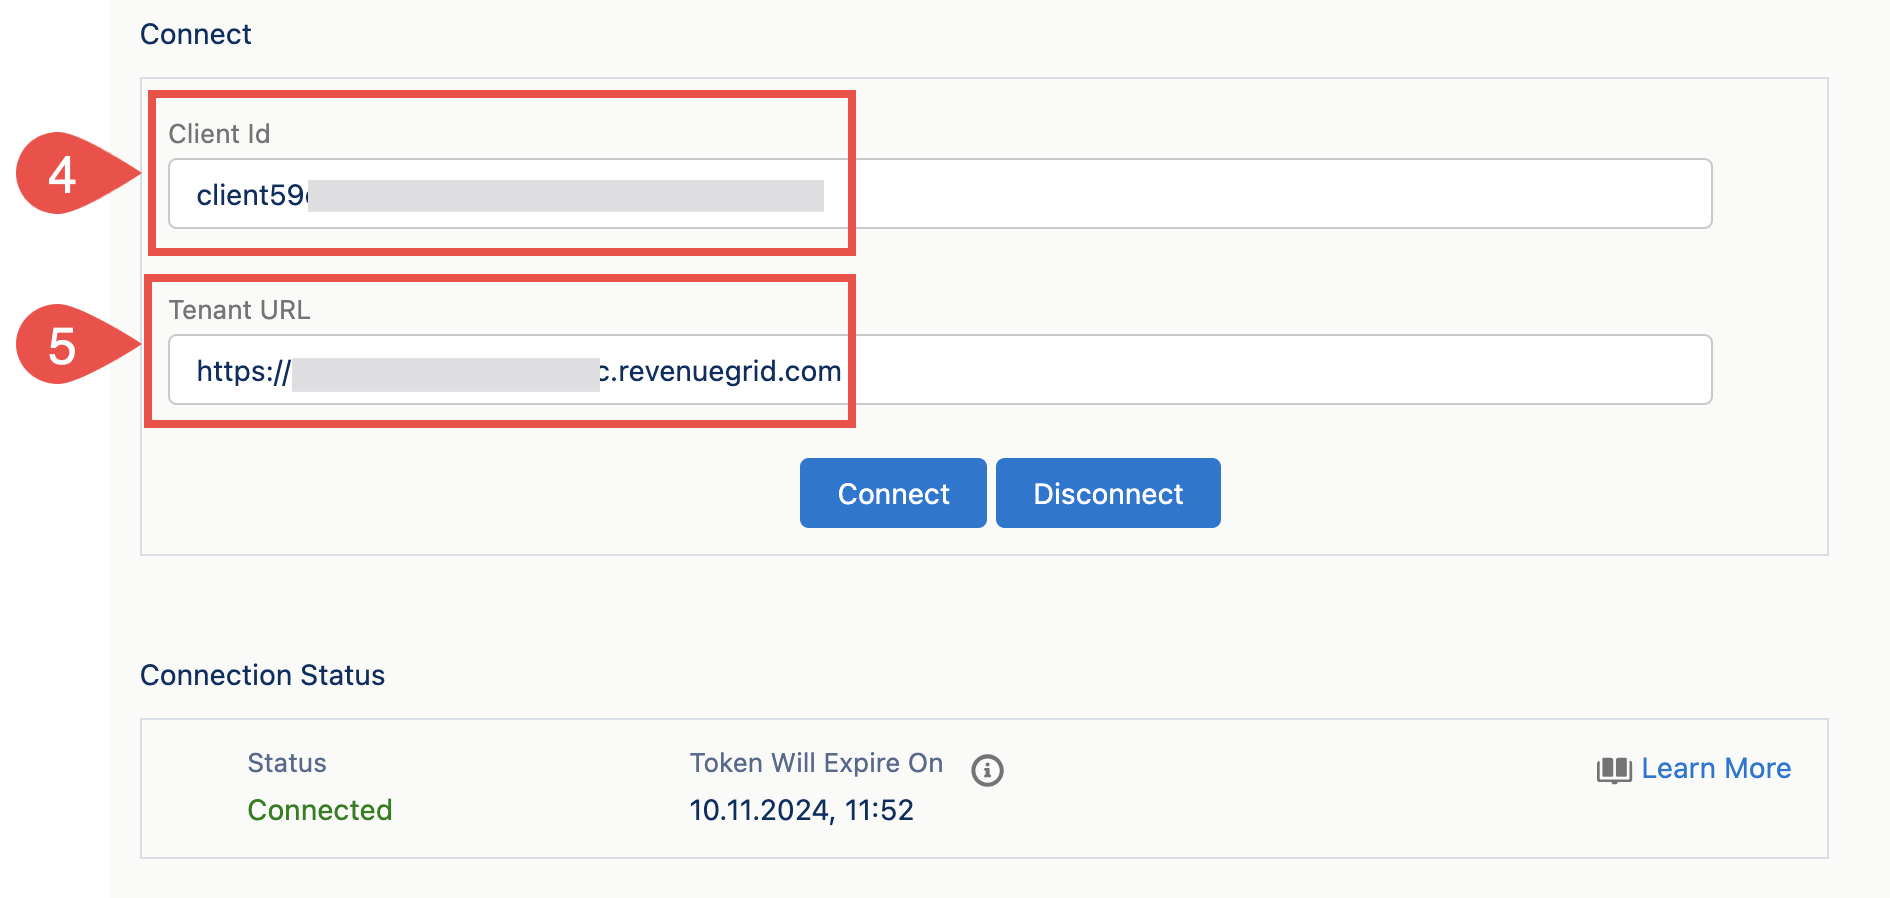
4.6. Click Connect
4.7. Log in with Salesforce Integration User’s credentials in the Salesforce OAuth window.
4.8. You will be redirected to the Connect page. You will see that the Connection status and/or date are updated
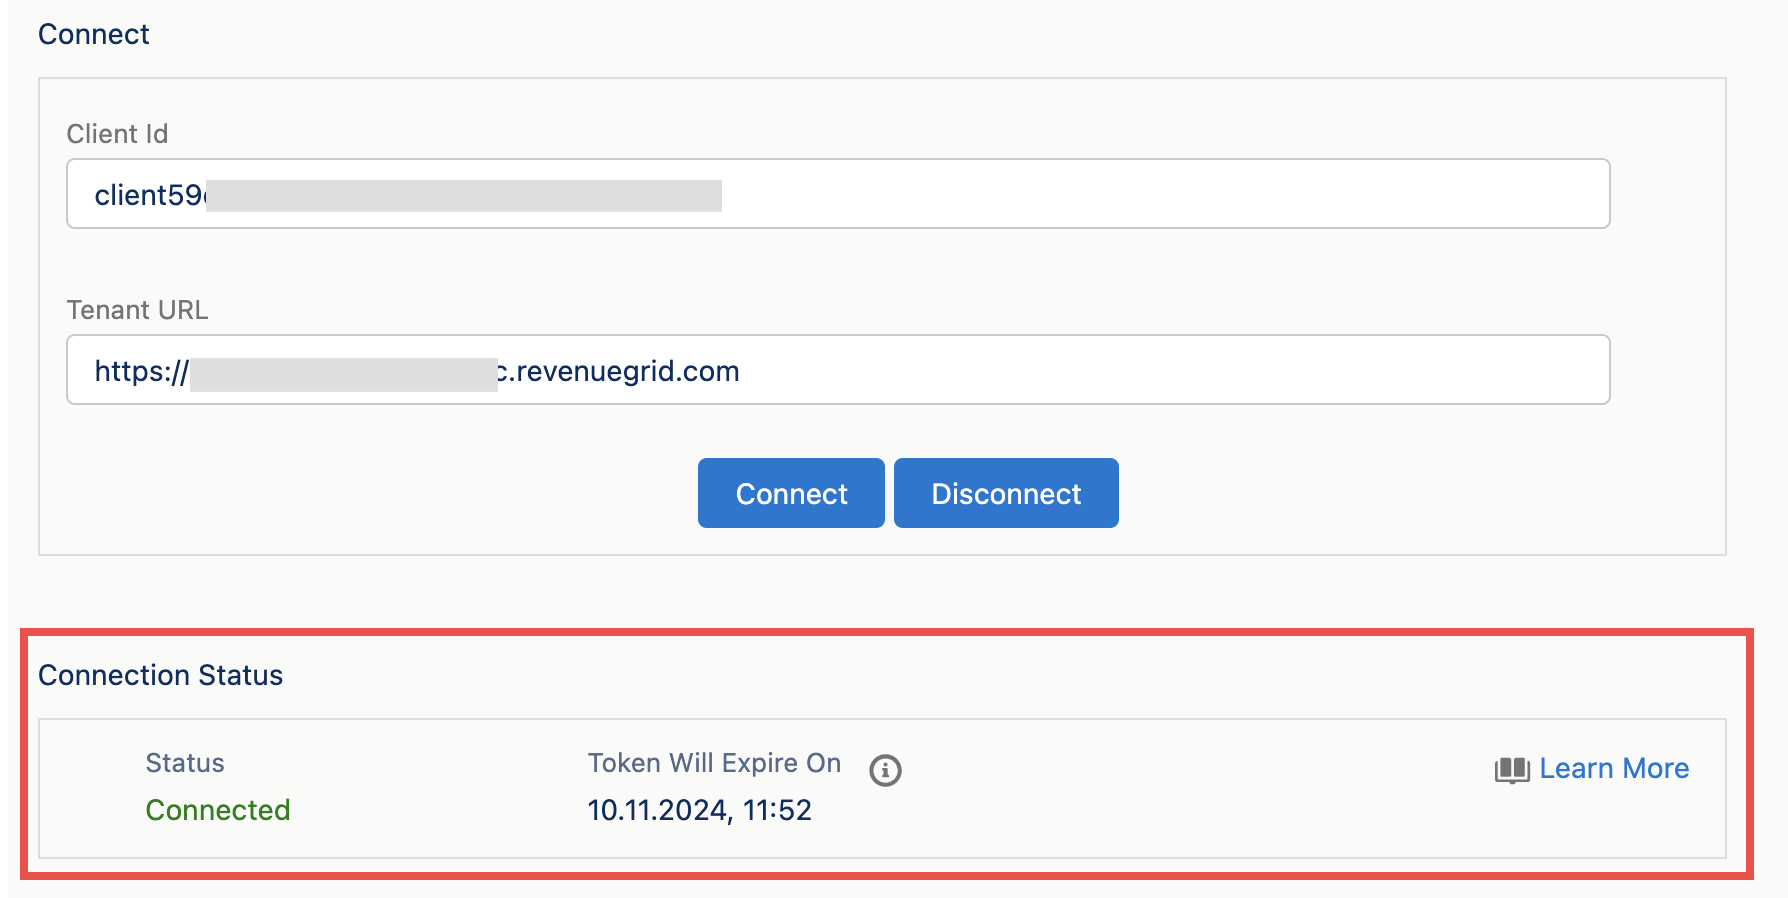
Check the connection status
1. Enter the specific Sync URL provided by Revenue Grid support team, e.g., https://sample-sync.revenuegrid.com, into the URL field in your web browser
2. Select the option “Sign in with Salesforce”
3. You will see a standard Salesforce OAuth window. Log in to it with Salesforce credentials to access RG sync settings page
4. Check the connection status.
If the connection wasn’t established, contact our support team for assistance.
Step 5: Configure Instant Creation of Calendar Items in Email Server Calendar
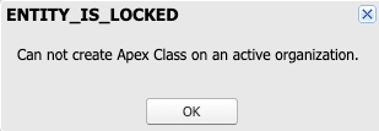
Instructions provided in sections 5.1-5.3 must be performed in the Sandbox environment. Learn how to create a sandbox in this Salesforce help article. While instructions from section 4 must be performed in your Prod environment.
This step is a prerequisite for configuring instant (direct) creation of calendar items in your Production environment. If you try to perform instructions from sections 1-3 in your Production environment, you will get such an error:
5.1. Create a trigger on the AppointmentSchedulingEvent object [Sandbox step]
5.1.1. Click on the Gear ⚙ icon and select Developer console

5.1.2. Click on File in the upper left corner and select New > Apps Trigger

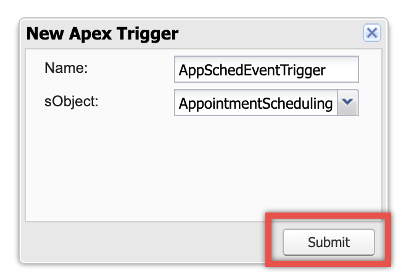 5.1.3. In the pop-up dialog that appears, enter:
Name: AppSchedEventTrigger
sObject: AppointmentSchedulingEvent
5.1.4. Click Submit
5.1.5. In the newly created document, substitute the automatically created text with the code provided below:
trigger AppSchedEventTrigger on AppointmentSchedulingEvent (after insert) {
    if (Trigger.isAfter && Trigger.isInsert) {
        for (AppointmentSchedulingEvent evt : Trigger.new) {
            try {
                system.debug(JSON.serialize(evt));
                String event_json = JSON.serialize(evt); RGLSA.AppSchedEventLSASendHandler app_handler = new RGLSA.AppSchedEventLSASendHandler(); app_handler.processAppointment(RGLSA.AppSchedulingEventWrapper.parse(event_json));
            } catch (Exception e) {
                System.debug('** ex msg: ' + e.getMessage() + e.getStackTraceString());
            }
        } RGLSA.SM005_Logs.save();
    }
}
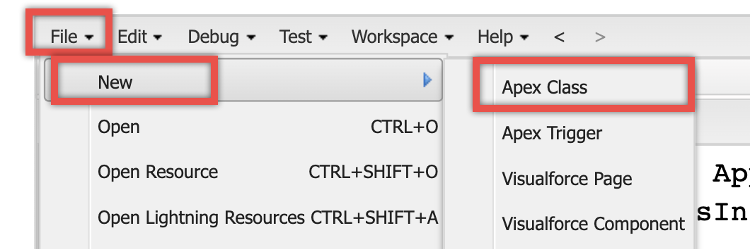
5.2. Add new Apex Class [Sandbox step]
5.2.1. Click on the Gear ⚙ icon and go to Developer console
5.2.2. Click on File in the upper left corner and select New > Apex Class
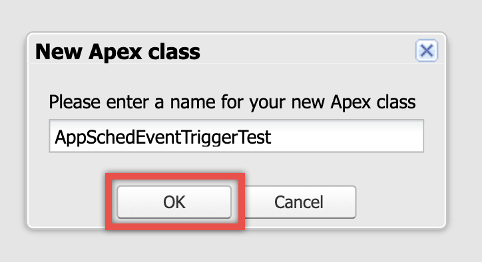
5.2.3. Enter the name “AppSchedEventTriggerTest” in the relevant field and click OK
5.2.4. In the newly created document, substitute all automatically created text with the code provided below:
@isTest
public class AppSchedEventTriggerTest {
    static testMethod void testTrigger() {
        Test.enableChangeDataCapture();
        List<AppointmentSchedulingEvent> evtList = new List<AppointmentSchedulingEvent> ();
        AppointmentSchedulingEvent evt = new AppointmentSchedulingEvent();
        evt.ChangeType = 'CREATE';
        evtList.add(evt);
        List <Database.SaveResult>  results = EventBus.publish(evtList);
        for (Database.SaveResult sr : results) {
            if (sr.isSuccess()) {
                System.debug('Successfully published event.');
            } else {
                for(Database.Error err : sr.getErrors()) {
                    System.debug('Error returned: ' + err.getStatusCode() + ' - ' + err.getMessage());
                }
            }
        } Test.getEventBus().deliver();
    }
}
5.3. Add an outbound change set and its components [Sandbox step]
Add an outbound change set
5.3.1. Click on the Gear ⚙ icon and select Setup
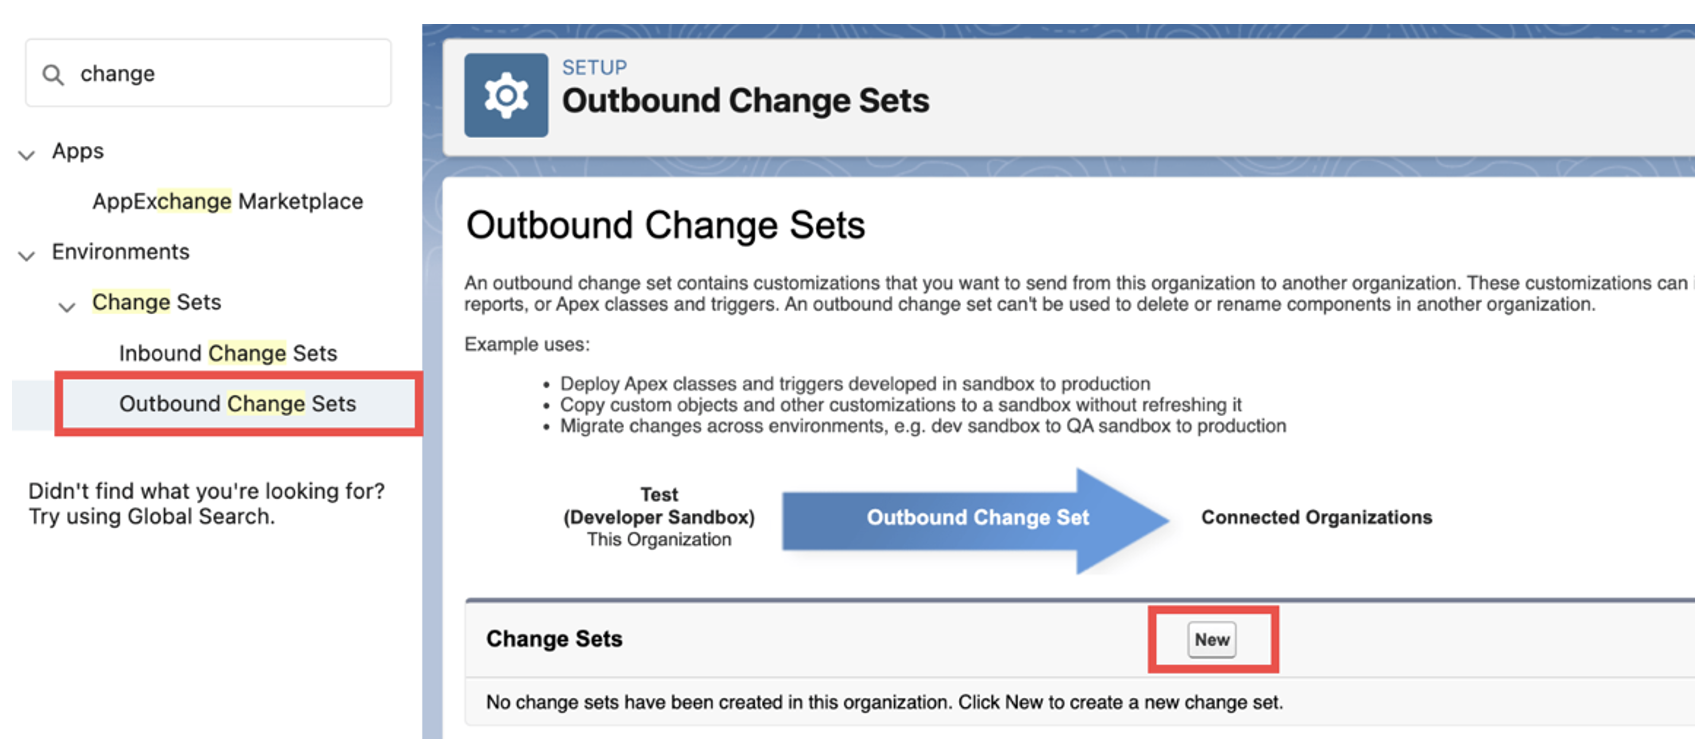
5.3.2. In the Quick Find box in left-hand sidebar, type in and open Outbound Change Sets
5.3.3. If you see a welcome screen, click continue to proceed to the list of outbound change sets
5.3.4. Click New
5.3.5. Specify the Name for the new change set. For example, AppointmentTrigger
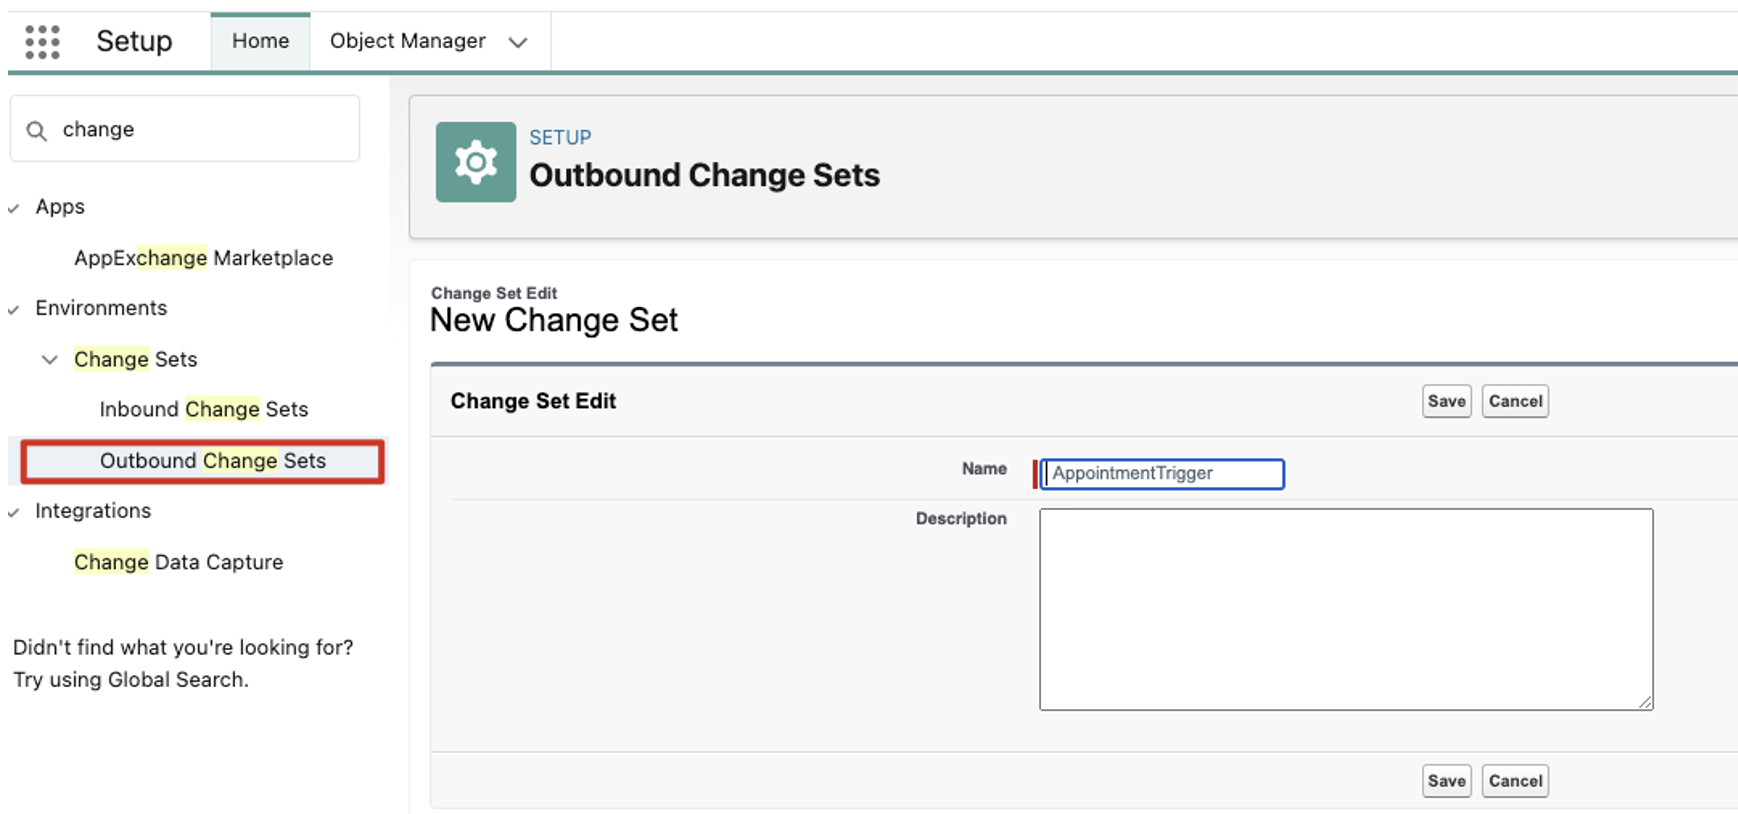
5.3.6. Click Save
Add change set components
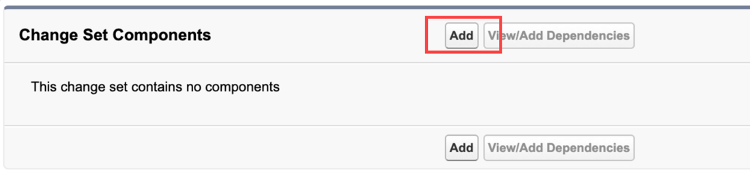
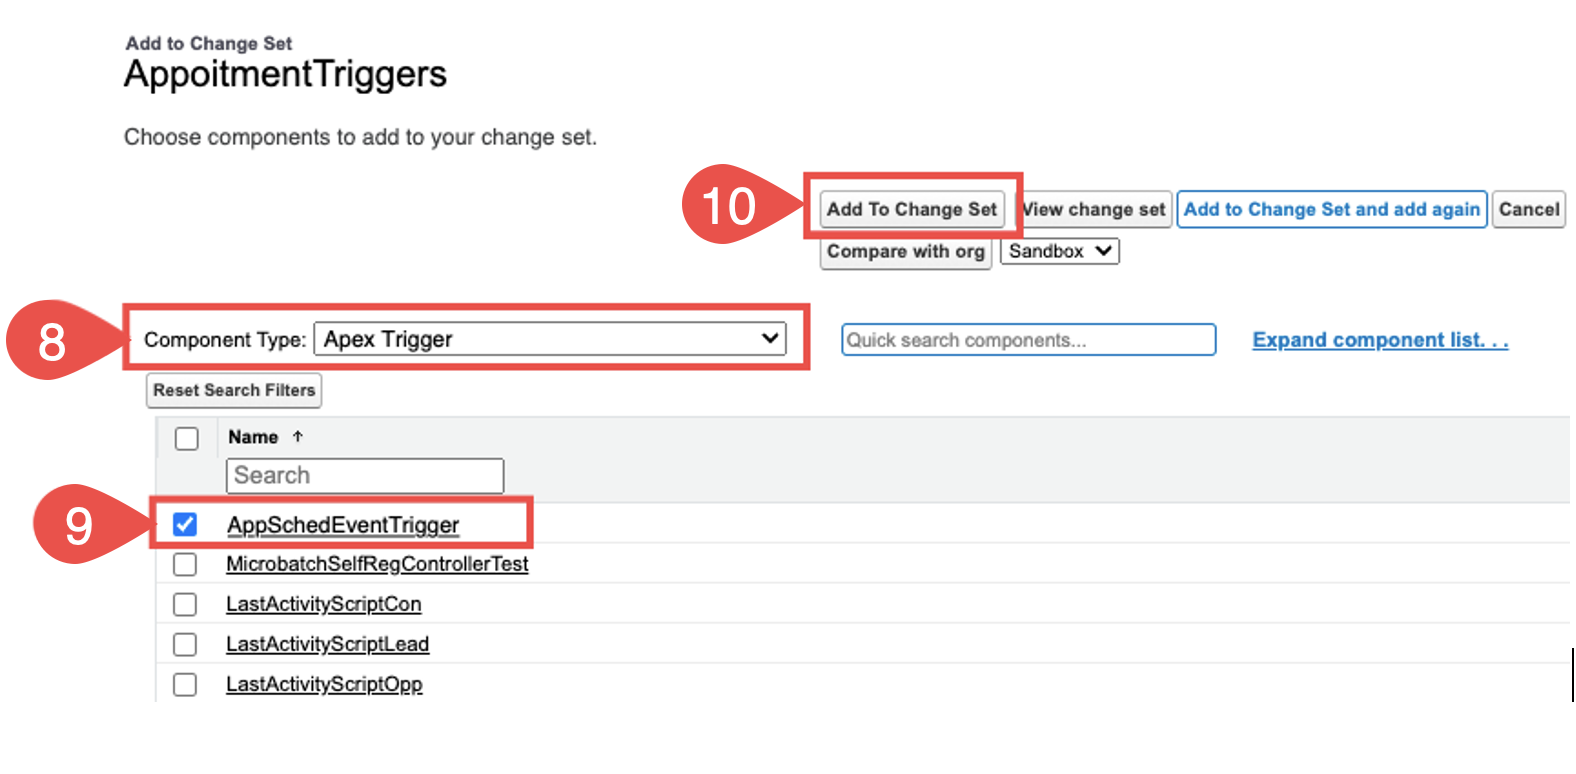
5.3.7. In the Change Set Components section, click Add
5.3.8. In the Component type, set Apex Trigger
5.3.9. Select the AppSchedEventTrigger trigger on the list
5.3.10. Click Add To Change Set
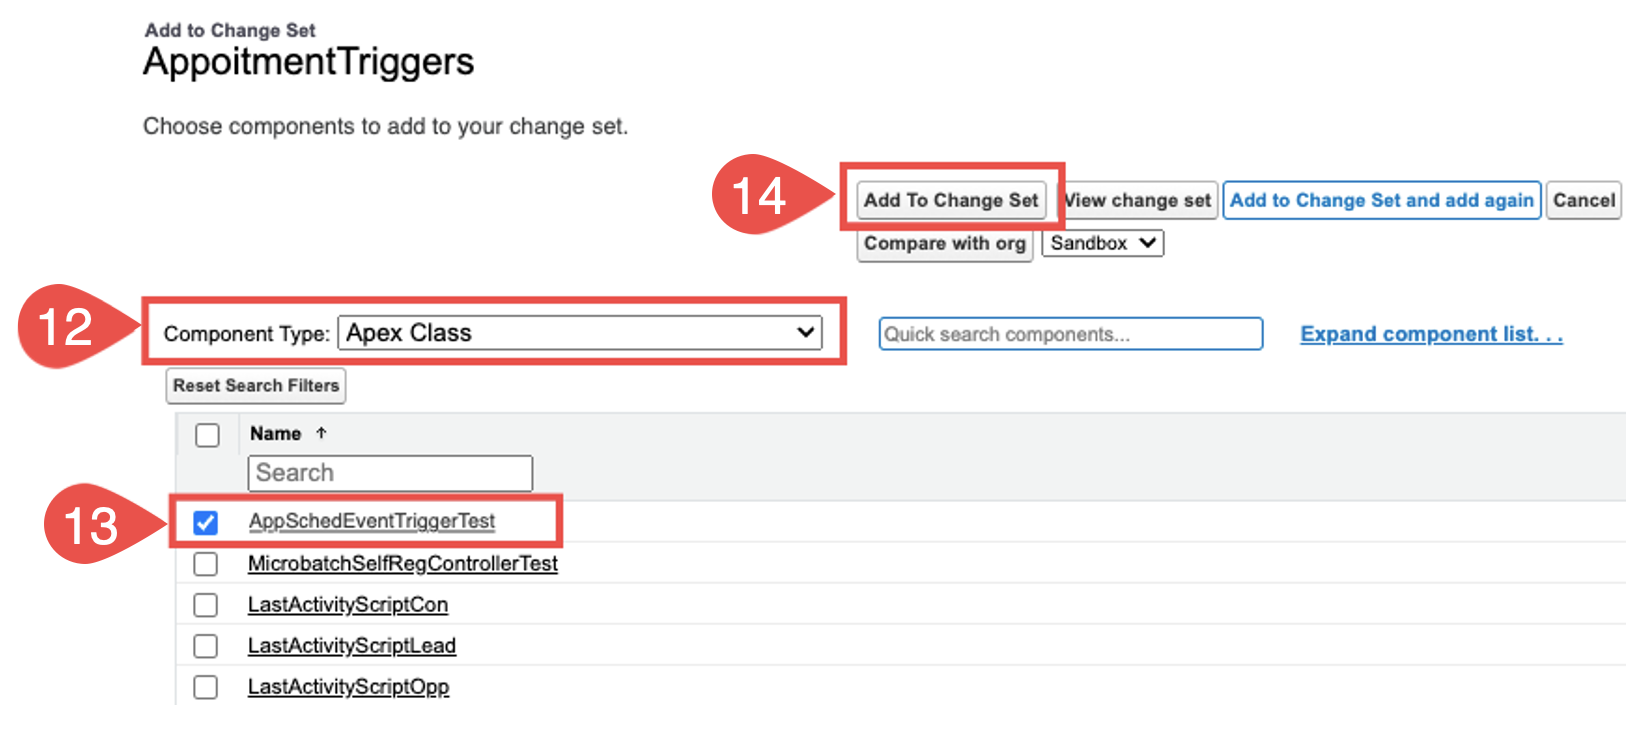
5.3.11. Again, in the Change Set Components section, click Add
5.3.12. In the Component type, set Apex Class
5.3.13. Select the AppSchedEventTriggerTest class on the list
5.3.14. Click Add To Change Set
Upload the change set
5.3.15. After adding components to the change set, you will automatically return to the change set details page
5.3.16. Find the Change Set Details section
5.3.17. Click Upload
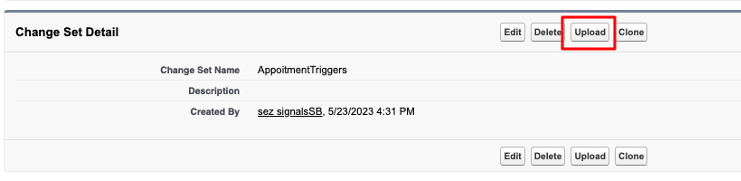
5.3.18. Select the organization to which it must be uploaded and click Upload
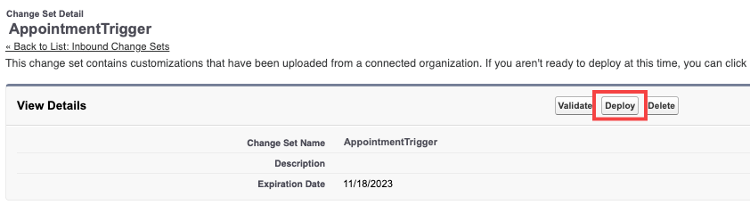
5.4. Add Inbound Change Set [Prod step]
This step must be performed in your Production environment
5.4.1. Click on the Gear ⚙ icon and select Setup
5.4.2. In the Quick Find box in left-hand sidebar, type in “Inbound Change Sets” to quickly find the necessary setting
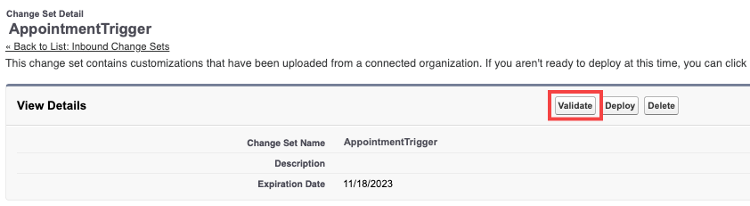
5.4.3. On the list, click on the change set which you created in step 5.3. For example, AppointmentTrigger.
5.4.4. Click Validate
5.4.5. Select Run specified tests
5.4.6. In the text field, enter the name of the added Apex Class “AppSchedEventTriggerTest”
5.4.7. Click Validate
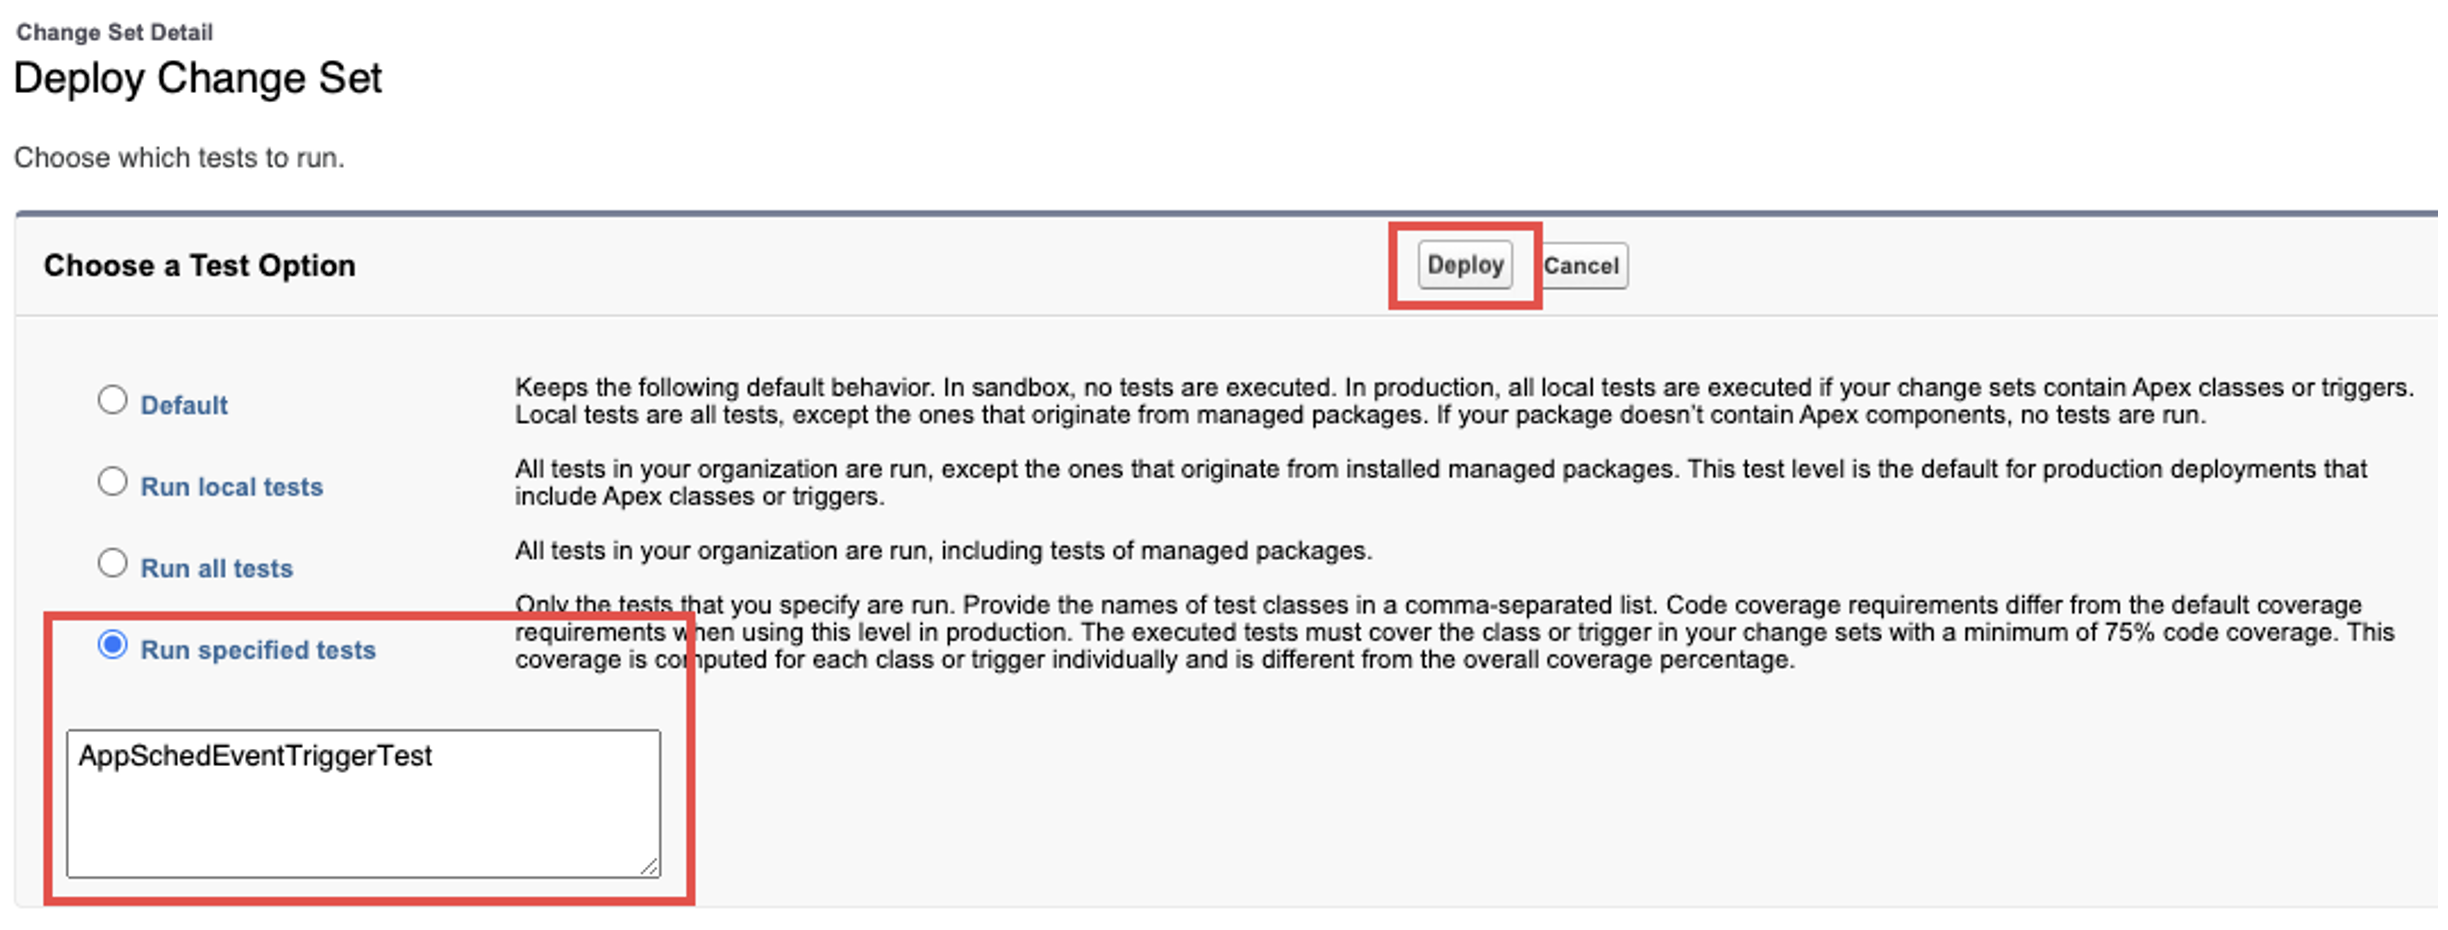
5.4.8. Next, click Deploy
5.4.9. Select Run specified tests
5.4.10. In the text field, enter the name of the added Apex Class “AppSchedEventTriggerTest”
5.4.11. Click Deploy
Warning
After completing all these steps, notify our support team about completing configuration on your side so that we can proceed with the necessary configuration on our side.
Step 6: Configure the necessary Salesforce flows (auxiliary)
Important
This step is ONLY for the organizations which use custom Salesforce flows created from Inbound New Guest Appointment and Book Appointment from Invitation standard flow templates for scheduling appointments.
If your organization does not use any custom Salesforce flows created from Inbound New Guest Appointment and Book Appointment from Invitation standard flow templates, skip this step
If your company utilizes the Salesforce flows created using the Inbound New Guest Appointment and Book Appointment from Invitation standard flow templates for scheduling appointments, you must configure your custom flows additionally to use the RG Lightning Scheduler Adapter.
6.1. Switch to Lightning Experience
6.2. Open Salesforce Setup menu
6.3. In the Quick Search field, enter “Flows” to quickly find the necessary tab
6.4. Click Flows. You will see the list of your Org’s flows
6.5. In the list of flows, find the one that was created from the template Inbound New Guest Appointment
6.5.1. Click on the flow to open the Flow builder
6.5.2. Then find the Action: Save Appointment block and click on it

6.5.3. In the dialog window, click on the Advanced section to expand it
6.5.4. In Transaction control, select the option "Let the flow decide (recommended)"
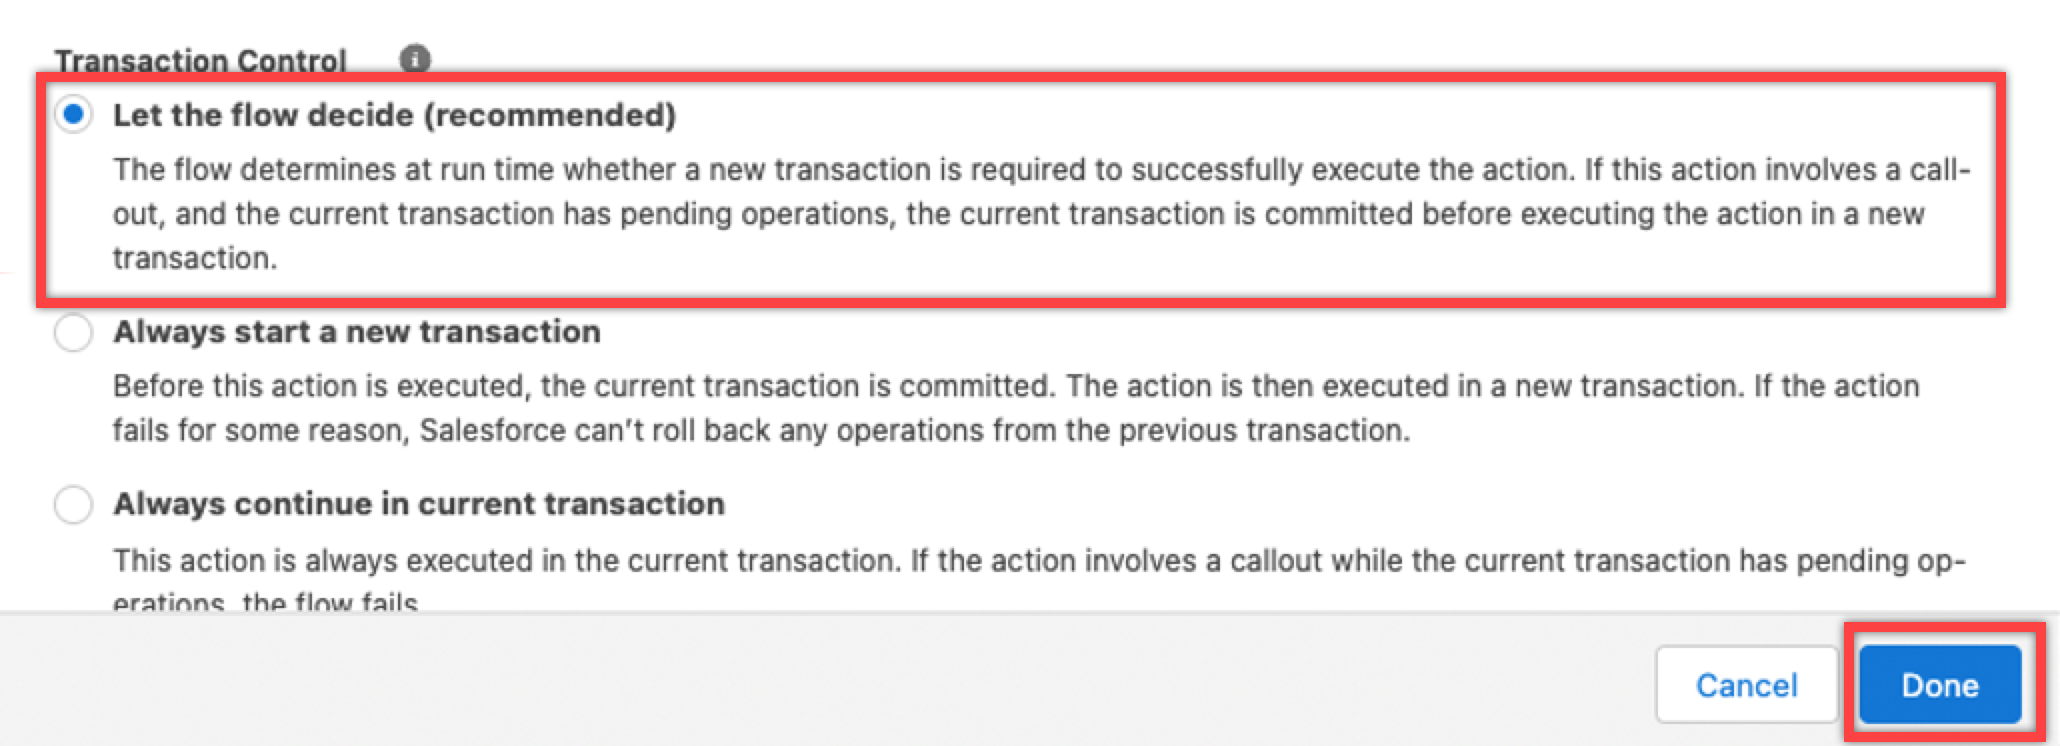
6.5.5. Click Done
6.5.6. In the upper right-hand corner, click Save to enforce the changes
6.6. In the list of flows, find the one that was created from the template Book Appointment from Invitation
6.6.1. Click on the flow to open the Flow builder
6.6.2. Then find the Action: Save Guest Appointment block and click on it

6.6.3. In the dialog window, click on the Advanced section to expand it
6.6.4. In Transaction control, select the option "Let the flow decide (recommended)"
6.6.5. Click Done
6.6.6. In the upper right-hand corner, click Save to enforce the changes

We would love to hear from you!