How to Configure and Use a Gmail / Google Workspace (G Suite) Service Account for Sync Activation
6 min read
Gmail / Google Workspace (G Suite) Service Accounts are used for various mail access management tasks, for example to mass-authorize RG Email Sidebar Sync engine to work with the end users’ Gmail data via RGES Chrome Extension for Gmail.
Within this scenario, a service account configured by the local mail Admin provides a simple way to authorize multiple Gmail boxes for RGES use, so the end users do not need to get their mailboxes authorized manually, and keep it connected every time they change their password. This makes adding new product users easier and allows admins and Managers to ensure that all users get all RG Email Sidebar features unrolled for them.
The steps to configure Gmail / Google Workspace (G Suite) Service Account:
Tip
After mass RGES Sync activation via a Gmail service account, you can proceed to mass-deploying the RGES Chrome extensions for the end users; the mass deployment procedure is only available on Windows systems, via MS Active Directory
Step 1. Create a Project
1.1. Log in to your Org’s Gmail / Google Workspace (G Suite) Console with a Super administrator credentials at https://console.developers.google.com/
If you haven’t used the Console before, you will first need to agree to the Console’s Terms of Service.
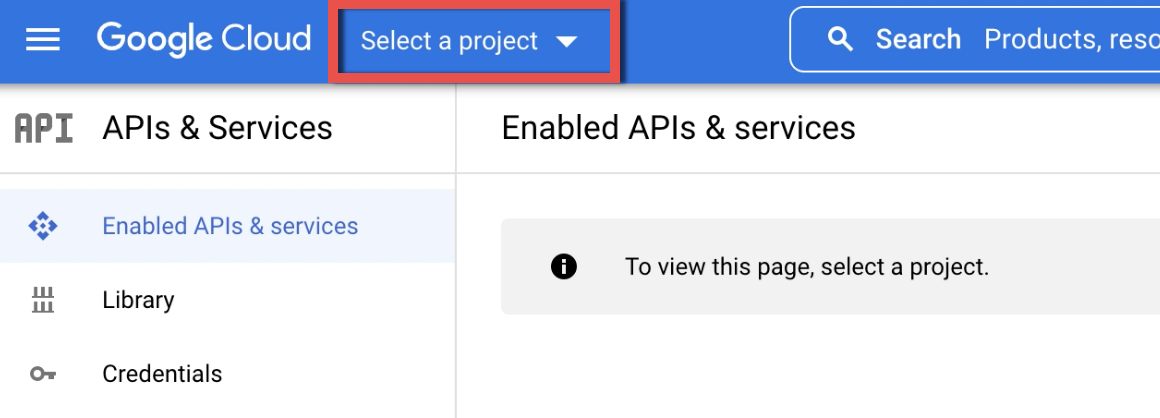
1.2. Click the button Select a project ▾ in the upper left corner of the Console
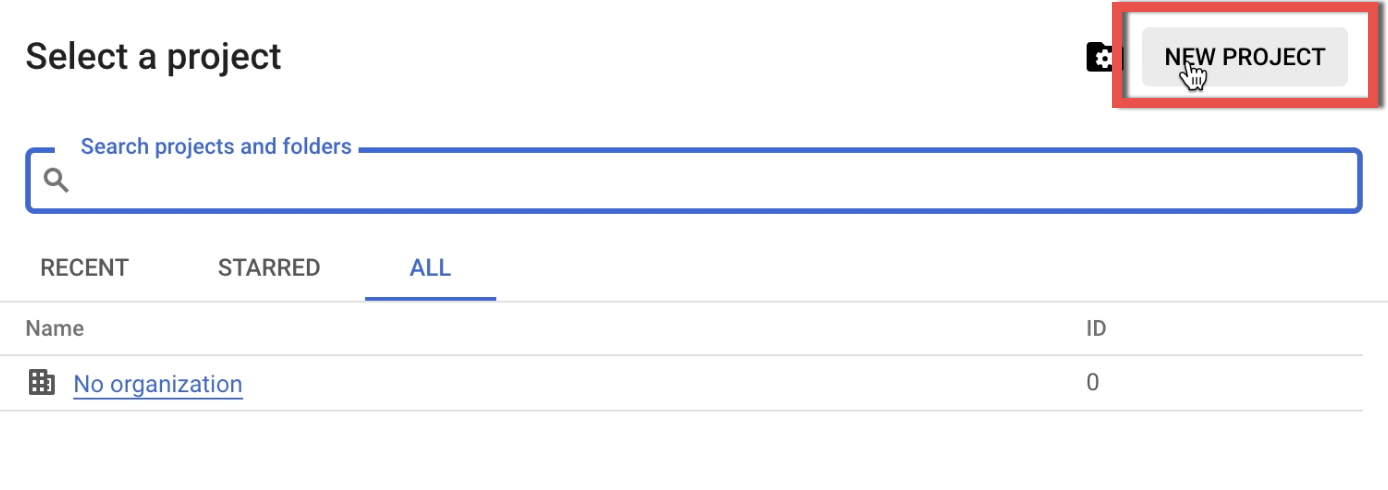
1.3. In the dialog that appears, click New Project
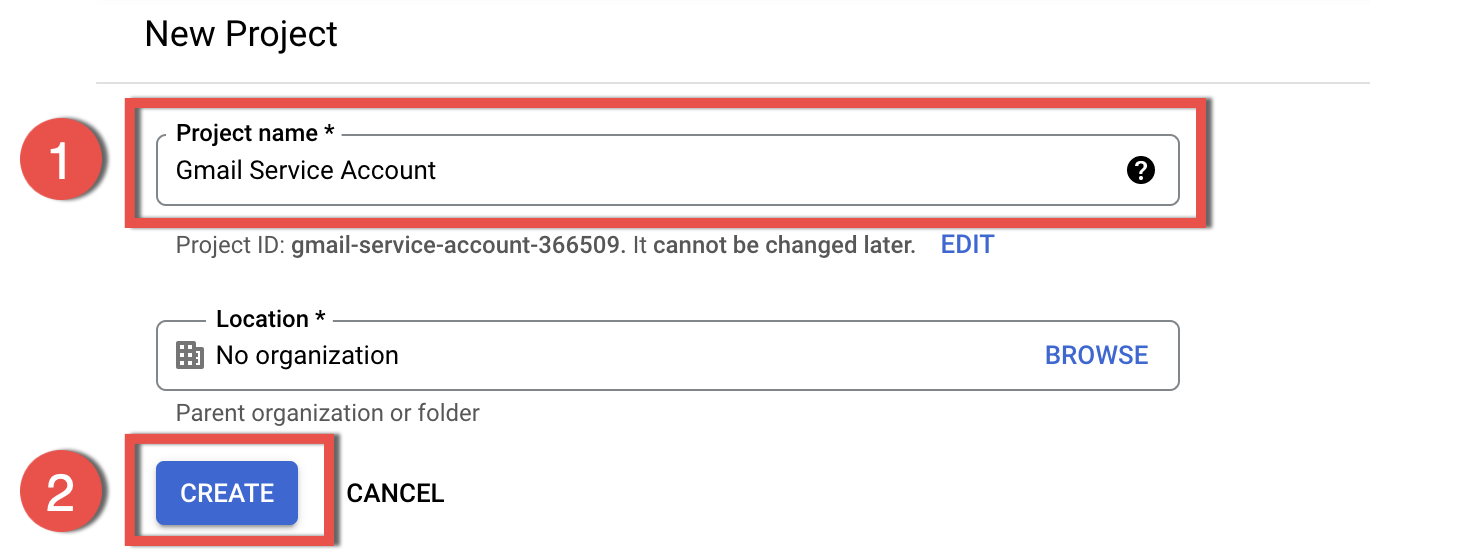
1.4. Enter a Project name and click Create. In this example we set the name Gmail Service Account
Step 2. Enable Gmail API Sets
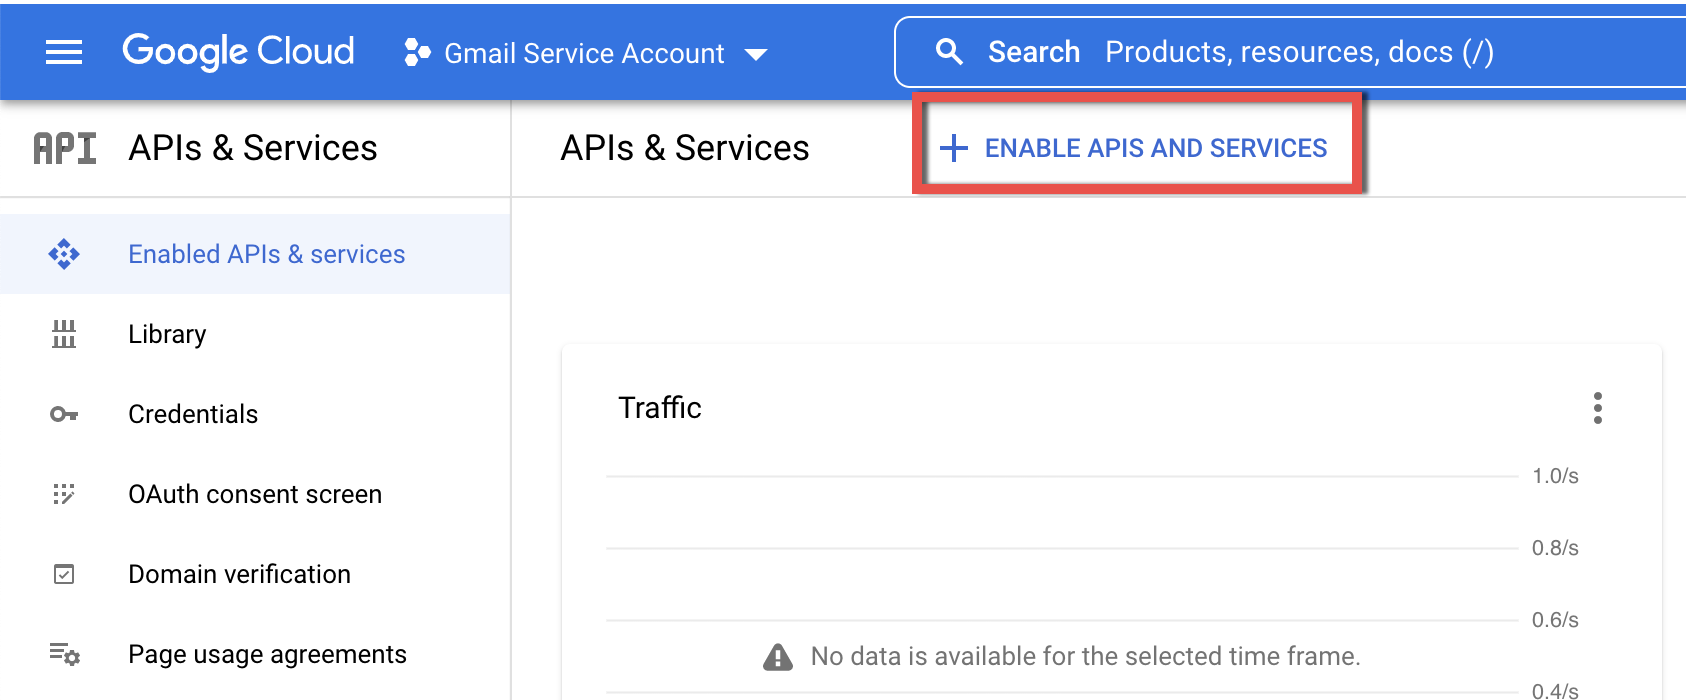
2.1. Select your Project from the list and click the ENABLE APIS AND SERVICES button
2.2. On the API Library page that opens, use the search box to find GMAIL API, click on it and then Enable it on the next page.
Note that enabling the APIs here does not instantly grant the access, it is a prerequisite to add the corresponding permission scopes later
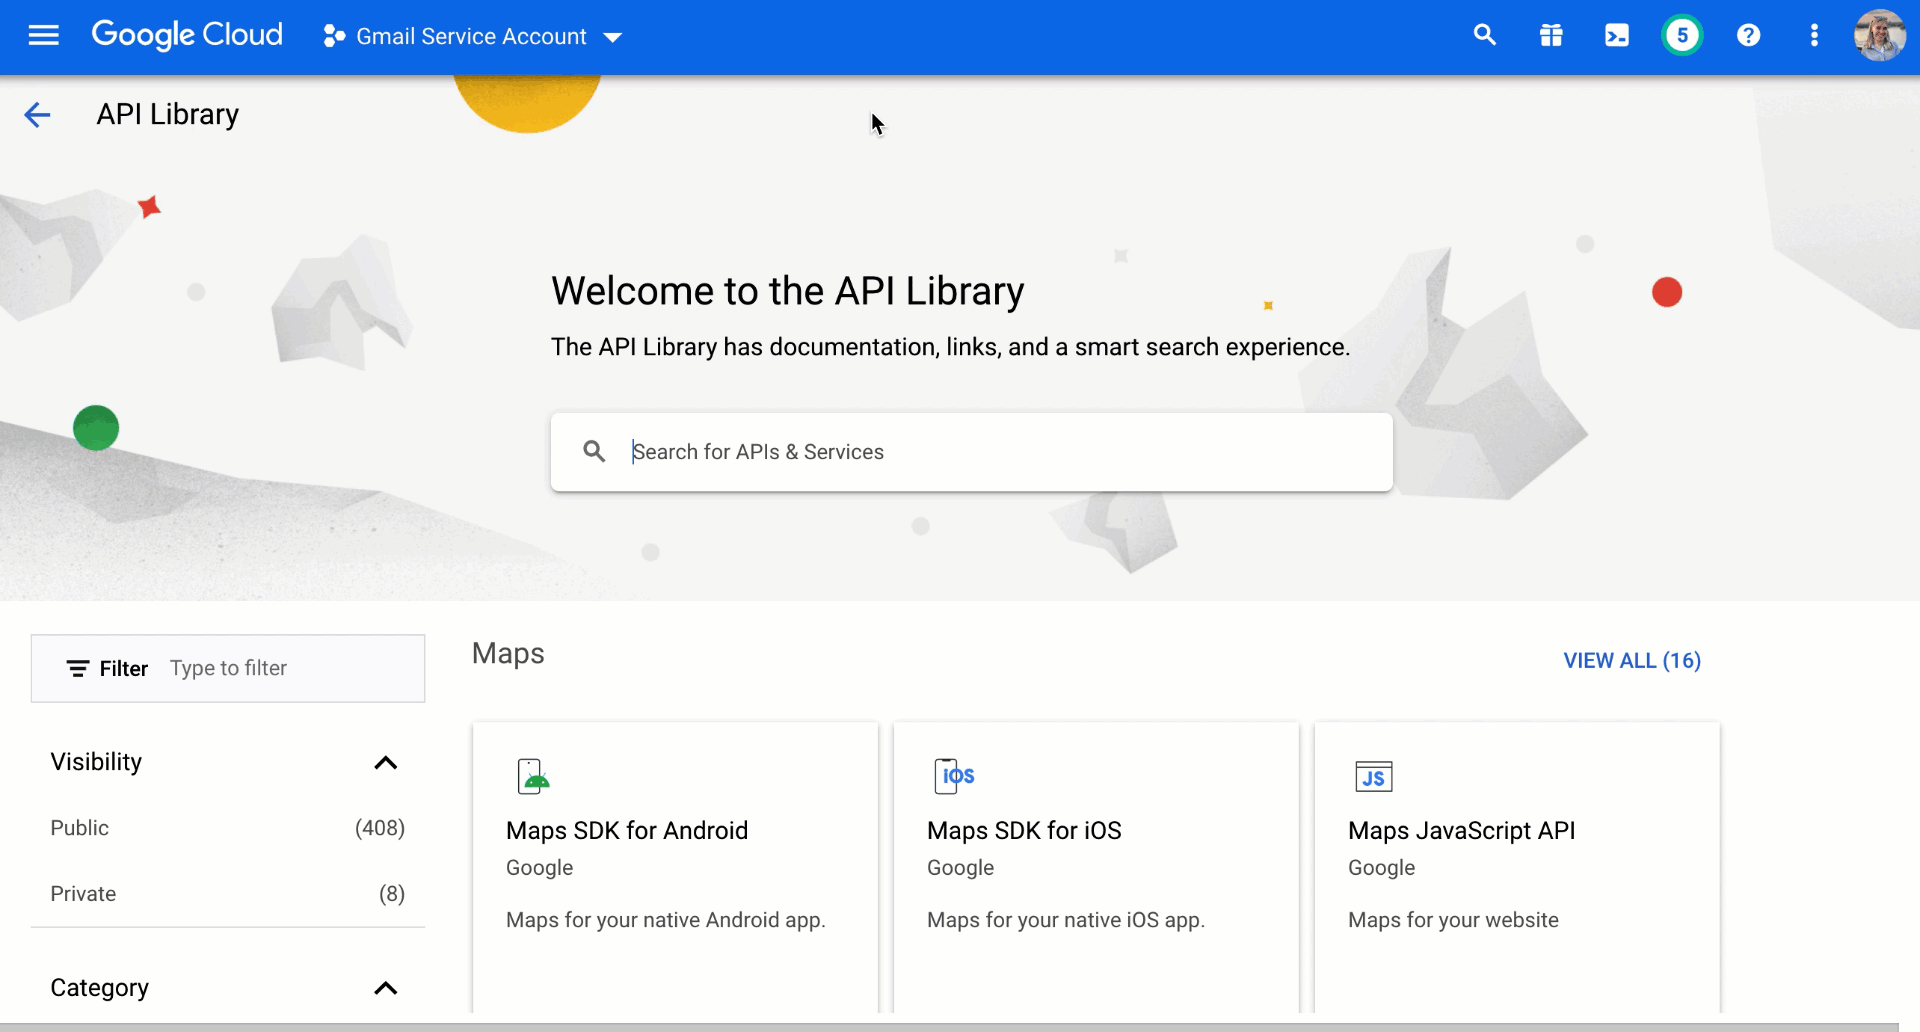
2.3. In the same manner find and enable four more API sets for the service account:
- Google Calendar API
- Google People API
- Google Drive API
- Tasks API
Step 3. Create a Service Account User
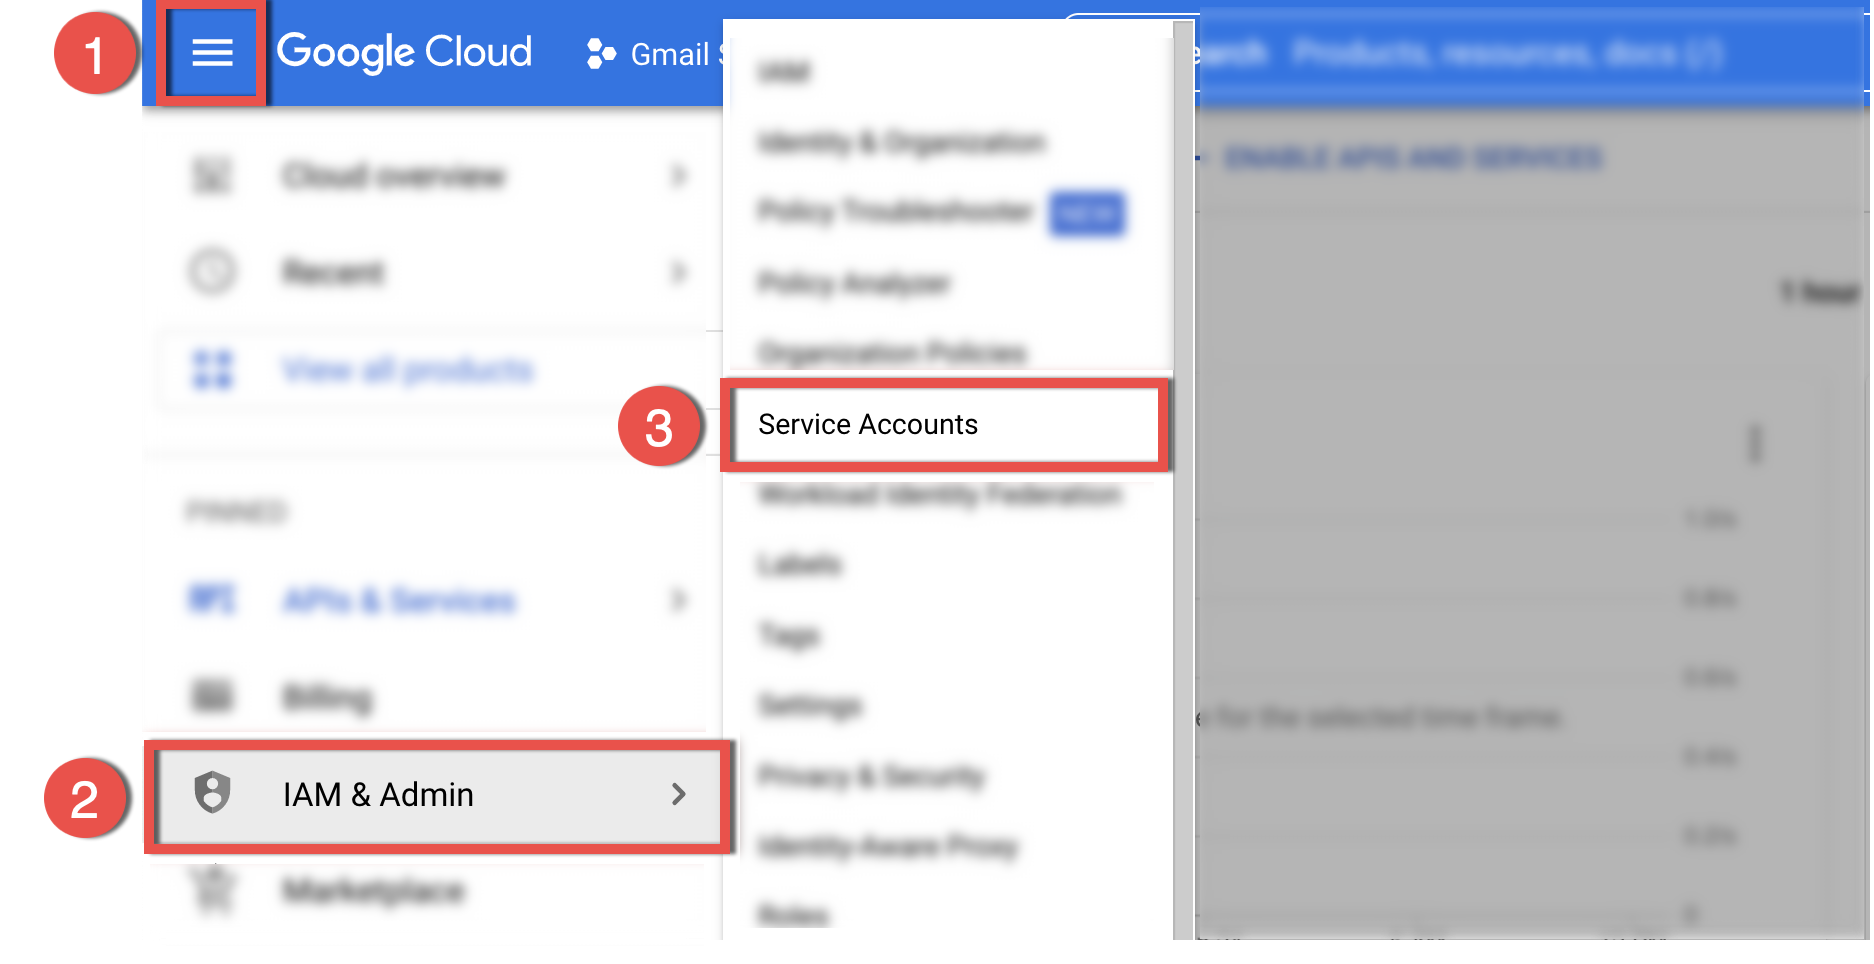
3.1. Click the ☰ (Navigation menu) icon (1) in the upper left corner of the Console and select IAM & admin(2) > Service accounts(3) in the navigation pane
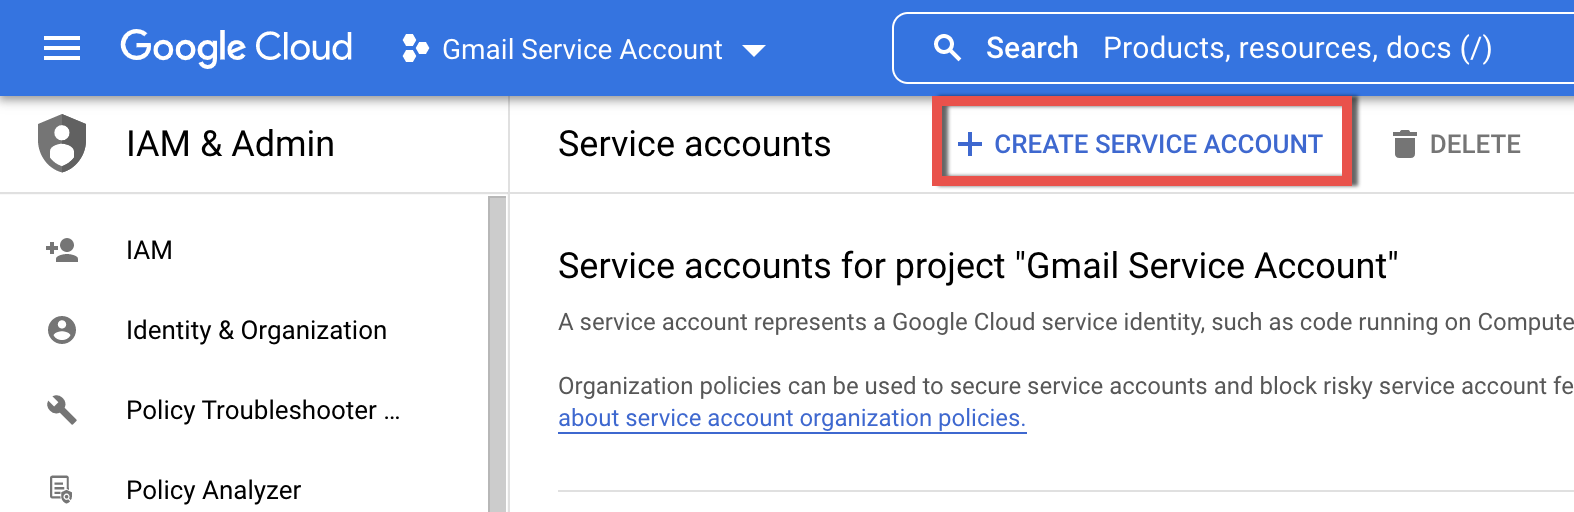
3.2. In the next dialog, click + CREATE SERVICE ACCOUNT
3.3. Enter a name to identify the service account and fill in the Service account description field, then click CREATE

3.4. In the next section, set the value Project > Owner in the field Select a role and click Continue
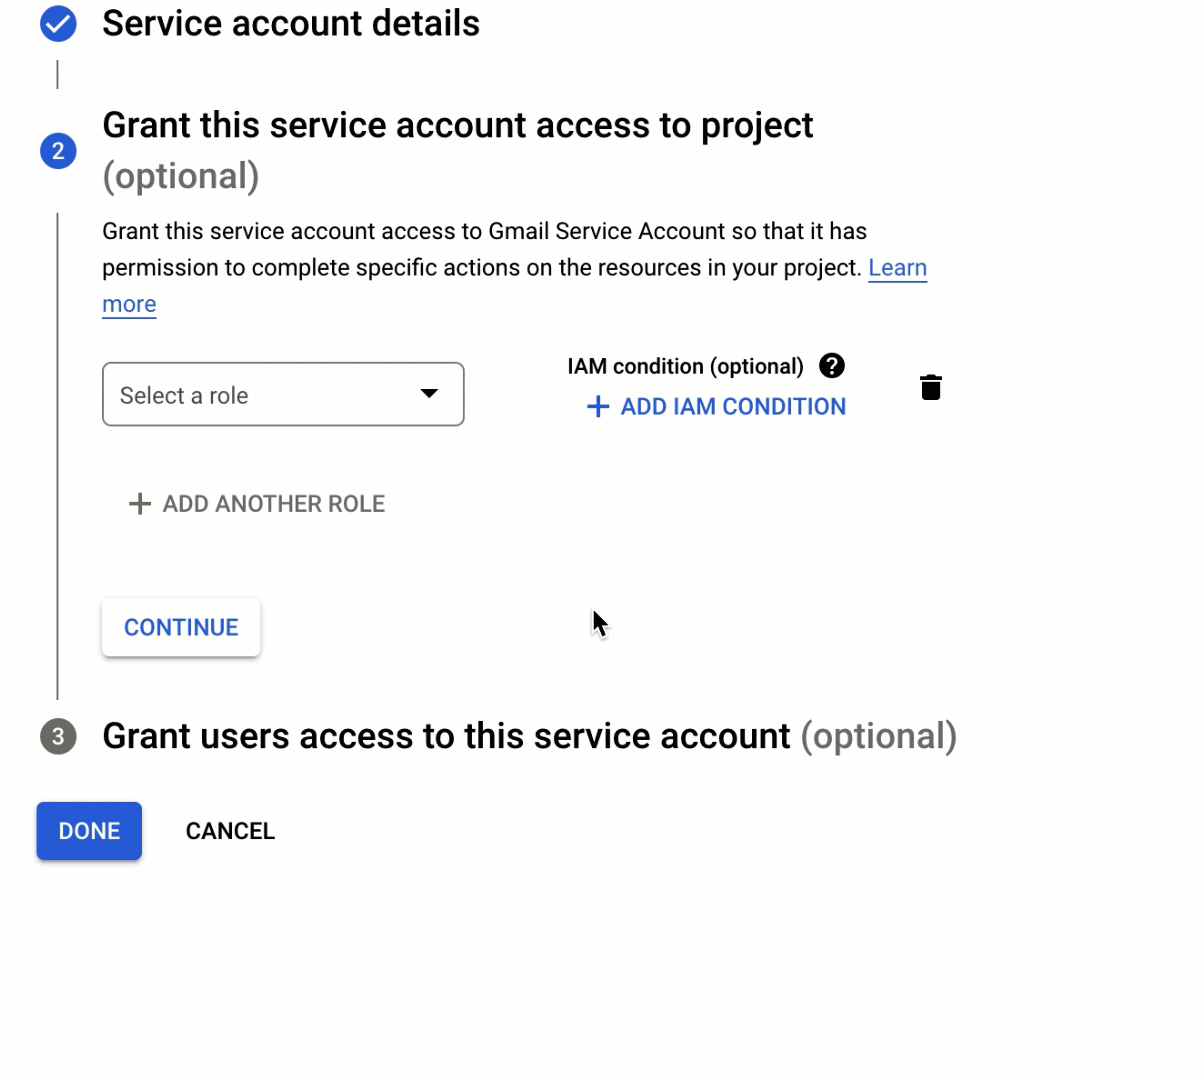
3.5. Then click DONE in the next section
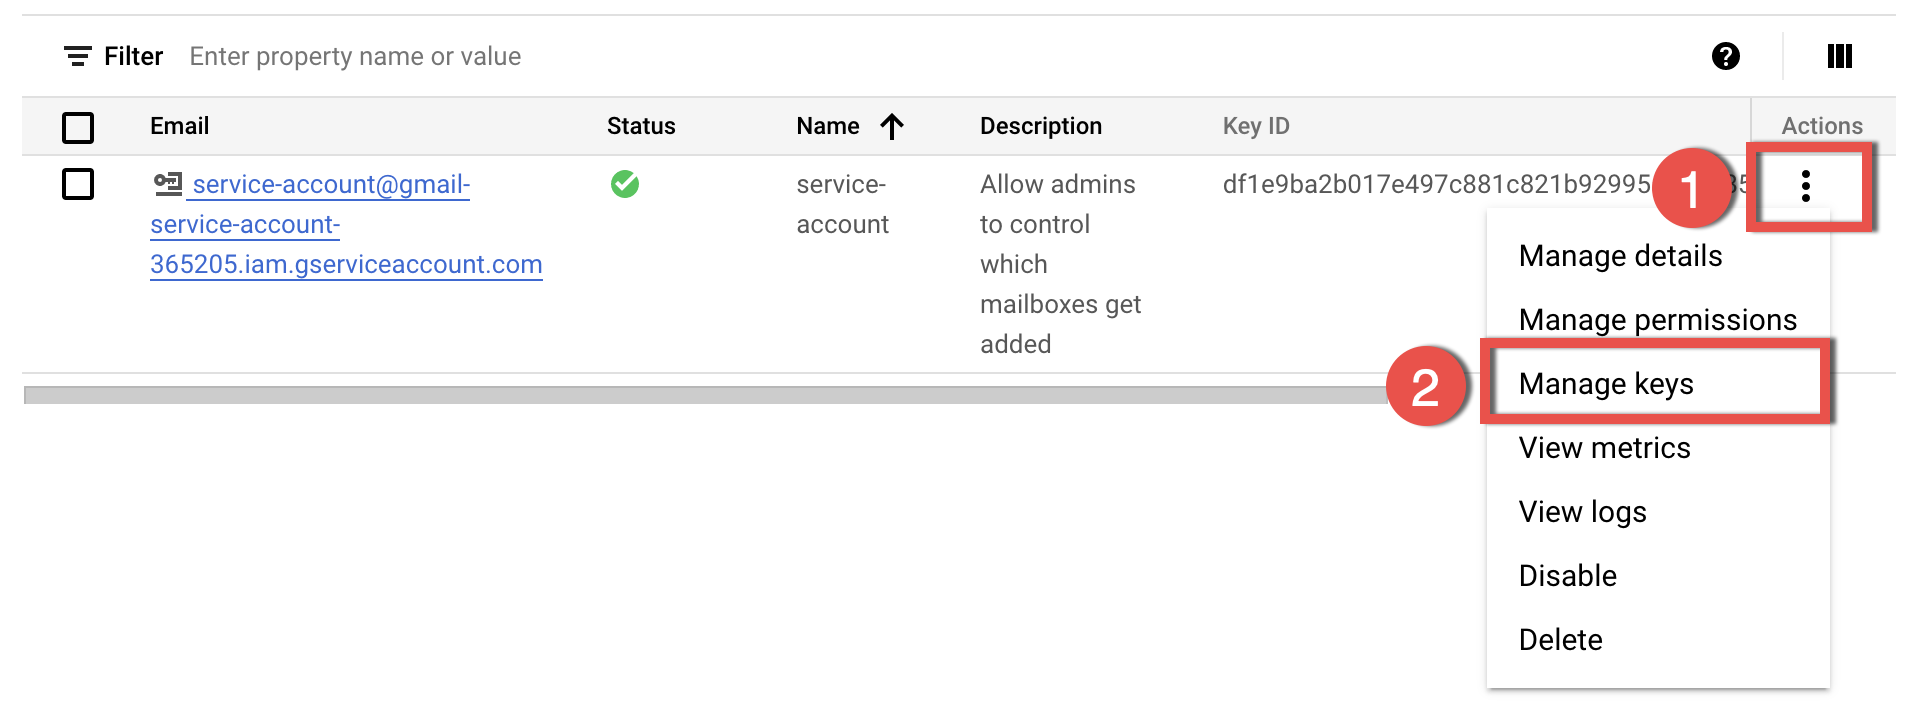
3.6. The next step, click the ⁝ (Menu) icon in the Actions column of the created service account and select Manage keys
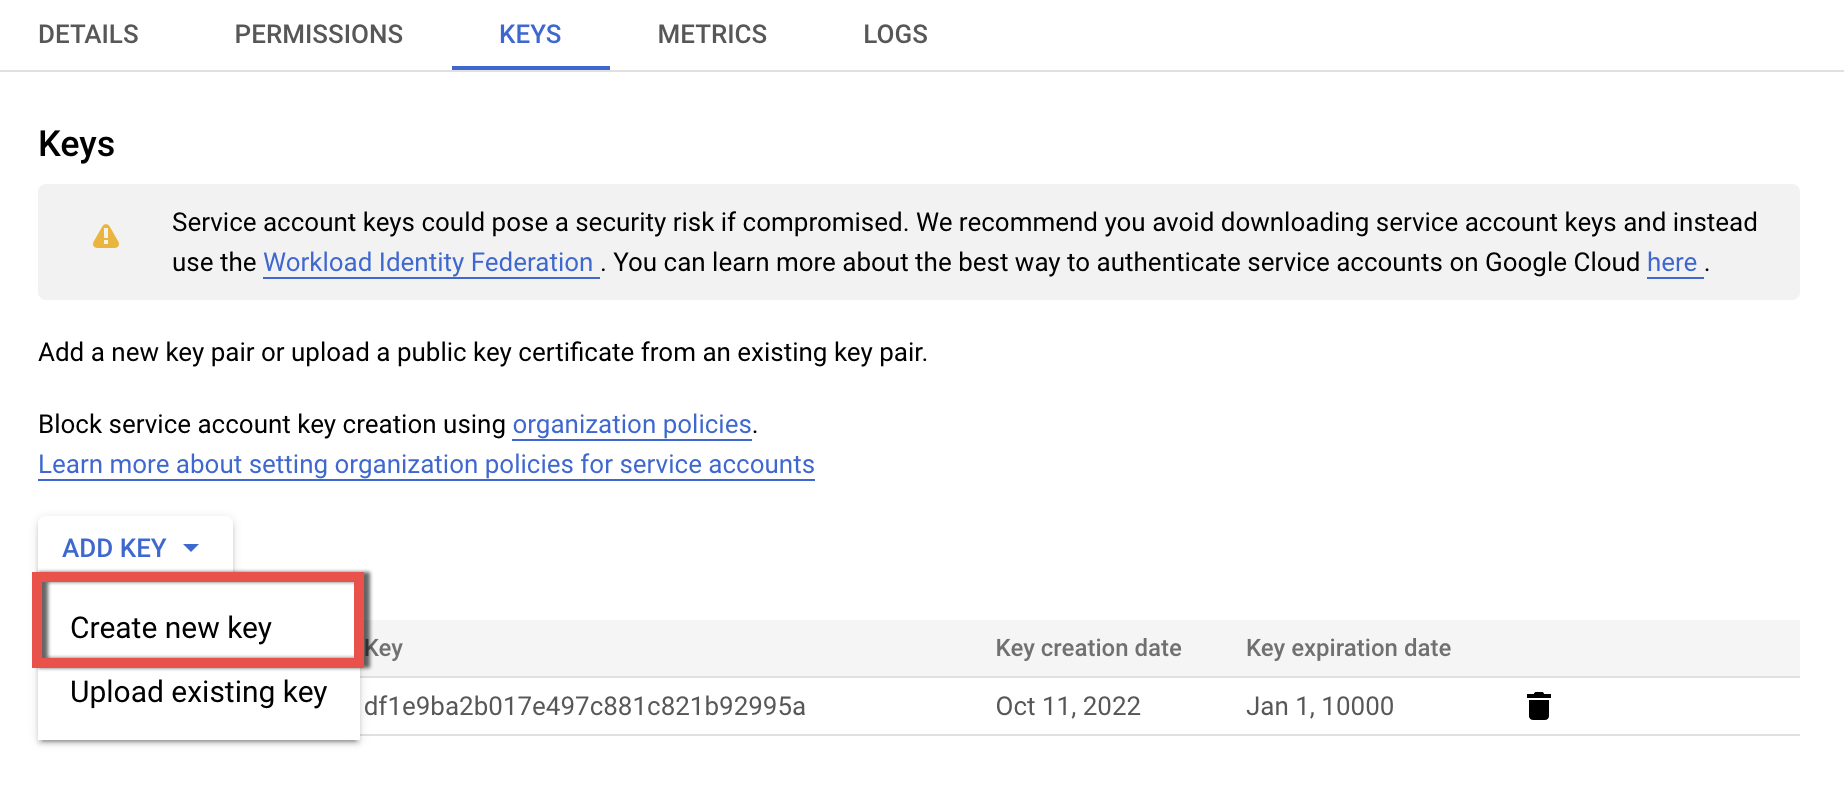
3.7. On the newly opened page, click ADD KEY and select Create new key from the drop-down list
3.8. Select JSON format for the key (the default one) and click CREATE
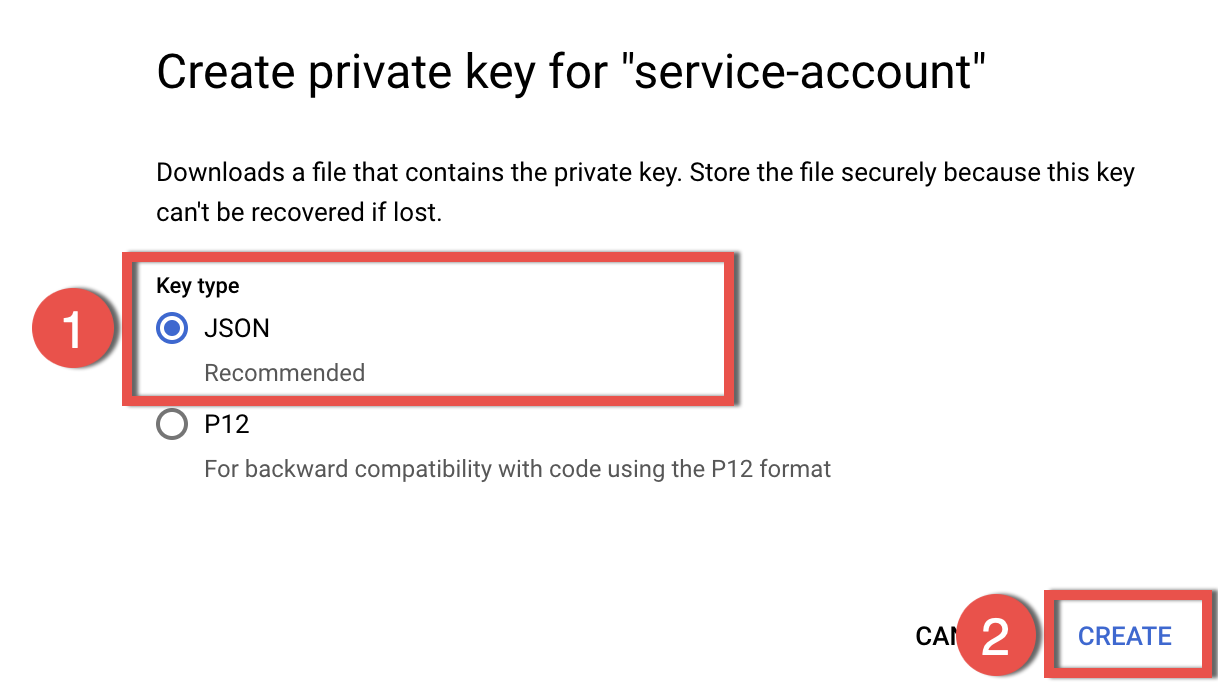
3.9. The JSON file will be automatically downloaded to your hard drive; store the Key file securely, as it unlocks access to your Gmail resources. This file will be used at a later step. Close the download notification and proceed to the next step

Step 4. Configure Google Workspace Marketspace OAuth client
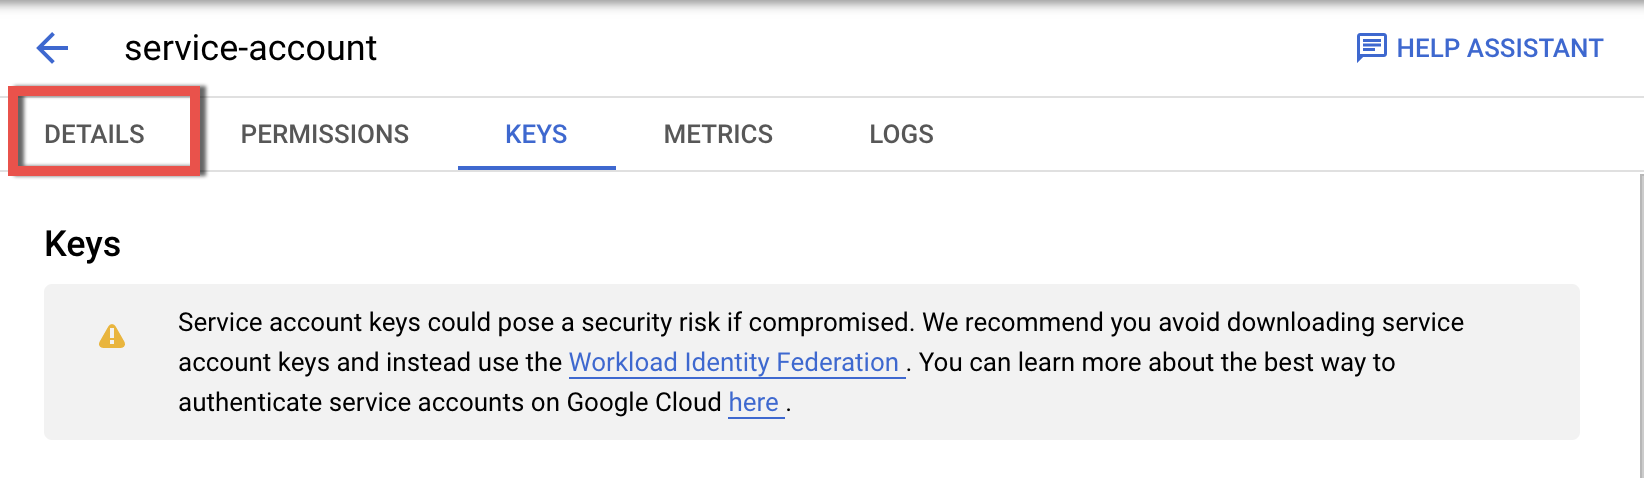
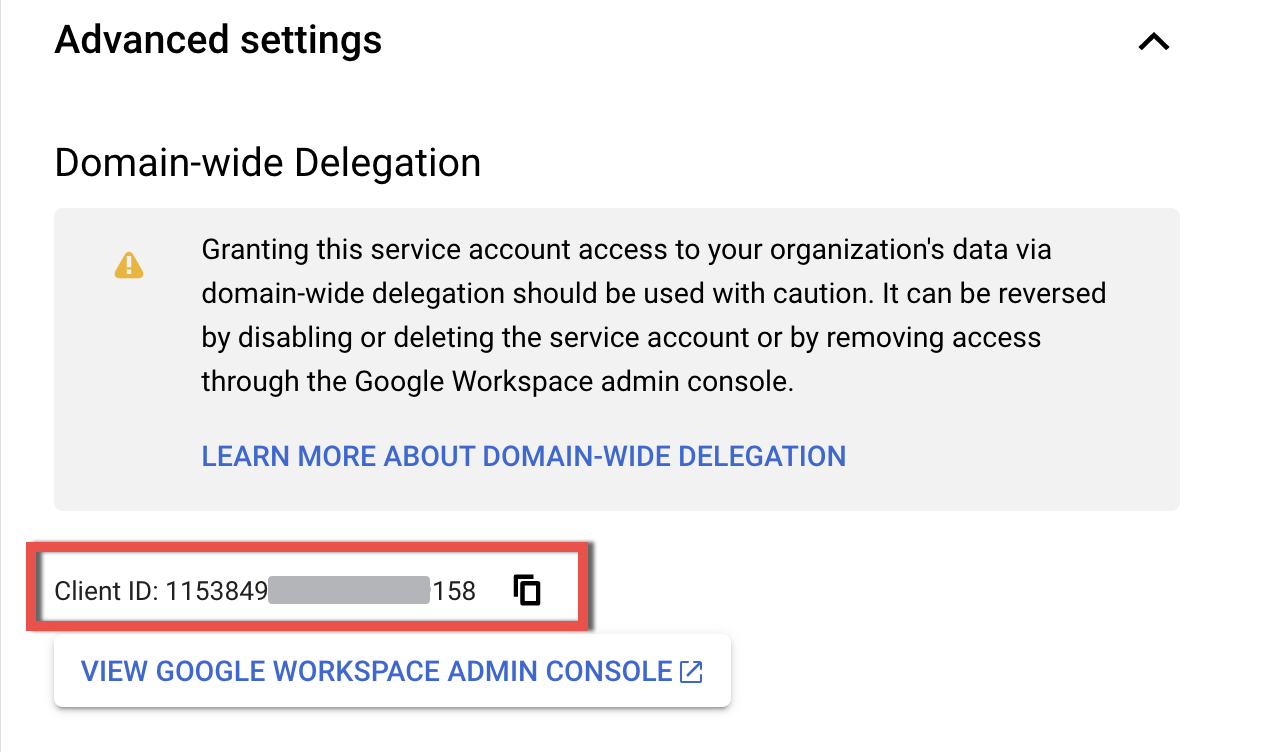
4.1. On the same page, switch to the DETAILS tab
4.2. On the Details tab, scroll down to the Advanced settings subsection. Expand the section. Then copy the Client ID of the created service account to a text file or the clipboard to be used later
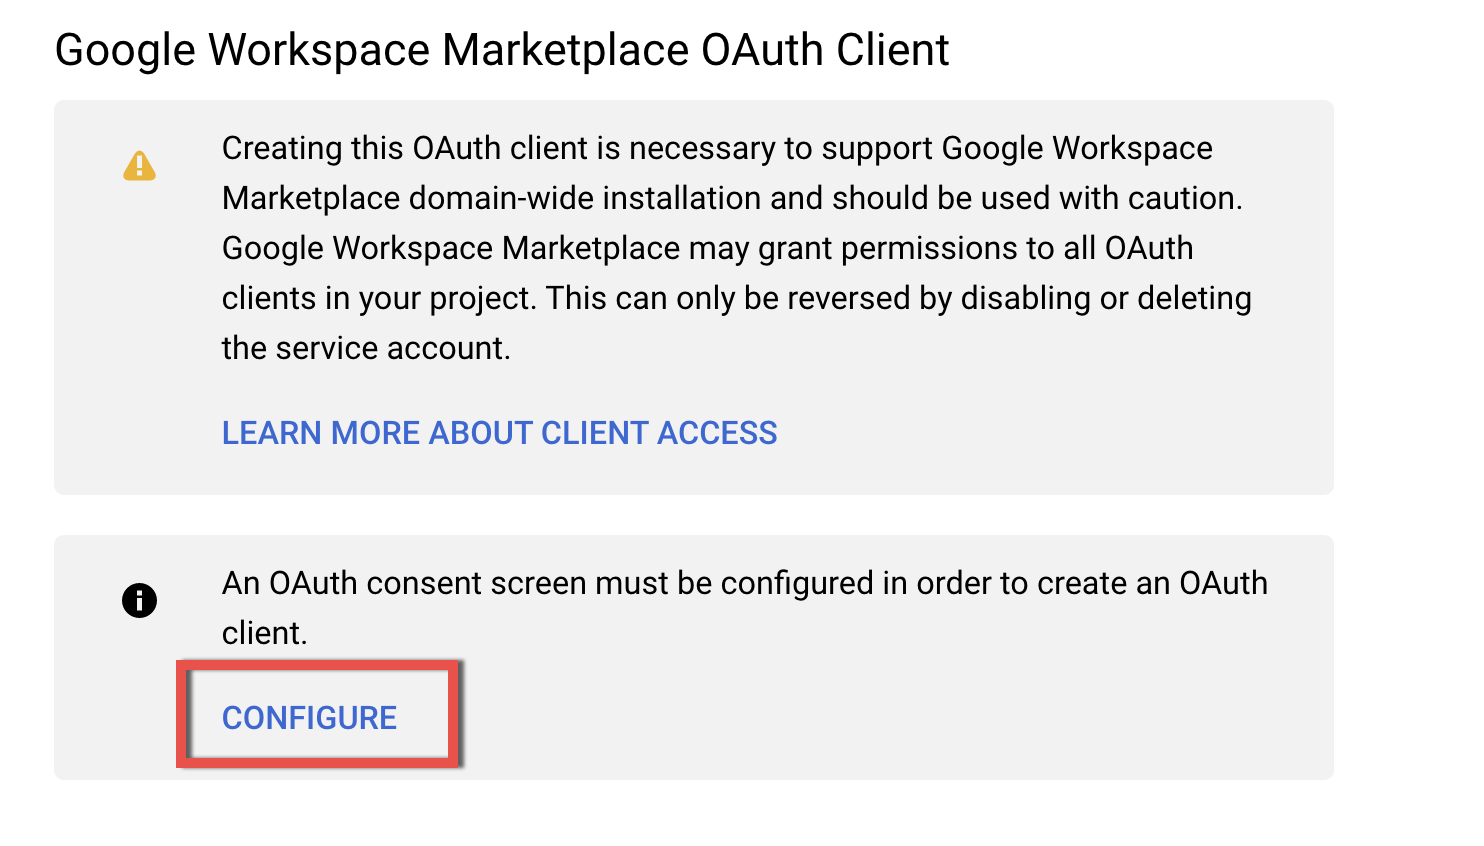
4.3. Scroll down to find the section Google Workspace Marketspace OAuth client and click Configure
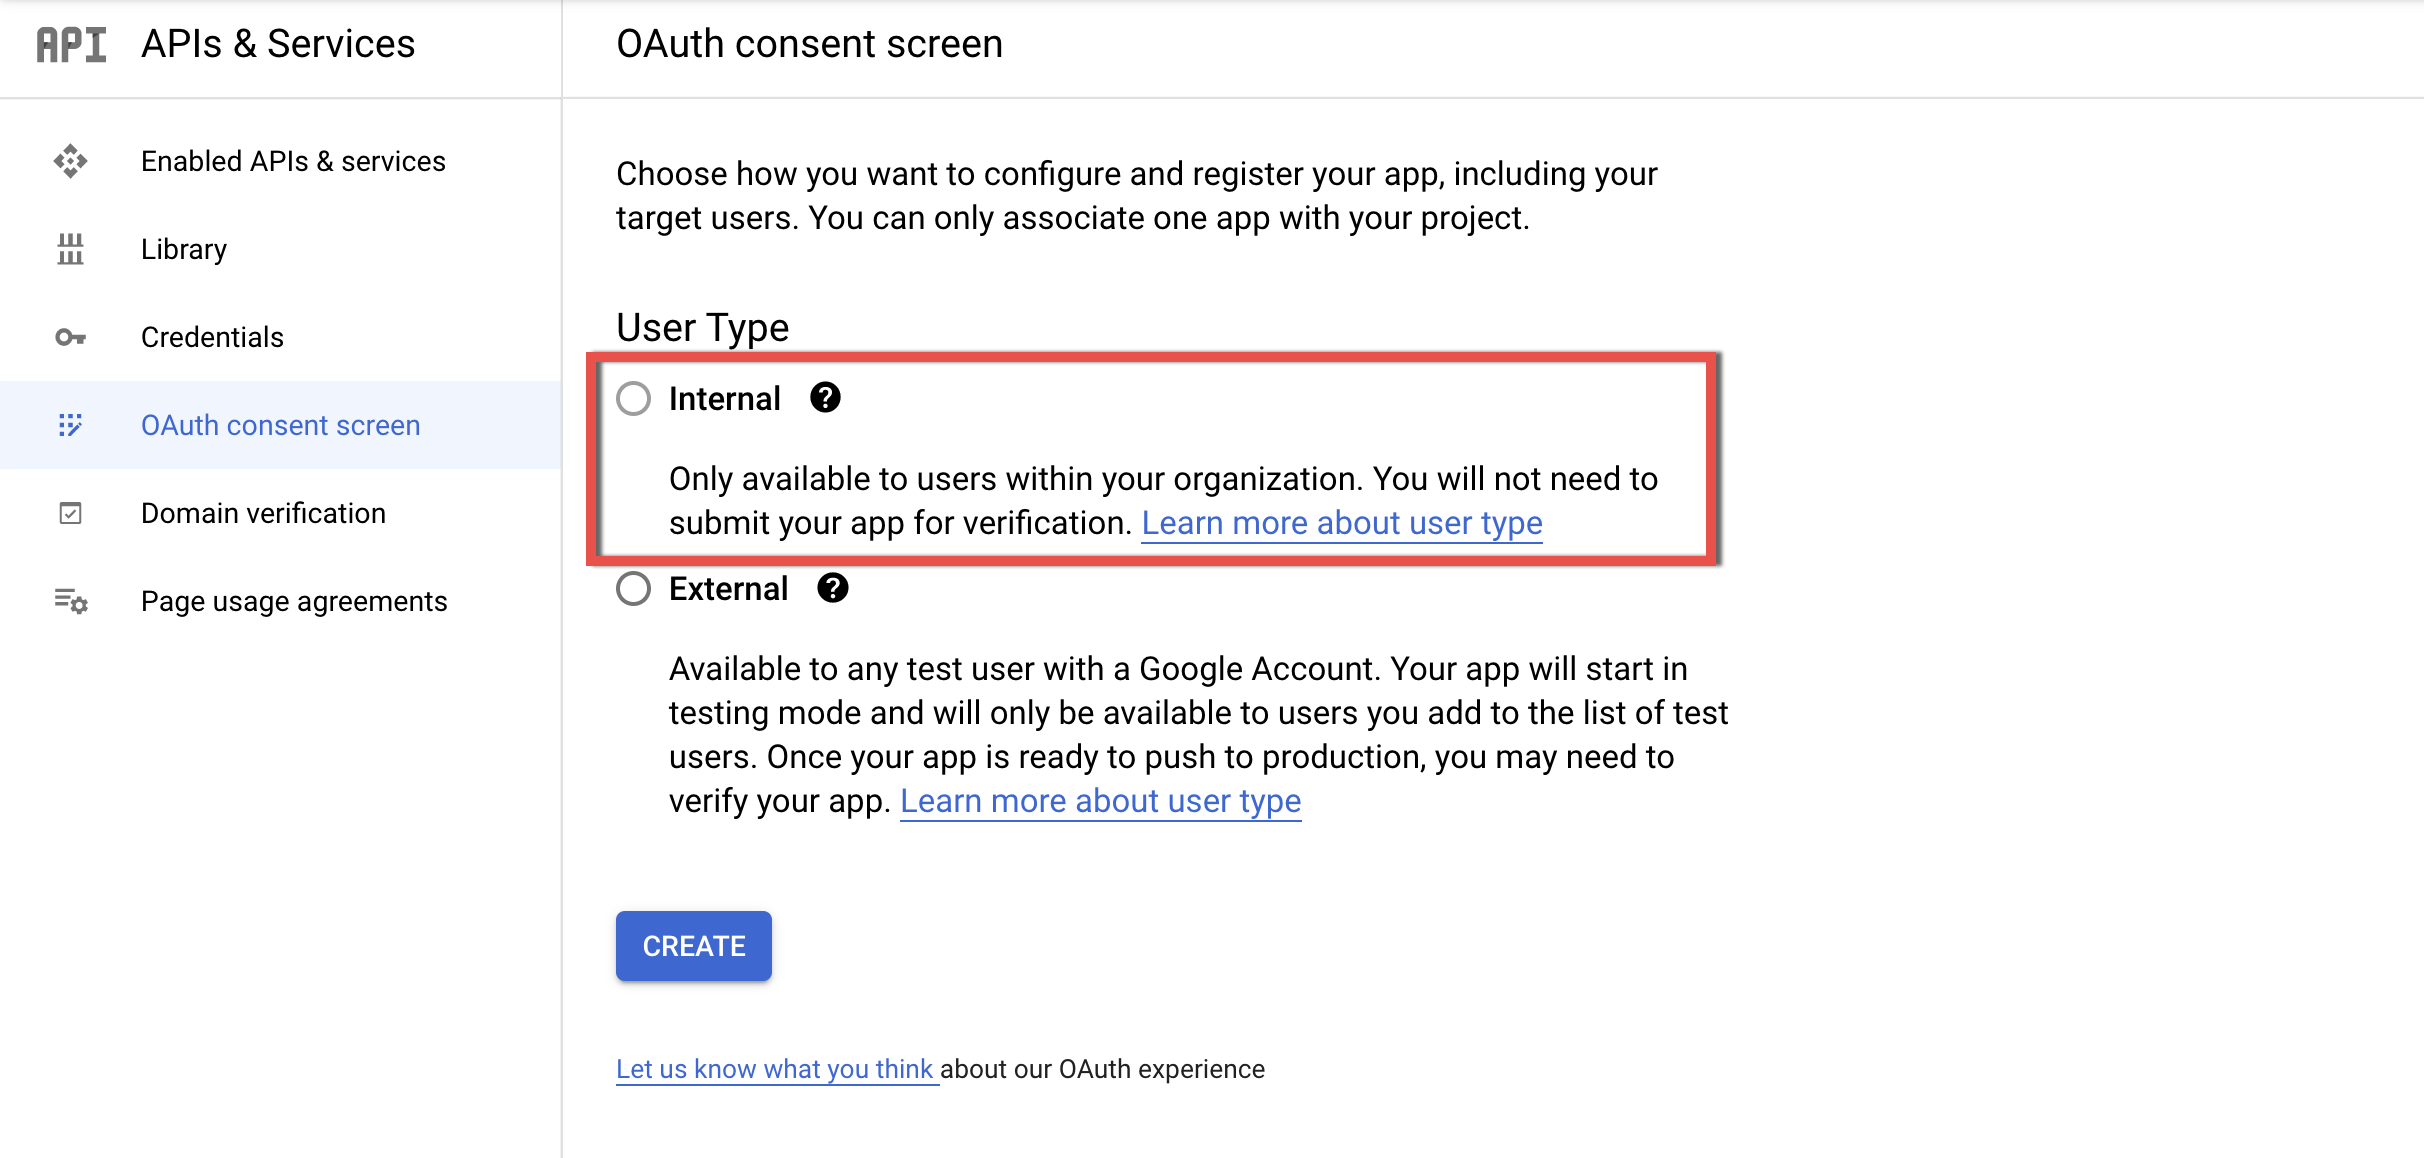
4.4. On the OAuth consent screen page, select the Internal user type and click Create
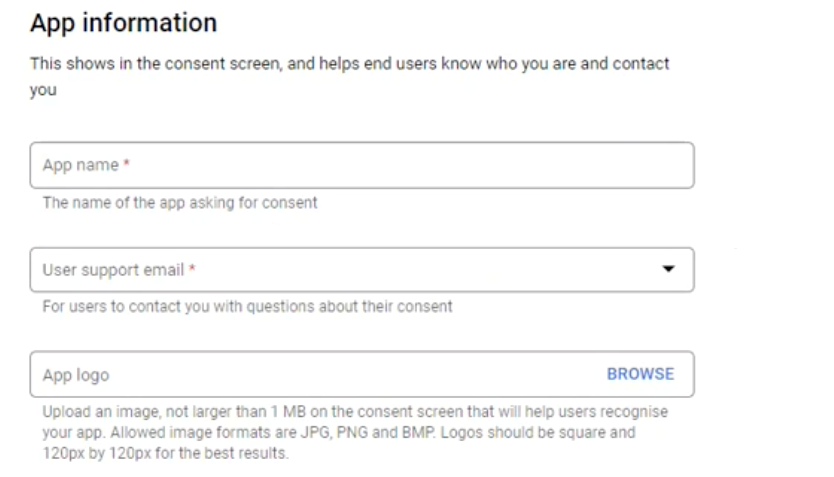
4.5. On the next page, edit the app registration information:
4.5.1. Fill in the app information to be showed on the consent screen:
- Enter Revenue Grid in the App Name field
- Enter your organization's user support email in the User support email field
4.5.2. Under Authorised domains,
- Click ADD DOMAIN
- Enter revenuegrid.com in the Authorized domain 1 field and click Add Domain
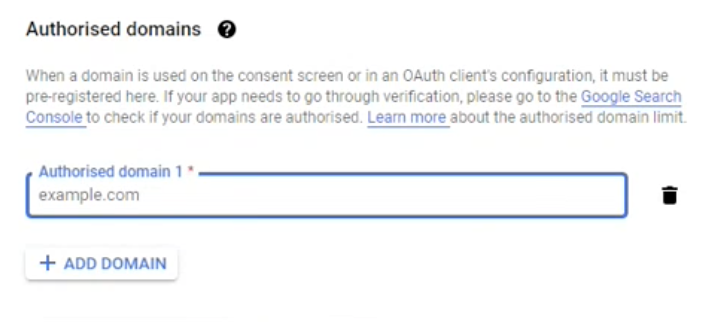
4.5.3. Under Developer contact information, enter the email address of your organization’s admin
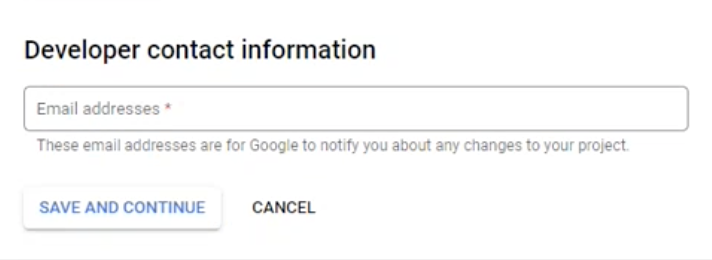
4.5.4. Click Save and Continue
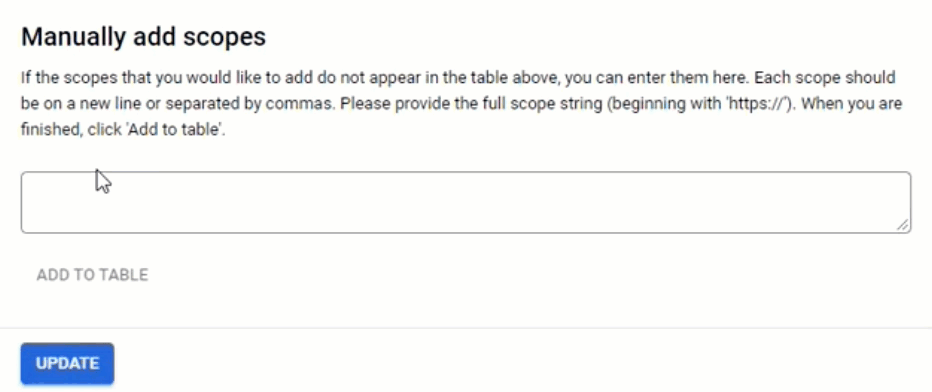
4.6. On the next page, click Add or Remove Scopes
4.7. In the section “Manually add scopes”, add the following coma-separated scopes in the scopes field:
https://www.googleapis.com/auth/gmail.readonly,
https://www.google.com/m8/feeds/,
https://www.googleapis.com/auth/calendar,
https://www.googleapis.com/auth/drive,
https://www.googleapis.com/auth/drive.appdata,
https://www.googleapis.com/auth/gmail.labels,
https://www.googleapis.com/auth/gmail.modify,
https://www.googleapis.com/auth/tasks,
https://www.googleapis.com/auth/userinfo.email,
https://www.googleapis.com/auth/gmail.compose,
https://www.googleapis.com/auth/contacts,
https://www.googleapis.com/auth/userinfo.profile
When done, click Add to Table and UPDATE
4.8. Click Save and Continue to proceed
4.9. On the next page, review the information you have entered and click Back to Dashboard
Step 5. Enable the Service Account in Gmail
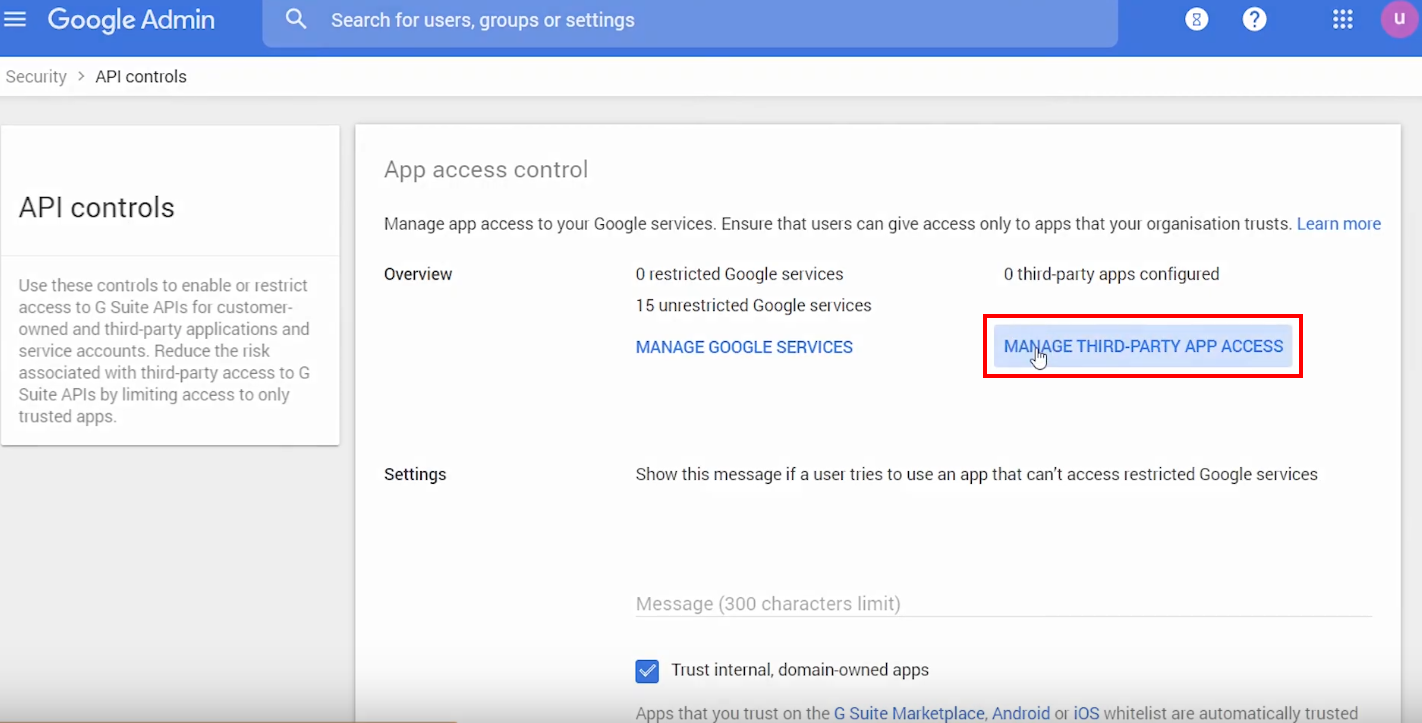
5.1. Log in to the Google Workspace Admin Console
5.2. On the right hand side navigation panel, click Security
5.3. Find Access and data control and click API controls
5.4. On the API Controls page that opens, click MANAGE THIRD-PARTY APP ACCESS
5.5. In the “App access control” window that opens, click Configure new app and select OAuth App Name Or Client ID on the picklist

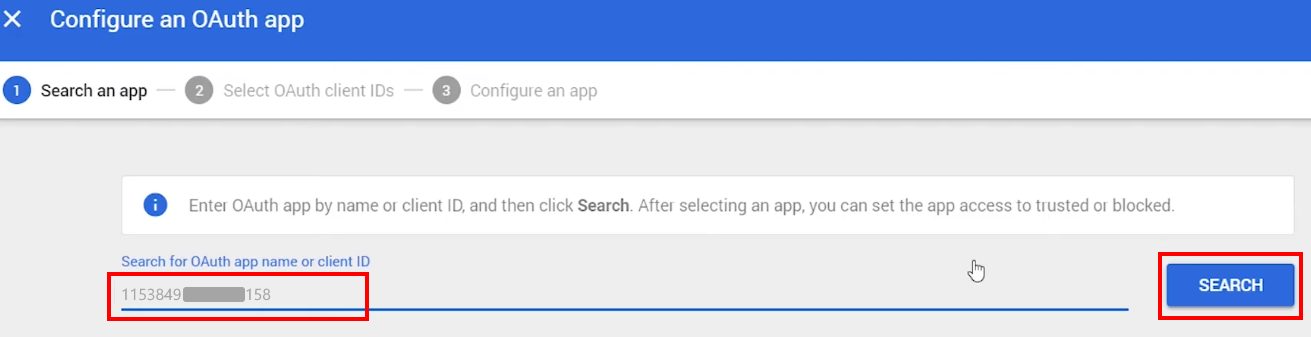
5.6. Now you need to find the OAuth app to connect it. Enter the Client ID, a digits only line that you copied in the Step 4.2 into the Search for app name or client ID field and click SEARCH
Tip
If you didn’t copy the Client ID, it can be retrieved in the following way: click ☰ (Menu) in the upper left corner of the Console window. Then select IAM & admin and click Service accounts. Once there, find the service account and click Edit in the Actions column menu, then copy the contents of the Client ID field from the account parameters page
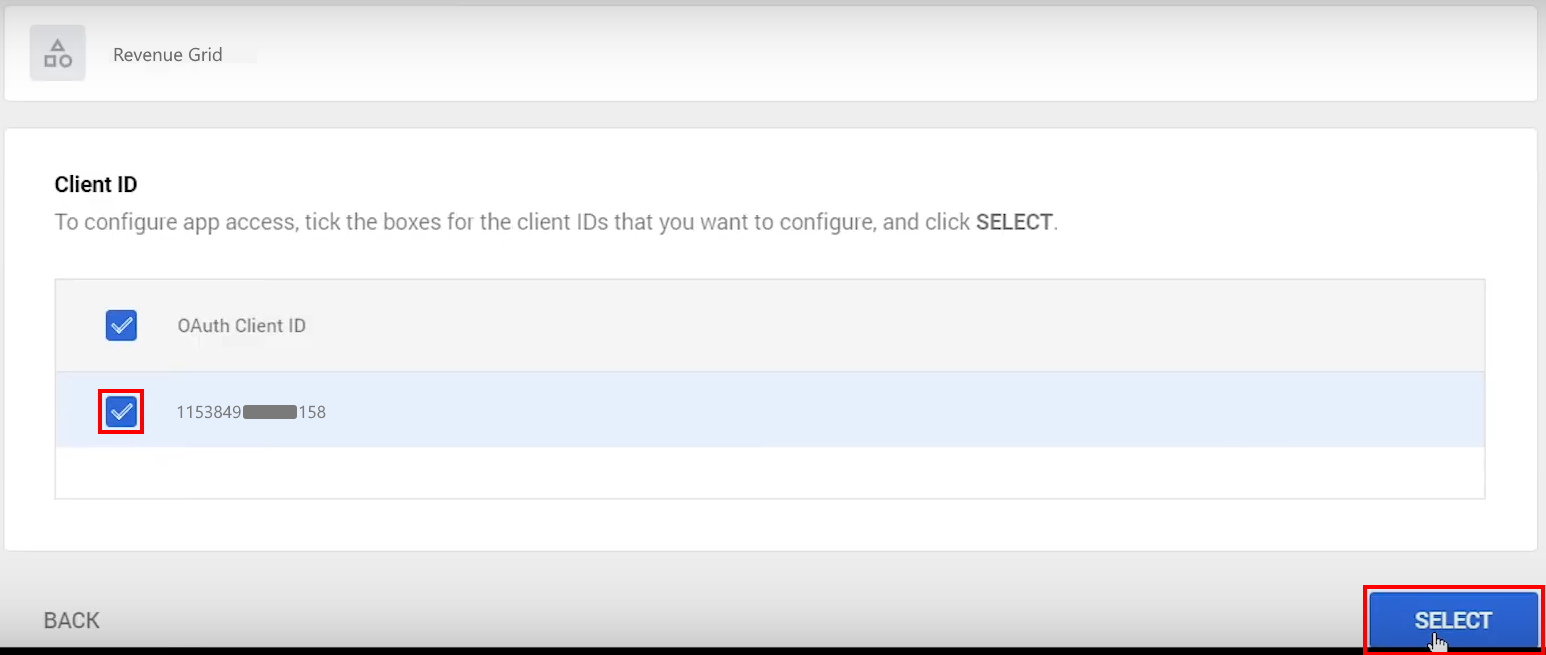
5.7. If everything was configured correctly, you will see Revenue Grid (or another app name that you entered) in the results. Click SELECT on the right hand side

5.8. The next step: select the checkbox next to the Client ID, then click SELECT in the bottom right corner of the dialog
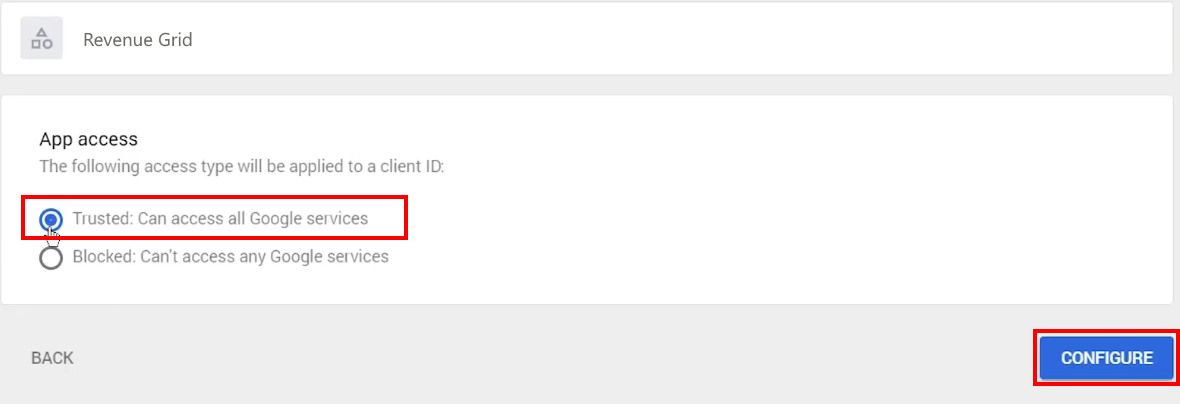
5.9. In the next dialog, set App access to Trusted: Can access all Google services and click CONFIGURE
5.10. Next, you will see the list of configured API apps, including Revenue Grid (or another app name you specified).

Step 6. Set Up Domain Delegation
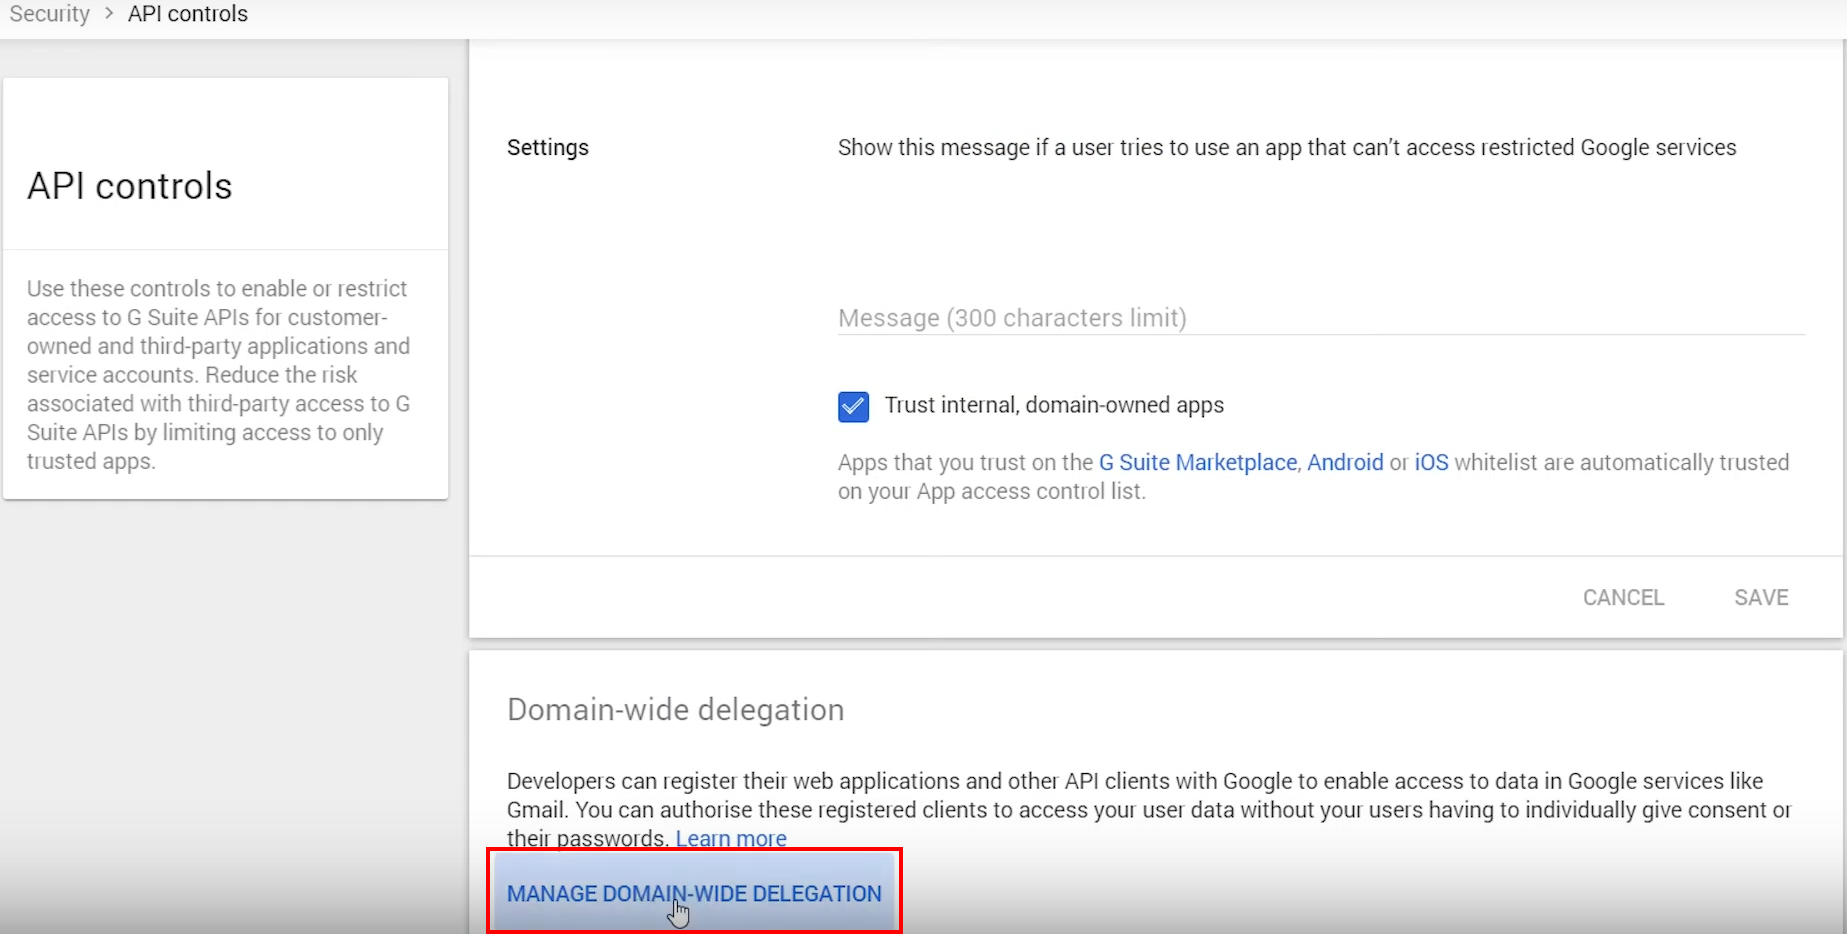
6.1. Go back to Gmail Admin Console’s Security tab (see the step 5.2.), then go to Access and data control > API controls
6.2. Click MANAGE DOMAIN-WIDE DELEGATION at the bottom of the page
6.3. In the pane “Domain-wide delegation”, click Add new API client

6.4. In the dialog “Add a new client ID” that appears:
- enter the Client ID that you copied in the step 4.2
- populate the OAuth scopes field with the following comma-separated values:
https://www.googleapis.com/auth/gmail.readonly,
https://www.google.com/m8/feeds/,
https://www.googleapis.com/auth/calendar,
https://www.googleapis.com/auth/drive,
https://www.googleapis.com/auth/drive.appdata,
https://www.googleapis.com/auth/gmail.labels,
https://www.googleapis.com/auth/gmail.modify,
https://www.googleapis.com/auth/tasks,
https://www.googleapis.com/auth/userinfo.email,
https://www.googleapis.com/auth/gmail.compose,
https://www.googleapis.com/auth/contacts,
https://www.googleapis.com/auth/userinfo.profile
- Click AUTHORISE
6.3. Hold up for 5 minutes for the configuration to be applied
Now you are all set up to use the Gmail Service Account for end users authorization.
Step 7. Use the configured service account to authorize users in RGES Admin panel
After you create a Gmail Service Account you must authorize the users in RG Email Sidebar Admin panel.
To do that:
7.1. Login to the Admin panel with admin credentials provided by RGES Support team
7.2. Click on the ORGANIZATIONS tab and select your Org
7.3. Open the E-MAIL CONFIGURATION subtab
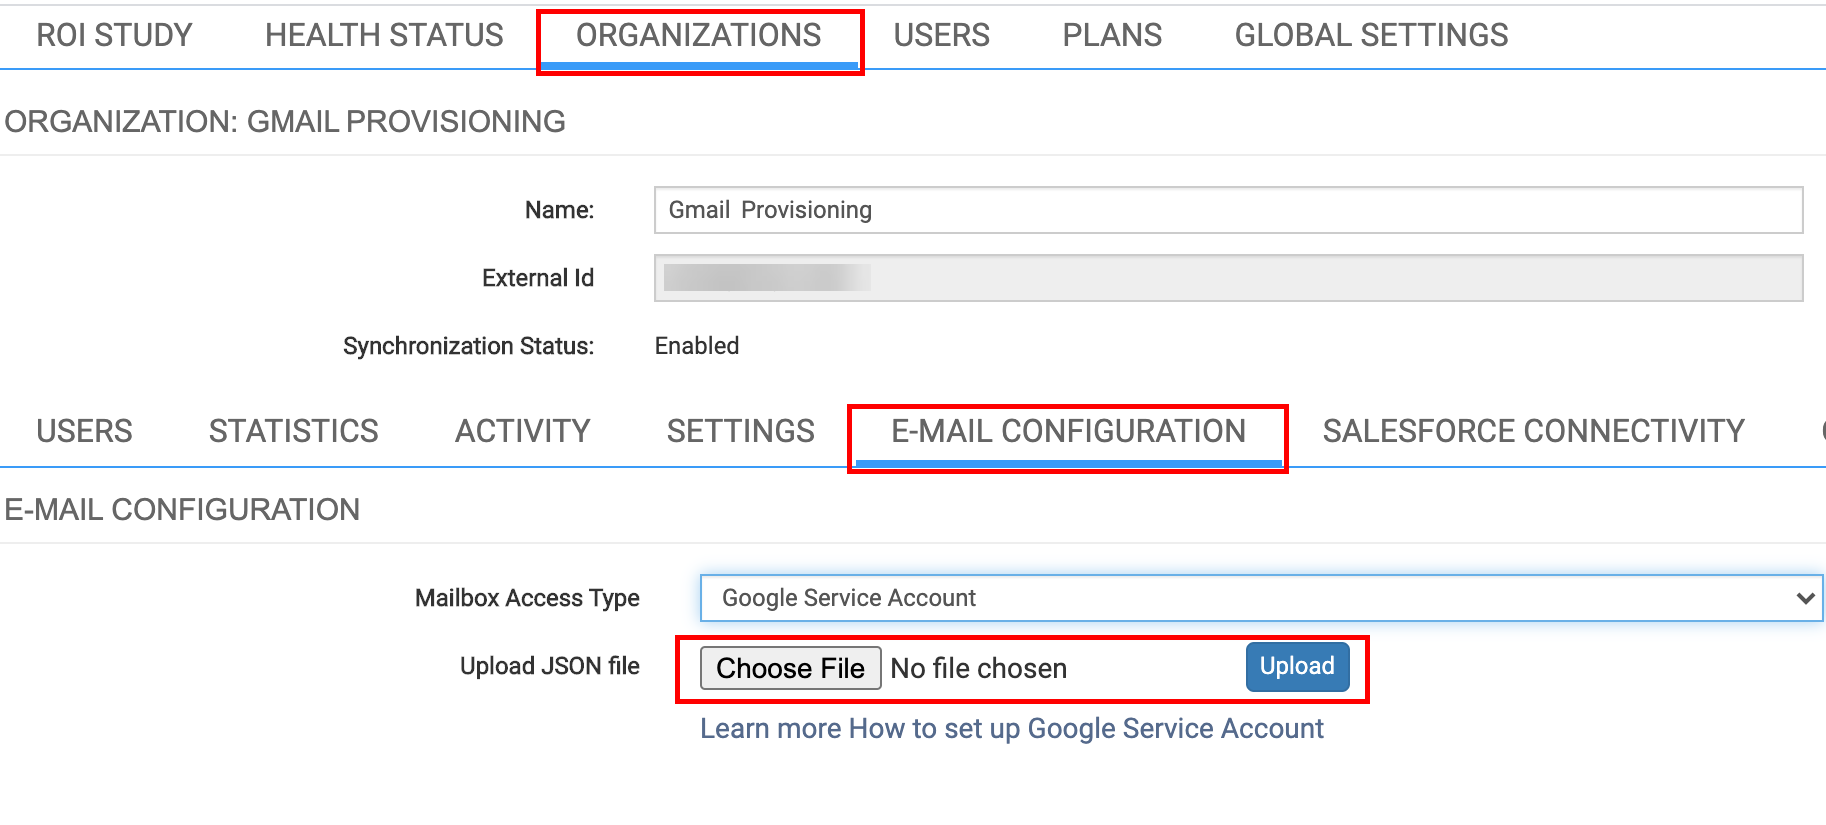
7.4. Click Choose File next to Upload JSON file, select the Private key .json file you generated at point ( 3.8 ) of the above instruction, then click Upload
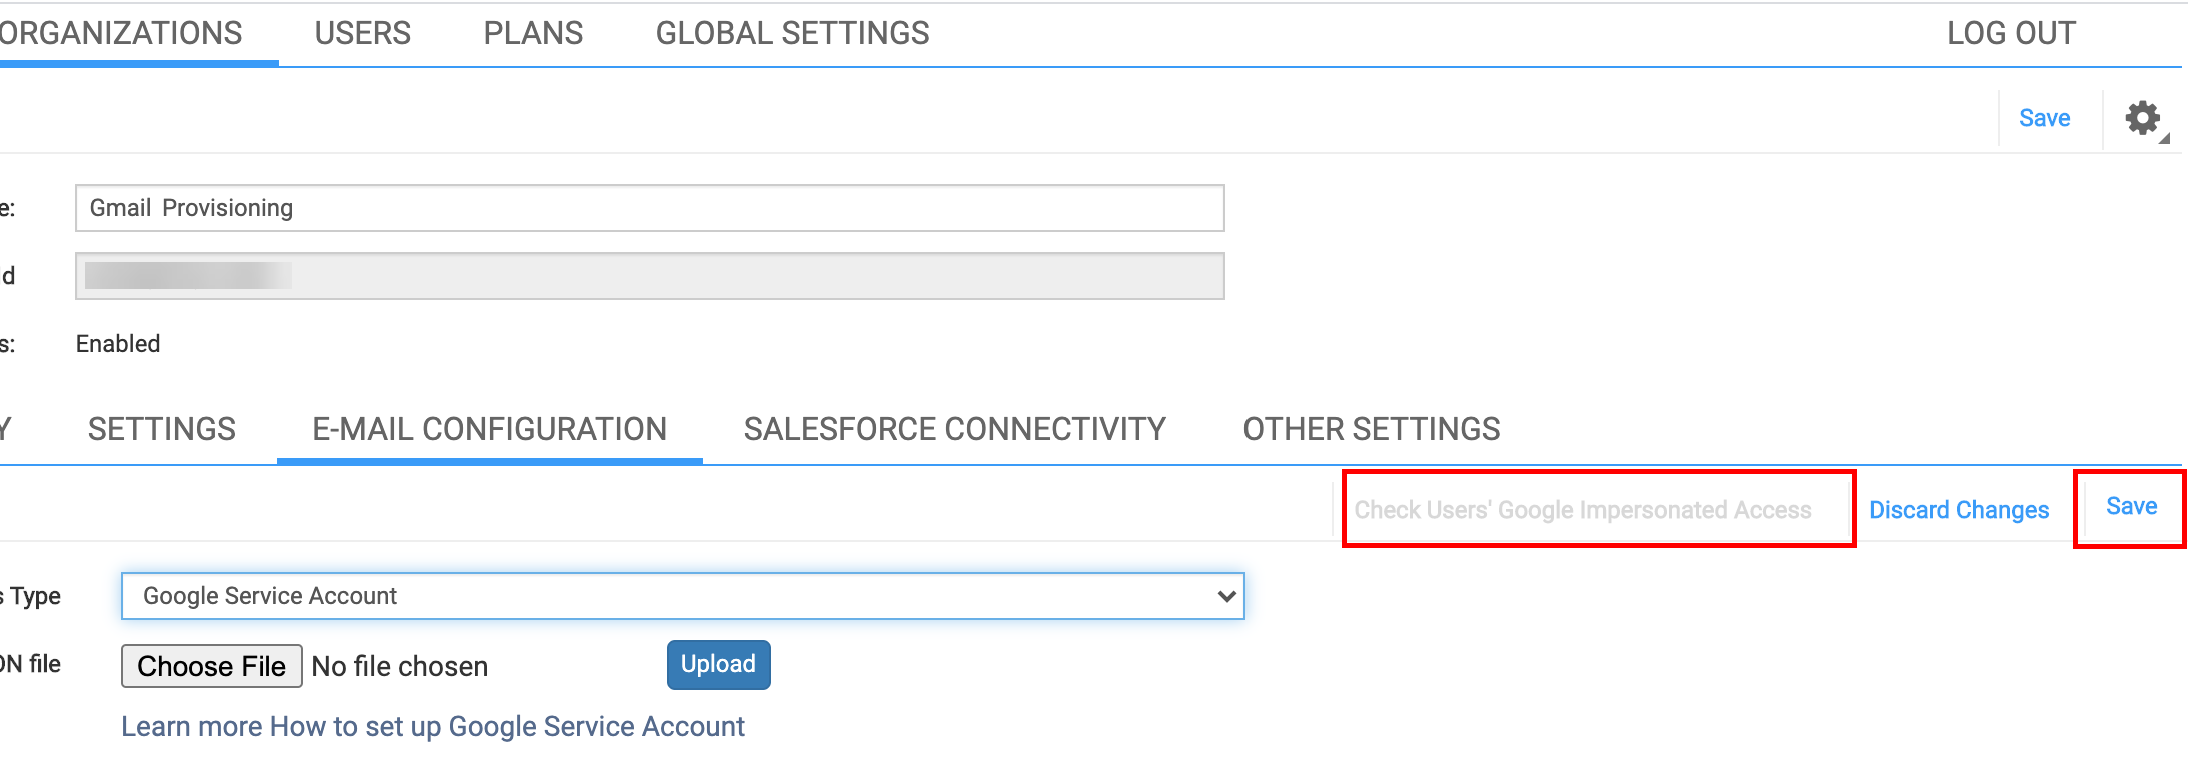
7.5. Click Save in the upper right corner of the subtab and then click Check Users’ Google Impersonated Access to make sure that the procedure was successful


We would love to hear from you!