

Mastering Salesforce Email Automation: A Comprehensive Step-by-Step Guide
Picture this: your marketing team just wrapped up a campaign. Leads came in, demos were booked, and the pipeline looked healthy. But three weeks later, half those leads have gone cold. Nobody sent a follow-up. The rep assumed marketing was nurturing them. Marketing assumed the rep had it covered. And the lead? They signed with a competitor who stayed in touch.
This is one of the most common and costly breakdowns in B2B sales. Not because the product wasn’t good enough, or the pitch was off. Simply because the right email didn’t go out at the right time. Manual follow-up doesn’t scale, and relying on individual reps to remember every touchpoint is a losing strategy.
Salesforce gives you the infrastructure to fix this. But knowing that email automation exists and actually knowing how to set it up properly are two very different things. The tools are powerful, but the setup has real complexity, and getting it wrong means emails that don’t send, workflows that fire incorrectly, or messages so generic they get ignored or flagged as spam.
This guide cuts through that complexity. Whether you’re a Salesforce admin building your first automation or a marketing professional trying to get more out of your existing setup, you’ll find clear, actionable steps for every stage of the process.
Why Email Automation in Salesforce Is Worth Getting Right
Before diving into the how, it’s worth being clear on what’s actually at stake. Automated emails, when done well, aren’t just a convenience. They’re a revenue driver.
Research consistently shows that nurtured leads make 47% larger purchases than non-nurtured ones. Triggered emails, those sent based on specific actions or conditions, generate 4x higher open rates than standard batch-and-blast campaigns. And companies that automate their lead nurturing see a 10% or greater increase in revenue within 6 to 9 months.
The gap between those results and what most teams actually experience comes down to execution. Salesforce has the data, the segmentation capability, and the automation engine. The question is whether your setup is actually using it. Here’s what well-configured email automation in Salesforce should be doing for your team:
- Sending timely, relevant follow-ups without rep intervention
- Triggering onboarding sequences the moment a deal closes
- Re-engaging dormant leads based on inactivity thresholds
- Delivering personalized content based on industry, role, or behavior
- Logging every sent email back to the right Salesforce record automatically
None of that happens by accident. It requires deliberate configuration. Let’s walk through exactly how to build it.
Understanding Salesforce’s Email Automation Tools
Salesforce doesn’t have a single “email automation” button. It has several tools, each designed for different use cases, and choosing the wrong one for your scenario is one of the most common setup mistakes. Here’s how they break down.
Flow (Formerly Process Builder and Workflow Rules)
Salesforce Flow is now the primary automation engine for most email triggers inside Salesforce CRM. It replaced the older Workflow Rules and Process Builder tools, which Salesforce has retired for new automations. Flow lets you build record-triggered, scheduled, or screen-based automations that can send emails, update fields, create tasks, and more.
For most admins, Flow-based automation is where the majority of transactional and CRM-triggered emails live. Think: a lead status changes to “Qualified” and an email fires to the prospect. Or a contract is signed and an onboarding sequence kicks off.
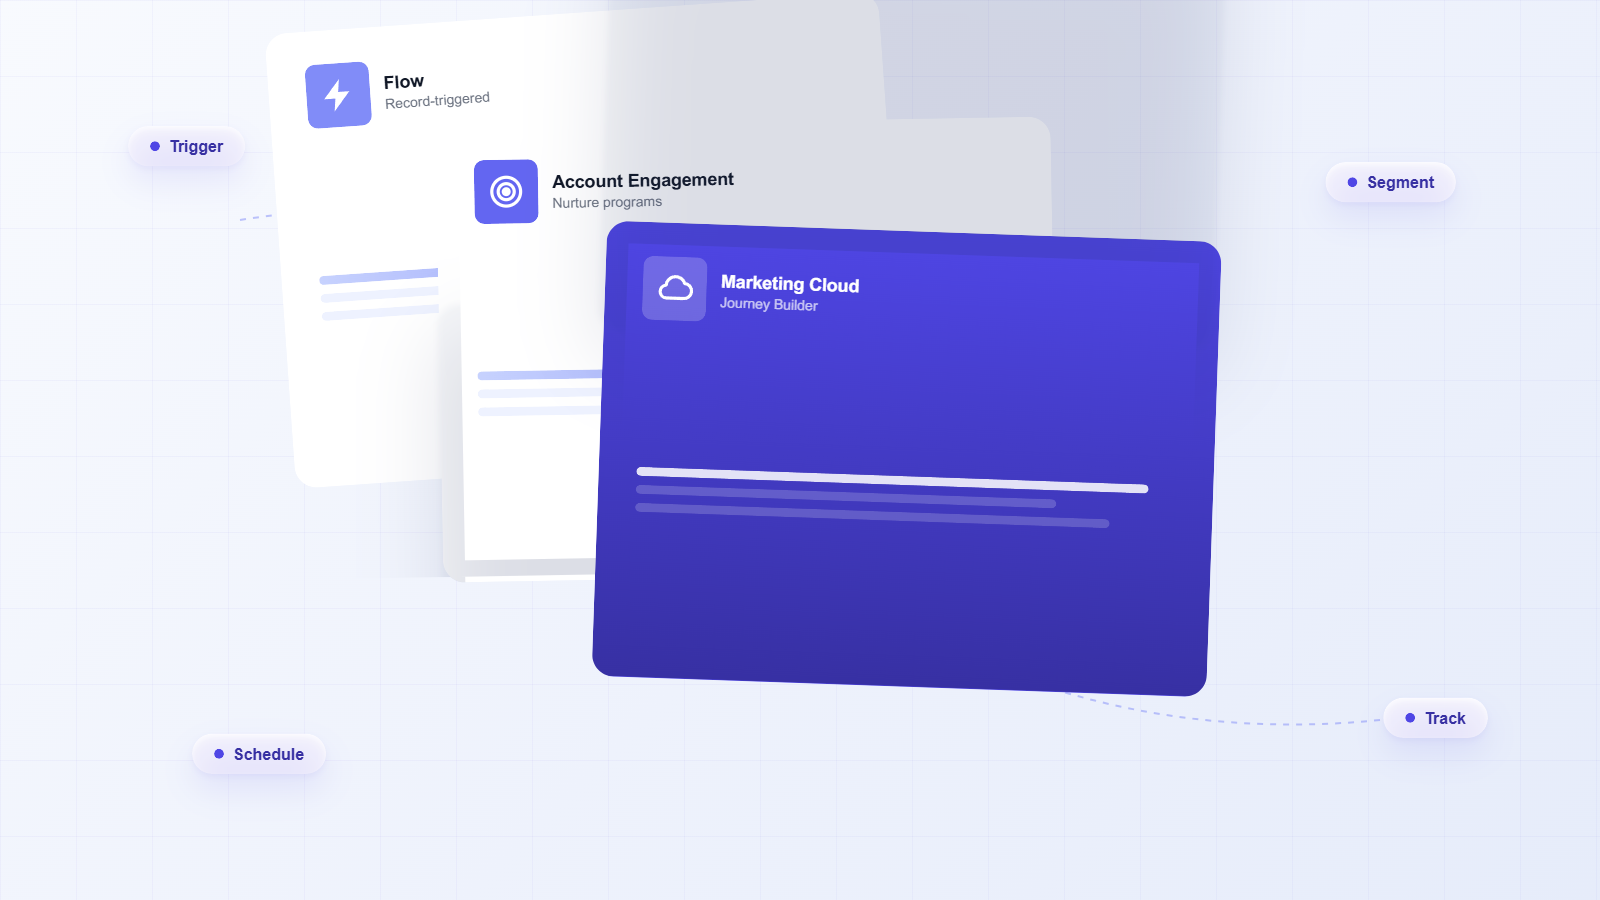
Marketing Cloud Account Engagement (Pardot)
For B2B marketing teams running longer nurture sequences, Account Engagement (formerly Pardot) is Salesforce’s dedicated marketing automation platform. It handles drip campaigns, lead scoring, dynamic content, and multi-touch nurture programs. It connects directly to your Salesforce CRM data, which means your segmentation can be as precise as your CRM records allow.
Marketing Cloud
Salesforce Marketing Cloud is the enterprise-grade option for high-volume, multi-channel campaigns. It includes Journey Builder for visual automation design, Email Studio for template creation, and Audience Builder for advanced segmentation. It’s the right tool when you’re managing complex customer journeys across email, SMS, social, and advertising simultaneously.
Email Alerts Within Flow
For simpler, record-based notifications, Salesforce’s Email Alert action within Flow lets you send a predefined email template when specific conditions are met. It’s lightweight, fast to configure, and works well for internal notifications or straightforward customer-facing triggers.
Choosing the right tool depends on your use case, your Salesforce edition, and what licenses your organization has. The steps below cover the most common scenarios across these tools.
How to Set Up Automated Emails in Salesforce Using Flow
This is the most practical starting point for most Salesforce admins. Flow handles the majority of CRM-triggered email automation without requiring a Marketing Cloud license. Here’s how to build a record-triggered email automation from scratch.
Step 1: Define Your Trigger Condition
Navigate to Setup → Process Automation → Flows and click New Flow. Select Record-Triggered Flow as your flow type. Choose the object you want to trigger from, such as Lead, Contact, Opportunity, or Case.
Set your trigger to fire when a record is created, updated, or both. Then define the entry conditions. For example: trigger when a Lead’s Status field changes to “Contacted,” or when an Opportunity’s Stage moves to “Closed Won.” Be specific here. Overly broad conditions cause flows to fire more than intended, which creates noise and deliverability problems.
Step 2: Build Your Email Alert
Before your flow can send an email, you need an Email Alert configured. Navigate to Setup → Process Automation → Email Alerts and click New Email Alert.
- Give it a clear, descriptive name
- Select the object it applies to
- Choose or create the email template it will use
- Define the recipients: the record owner, a specific user, a role, or a related field like the contact’s email address
- Set the From Email Address, either the current user, a specific org-wide address, or a default sender
Save the Email Alert. You’ll reference it inside your flow in the next step.
Step 3: Add the Send Email Action to Your Flow
Back in your flow, add a new element after your trigger. Select Action and search for Send Email Alert. Select the Email Alert you just created. Map any dynamic fields if your template uses merge fields that need to pull from the triggering record.
If you want more control over the email content directly within the flow, use the Send Email core action instead. This lets you define the subject, body, and recipients inline without a separate Email Alert record. It’s more flexible but requires more configuration.
Step 4: Add a Scheduled Path (Optional but Recommended)
Not every email should fire the instant a record changes. For follow-up sequences, you’ll want to add a Scheduled Path to your flow. This lets you delay the email by hours, days, or weeks after the trigger condition is met.
For example: a lead fills out a form (trigger), then receives a welcome email immediately (path 1), a follow-up with a case study 3 days later (path 2), and a check-in from the rep 7 days after that (path 3). Scheduled paths make this possible within a single flow.
Step 5: Activate and Test
Before activating, use Flow’s built-in Debug feature to simulate the trigger with a real or test record. Verify that:
- The flow fires under the correct conditions
- The email sends to the right recipient
- Merge fields populate correctly
- The email logs back to the Salesforce record
- Scheduled paths fire at the right intervals
Once testing passes, click Activate. Monitor the flow’s run history in the first 48 hours to catch any unexpected behavior before it affects a large volume of records.
How to Send Automated Emails in Salesforce Using Account Engagement (Pardot)
If your team runs longer nurture programs or needs more sophisticated segmentation, Account Engagement is the right layer to add. Here’s how to set up an automated email sequence.
Step 1: Build Your Email Template
In Account Engagement, navigate to Content → Emails → Templates and click + Add Email Template. Choose between a drag-and-drop builder or HTML editor. Build your template with dynamic merge fields like {{Recipient.FirstName}} and {{Recipient.Company}} to personalize at scale.
Create separate templates for each step in your sequence. A three-email nurture program needs three distinct templates, each with a clear purpose and a single call to action.
Step 2: Create a List or Dynamic List
Navigate to Prospects → Lists and click + Add List. For static campaigns, build a standard list and import or manually add prospects. For ongoing automation, create a Dynamic List with rules that automatically add or remove prospects based on CRM field values, such as industry, lead score, or lifecycle stage.
Dynamic lists are the more powerful option because they self-maintain. As your Salesforce data updates, the list membership updates with it.
Step 3: Build an Engagement Studio Program
Navigate to Automations → Engagement Studio and click + Add Engagement Program. Select your recipient list and define your program’s start conditions.
Inside the program builder, add steps using the visual canvas:
- Send Email — select your template and set the send time
- Wait — define the delay before the next step (days or hours)
- Check — evaluate a condition, such as whether the prospect opened the email or clicked a link
- Action — update a field, add to a list, notify a rep, or adjust lead score
Branch your program based on engagement. Prospects who click get moved to a higher-intent track. Those who don’t open after two emails get a re-engagement message with a different subject line. This branching logic is what separates a real nurture program from a simple drip sequence.
Step 4: Configure Completion Actions
At the end of each email step, set Completion Actions that fire when a prospect takes a specific action. For example: if a prospect clicks the demo link in email two, immediately notify the assigned rep in Salesforce and change the prospect’s lead status to “Sales Ready.” These actions bridge the gap between marketing automation and sales follow-up.
Step 5: Test and Launch
Use Account Engagement’s Test function to send a preview of each email to yourself. Check rendering across desktop and mobile, verify all merge fields, and confirm that links resolve correctly. Then set your program to Active and monitor the Reporting tab for open rates, click rates, and unsubscribes in the first week.
Personalizing Automated Emails: Moving Past Generic
Generic automated emails are easy to spot and easy to ignore. “Hi [First Name], we wanted to reach out…” isn’t personalization. It’s a mail merge. Real personalization uses the data Salesforce already holds to make each email feel like it was written for that specific person.
Here’s how to build meaningful personalization into your automated emails:
Use Field-Level Merge Tags Strategically
Go beyond first name. Pull in the prospect’s company name, their industry, the product they expressed interest in, or the rep’s name and phone number. In Salesforce email templates, these are called merge fields and they reference any field on the related object. In Account Engagement, they use the {{Field.Name}} syntax.
A subject line like “How [Company] can reduce onboarding time by 30%” outperforms “Improve your onboarding process” every time. The data to make that happen already lives in your Salesforce records.
Segment Before You Automate
The most personalized email is one sent to the right segment. Before building your automation, define your audience precisely. Use Salesforce reports or Account Engagement dynamic lists to segment by:
- Industry or vertical
- Company size or revenue range
- Lead source or campaign origin
- Lifecycle stage or lead score
- Geographic region
- Product interest or last activity date
Each segment should have its own email sequence with messaging tailored to that audience’s specific challenges. A CFO at a 500-person manufacturing company has different concerns than a marketing director at a 20-person SaaS startup. Your emails should reflect that.
Dynamic Content Blocks
In Marketing Cloud and Account Engagement, you can use dynamic content to show different sections of an email based on prospect attributes. The email structure stays the same, but the body copy, images, or CTAs swap out based on the recipient’s industry, role, or behavior. One template, multiple personalized experiences.
Email Deliverability: What Actually Gets Your Emails to the Inbox
You can build the most sophisticated automation in Salesforce and still have it fail if your emails land in spam. Deliverability isn’t a technical afterthought. It’s a foundational requirement. Here’s what determines whether your automated emails reach the inbox.
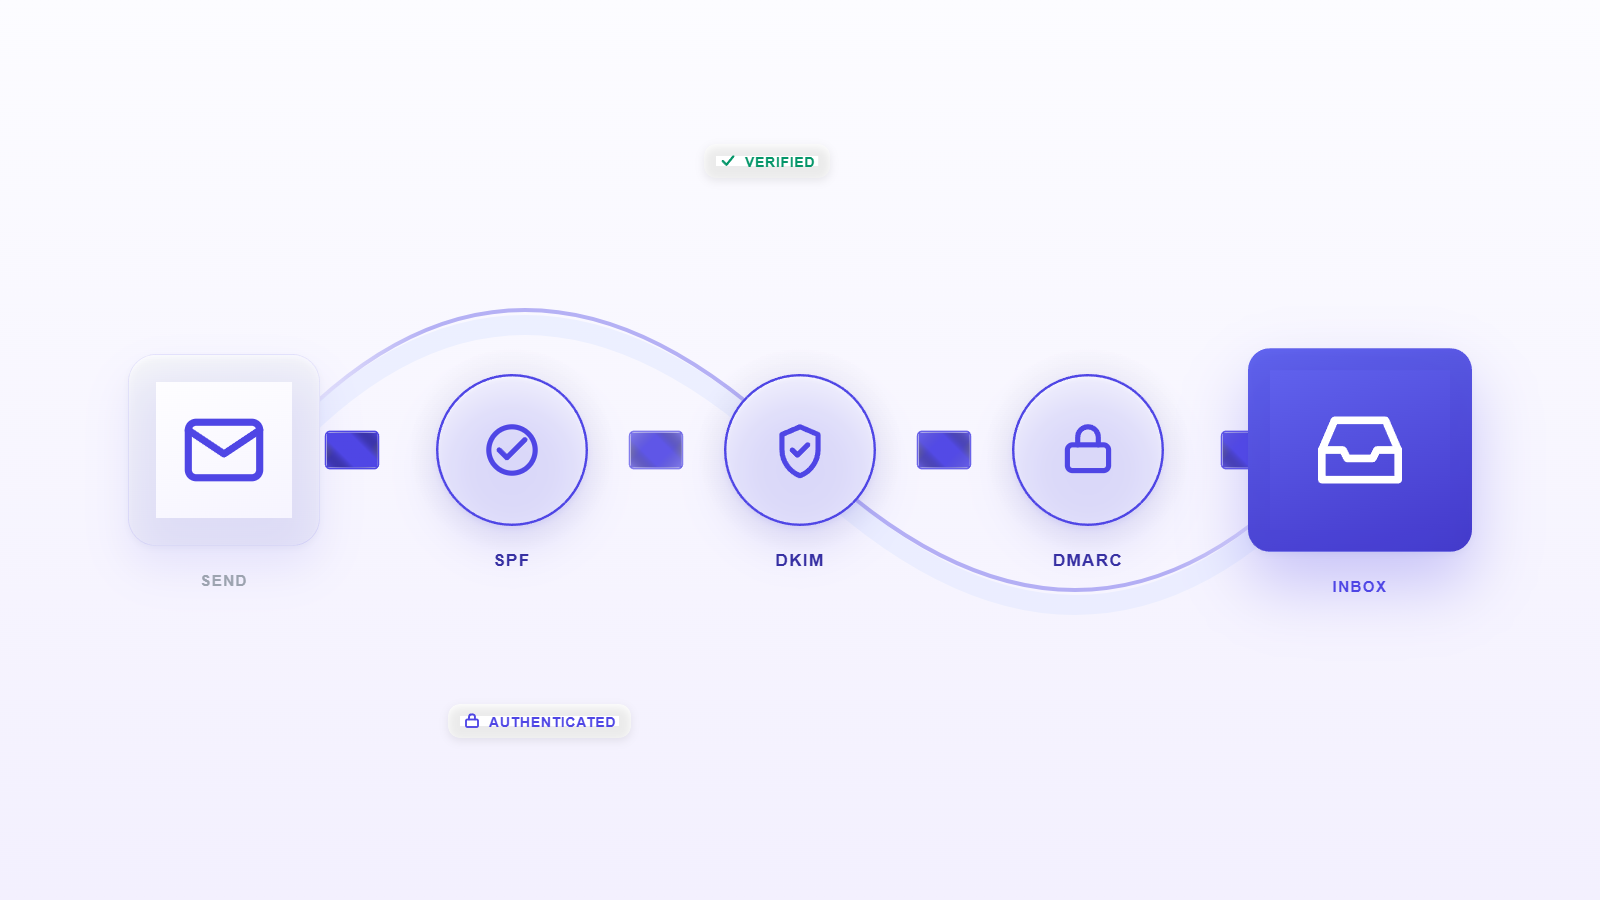
Authentication Setup
Three authentication protocols protect your sender reputation and signal to receiving mail servers that your emails are legitimate:
- SPF (Sender Policy Framework) — a DNS record that lists which servers are authorized to send email on behalf of your domain
- DKIM (DomainKeys Identified Mail) — a digital signature that verifies the email hasn’t been tampered with in transit
- DMARC (Domain-based Message Authentication, Reporting & Conformance) — a policy that tells receiving servers what to do if SPF or DKIM checks fail
In Salesforce, configure your Organization-Wide Email Addresses under Setup → Email → Organization-Wide Addresses. For Marketing Cloud, work with your IT team to add the required DNS records for your sending domain. Account Engagement has a dedicated Domain Management section under Admin → Domain Management where you verify and authenticate your sending domain.
List Hygiene
Sending to stale, unverified, or disengaged lists tanks your sender reputation fast. Before any automated sequence goes live, run your list through an email validation tool to remove invalid addresses. Set up automatic suppression for hard bounces and honor unsubscribe requests immediately. In Account Engagement, the Prospect Opt-Out field handles this automatically when properly configured.
Sending Volume and Warm-Up
If you’re setting up a new sending domain or dramatically increasing your email volume, warm up gradually. Start with your most engaged contacts, keep daily volume low in the first two weeks, and increase incrementally. Jumping from zero to 10,000 emails per day on a new domain is a reliable way to get flagged.
Content and Engagement Signals
Spam filters evaluate content signals alongside authentication. Avoid excessive use of all-caps, multiple exclamation points, and spam-trigger words like “FREE” or “ACT NOW.” More importantly, monitor engagement. Low open rates and high delete-without-reading rates signal to inbox providers that your emails aren’t wanted, which affects deliverability for your entire domain.
Integrating Salesforce Email Automation With Your Existing Stack
Salesforce rarely operates in isolation. Most teams use it alongside email clients, calendaring tools, and other platforms. Getting those integrations right is what makes your automation actually work end-to-end.
Outlook and Gmail Integration
If your reps send emails from Outlook or Gmail, those emails need to log back to Salesforce automatically. Without that, your automation data is incomplete and your CRM records don’t reflect the full conversation history. Salesforce’s Outlook integration and Gmail integration handle this, but the native versions have limitations around what gets captured and how reliably it syncs.
The email sidebar experience matters here too. Reps need to see Salesforce context without leaving their inbox, and they need to log emails without extra steps. When that friction exists, logging doesn’t happen consistently, and your automation data suffers.
Calendar and Meeting Sync
Email automation often triggers meeting requests or follow-up tasks. Salesforce email and calendar integration ensures that booked meetings, rescheduled calls, and completed activities all flow back into the CRM without manual entry. When this sync breaks down, reps end up with duplicate calendar entries, missed follow-ups, and activity data that doesn’t match reality. A reliable calendar sync setup is non-negotiable for teams running high-volume outreach.
Email-to-Salesforce
Email-to-Salesforce is a native feature that lets you BCC a unique Salesforce address to log any outbound email to the relevant lead or contact record. It’s a useful fallback for emails sent outside of Salesforce’s native interface, but it requires reps to remember to include the BCC address, which makes it inconsistent in practice.
Lightning Sync
Salesforce Lightning Sync keeps contacts and calendar events synchronized between Salesforce and your email client. It reduces duplicate data entry and ensures that your automation has accurate contact information to work with. Without reliable sync, merge fields pull stale data and your personalization breaks down.
Salesforce Email Automation Tools Worth Knowing
Native Salesforce tools cover a lot of ground, but there are scenarios where purpose-built tools fill gaps that the platform doesn’t address natively. Here’s a practical overview of what’s available and when each makes sense.
Salesforce Engage
Salesforce Engage is designed for sales reps who want to run their own nurture sequences without waiting on marketing. It sits on top of Account Engagement and gives reps access to pre-approved email templates and cadences that they can deploy directly from Salesforce or their inbox. It’s a good fit for teams where sales and marketing need to share automation capabilities without stepping on each other.
Salesforce Inbox
Salesforce Inbox adds productivity features to your email client, including email tracking, scheduling, and one-click CRM logging. For reps who live in their inbox, it reduces the friction of keeping Salesforce updated while running outreach sequences.
Revenue Grid
For teams that need more than what native Salesforce automation provides, Revenue Grid adds a layer of intelligence that the platform doesn’t offer out of the box. It captures email and meeting activity automatically, without relying on reps to log anything manually. It surfaces engagement signals directly in Salesforce, so your automation triggers are working from complete, accurate data rather than whatever happened to get logged.
Where native tools require reps to remember to BCC, manually update fields, or log calls after the fact, Revenue Grid handles that capture automatically. That matters for automation because your flows and sequences are only as good as the data feeding them. If activity isn’t being captured, your triggers fire late, your personalization pulls stale information, and your follow-up sequences miss the window.
Third-Party AppExchange Tools
The Salesforce AppExchange has dozens of email automation tools for specific use cases, from mass email senders to advanced deliverability platforms. When evaluating any AppExchange tool, check for native Salesforce data sync, review the permission requirements carefully, and test in a sandbox before deploying to production.
Common Pitfalls in Salesforce Email Automation (And How to Avoid Them)
Most automation problems aren’t caused by the tools. They’re caused by setup decisions that seemed reasonable at the time but created issues at scale. Here are the ones that come up most often:
- Overly broad trigger conditions — A flow that fires on any record update instead of a specific field change will send emails to people who shouldn’t receive them. Always use entry conditions that are as specific as possible.
- Missing opt-out handling — Automated emails that ignore unsubscribe preferences create compliance risk and damage sender reputation. Ensure every sequence respects the Email Opt Out field on Contact and Lead records.
- No re-entry controls — Without re-entry limits, a prospect can enter the same flow multiple times and receive duplicate emails. Set re-entry conditions explicitly in your flow settings.
- Generic templates across all segments — One email template sent to your entire database isn’t automation. It’s a blast. Segment first, then build templates for each audience.
- Skipping the sandbox test — Testing in production means real customers receive test emails. Always build and test in a sandbox environment before activating any flow or program.
- Ignoring email performance data — Setting up automation and never reviewing open rates, click rates, or bounce rates means problems compound silently. Build a review cadence into your process from day one.
- Incomplete activity capture — If emails sent from Outlook or Gmail aren’t logging back to Salesforce, your automation is working from an incomplete picture of the customer relationship. Fix the sync before building complex sequences on top of it.
Measuring What Your Email Automation Is Actually Doing
Automation without measurement is just noise at scale. These are the metrics that tell you whether your setup is working:
- Open rate — Industry benchmark for B2B is 20-25%. Below that, look at subject lines, sender name, and send timing first.
- Click-through rate (CTR) — Measures engagement with your content. A CTR below 2% usually signals a mismatch between the email content and the audience’s interests.
- Bounce rate — Hard bounces above 2% indicate list quality problems. Address these immediately to protect sender reputation.
- Unsubscribe rate — Above 0.5% per email suggests frequency or relevance issues. Review your segmentation and cadence.
- Conversion rate — The percentage of recipients who take the desired action, whether that’s booking a demo, downloading a resource, or responding to a rep. This is the metric that connects email performance to revenue.
- Pipeline influenced — Track how many opportunities were touched by an automated email sequence. This connects your automation investment directly to revenue outcomes.
In Salesforce, use Pipeline Inspection to connect email engagement data to opportunity movement. When you can see that prospects who engaged with your nurture sequence close at a higher rate, you have the data to justify expanding your automation investment.
Putting It All Together
Email automation in Salesforce isn’t a one-time setup. It’s an ongoing system that gets more effective as your data improves, your segmentation sharpens, and your sequences are refined based on real performance data.
The teams that get the most out of it start with a clear use case, build the right foundation with proper authentication and clean data, and then expand from there. They don’t try to automate everything at once. They pick the highest-impact scenario, whether that’s a post-demo follow-up sequence, a closed-won onboarding flow, or a re-engagement program for dormant leads, and they get that working well before adding complexity.
The tools Salesforce provides are genuinely powerful. Flow handles most CRM-triggered automation. Account Engagement manages longer nurture programs. Marketing Cloud scales to enterprise complexity. And when your lead capture, triggers, and activity data are all flowing into Salesforce accurately, your automation has the foundation it needs to actually work.
If your team is running into gaps where native Salesforce automation isn’t capturing the full picture of customer engagement, or where activity data isn’t flowing back to records reliably, that’s worth addressing before expanding your automation footprint. Revenue Grid helps close those gaps by capturing email and meeting activity automatically, keeping your Salesforce data complete, and giving your automation the accurate signals it needs to fire at the right time.
What are the benefits of using email automation in Salesforce?
Email automation in Salesforce removes the manual work of sending timely, relevant follow-ups at every stage of the customer journey. Reps stop losing deals because a follow-up slipped through the cracks. Marketing teams can run sophisticated nurture programs without managing each send manually. And because everything runs through Salesforce, every email interaction logs back to the right record, giving leadership a complete view of how communication is influencing pipeline. The compounding effect is significant: teams that automate lead nurturing see revenue increases of 10% or more within six to nine months, and nurtured leads consistently close at higher values than those who receive no structured follow-up.
How can I ensure high deliverability of automated emails?
Deliverability comes down to three things: authentication, list quality, and engagement. Start by configuring SPF, DKIM, and DMARC records for your sending domain. These tell receiving mail servers that your emails are legitimate. Next, keep your lists clean by removing invalid addresses, honoring unsubscribes immediately, and suppressing hard bounces. Finally, monitor engagement signals. Low open rates and high delete-without-reading rates signal to inbox providers that your emails aren’t wanted, which affects your entire domain’s deliverability over time. If you’re launching a new sending domain or significantly increasing volume, warm up gradually over two to four weeks rather than jumping to full volume immediately.
What are the best practices for personalizing automated emails in Salesforce?
Real personalization goes well beyond inserting a first name. Use Salesforce merge fields to pull in company name, industry, product interest, or the rep’s contact information. Segment your audience before building your sequences so that each group receives messaging tailored to their specific situation. In Account Engagement and Marketing Cloud, use dynamic content blocks to show different email sections based on recipient attributes, so one template can serve multiple audience variations. The most effective personalization combines field-level data with behavioral signals: what the prospect clicked, what pages they visited, and where they are in the buying journey. That combination is what makes an automated email feel like it was written specifically for the recipient.
Can Salesforce automation be integrated with other CRM tools?
Salesforce is designed to be the central hub, and it integrates with a wide range of external tools through native connectors, the AppExchange, and API-based integrations. For email clients, Outlook and Gmail both have native integrations that sync emails and calendar events back to Salesforce records. For marketing platforms, Account Engagement connects directly to Salesforce CRM data for segmentation and lead management. For teams using other CRM tools alongside Salesforce, API-based integrations can sync contact data, activity history, and engagement signals bidirectionally. The key is ensuring that whatever integration you use keeps Salesforce as the source of truth for customer data, so your automation triggers are always working from accurate, up-to-date information.
What are the common pitfalls in setting up email automation in Salesforce?
The most common problems fall into a few categories. Overly broad trigger conditions cause flows to fire on records that shouldn’t receive the email, creating noise and deliverability issues. Missing opt-out handling creates compliance risk and can get your domain flagged. Generic templates sent to unsegmented audiences produce low engagement, which hurts sender reputation over time. Skipping sandbox testing means real customers receive test emails or broken sequences. And perhaps most underestimated: incomplete activity capture. If emails sent from Outlook or Gmail aren’t logging back to Salesforce reliably, your automation is building on an incomplete picture of the customer relationship. Triggers fire late, personalization pulls stale data, and follow-up sequences miss the window when a prospect is actually engaged. Fixing the data foundation before building complex automation on top of it saves significant rework later.