

Key Takeaway
- Automate first response to reduce delays: Salesforce auto-response rules ensure every case or lead gets an instant acknowledgment, eliminating customer uncertainty and reducing follow-up volume.
- Design rules with “first match wins” logic: Proper sort order and well-defined criteria are critical—specific scenarios should come first, followed by a catch-all rule to avoid missed responses.
- Use auto-response rules vs workflow alerts correctly: Auto-responses are for immediate external acknowledgment at record creation, while workflow alerts handle internal notifications and ongoing automation.
- Email templates directly impact customer experience: Clear subject lines, personalization, response timelines, and self-service links make automated emails more effective and professional.
- Automation improves efficiency and scalability: It saves rep time, ensures consistency, and helps teams handle high case volumes without increasing headcount.
Picture this: a customer submits a support request on a Friday afternoon. Your team is stretched thin. By Monday morning, that customer has heard nothing — no acknowledgment, no case number, no indication that anyone received their message. So they send a follow-up. Then another. By the time a rep picks it up, the customer is already frustrated, and the rep is playing catch-up before the conversation even starts.
This isn’t a staffing problem. It’s an automation gap.
Customer service teams running on manual email responses face a compounding challenge. Every new case that comes in without an immediate acknowledgment creates anxiety on the customer’s end and extra work on yours. Reps spend time composing routine “we got your message” emails instead of actually solving problems. And when volume spikes — during product launches, outages, or seasonal peaks — the gap between case creation and first contact widens fast.
Salesforce automated email responses exist precisely to close that gap. Through a feature called auto-response rules, you can configure Salesforce to send immediate, personalized acknowledgment emails the moment a case or lead enters the system — no rep involvement required. Done right, it’s one of the highest-leverage configurations a Salesforce admin can implement.
This guide walks through everything: how auto-response rules work, how to set them up correctly, how they differ from workflow email alerts, and how to troubleshoot when things go sideways. Whether you’re a Salesforce administrator building out your first automation or a customer service manager trying to improve response times, this is the practical reference you need.
What Salesforce Auto-Response Rules Actually Do
Auto-response rules are a native Salesforce automation feature that automatically sends an email to a customer or prospect the moment a qualifying case or lead record is created. The rule evaluates the incoming record against predefined criteria, and if there’s a match, it fires off a templated email — instantly, without any human in the loop.
Think of it as a smart receptionist that never sleeps. The moment someone walks through the door (submits a case), they get a professional acknowledgment with their case number, expected response time, and next steps — before a single rep has even seen the record.
Auto-response rules work across several case creation channels:
- Web-to-Case forms — customers submit cases through your website or embedded portal
- Email-to-Case — incoming emails are automatically converted to case records
- On-Demand Email-to-Case — for organizations processing support emails on demand
- Customer Portal and Self-Service Portal submissions
- Web-to-Lead forms — for lead acknowledgment on the sales side
For leads, auto-response rules trigger when a prospect submits a Web-to-Lead form. For cases, the trigger spans all the channels above. Either way, the logic is the same: record created, criteria evaluated, email sent.
One architectural detail worth knowing upfront: only one auto-response rule can be active at a time per object. One active rule for leads, one for cases. That means your rule needs to handle all your response scenarios through multiple rule entries within a single active rule — not through multiple parallel rules. Understanding this constraint shapes how you design your entire configuration.
Where Auto-Response Emails Show Up in Salesforce
When an auto-response fires for a case, the email appears in the Email related list on the case detail page. For leads, it shows up in the Activity History related list. This visibility matters more than it might seem.
When a rep picks up a case, they immediately see that the customer has already been acknowledged. No duplicate “thanks for reaching out” emails. No awkward moments where the customer gets two different responses. The rep can skip straight to solving the problem.
There’s also a quota benefit: emails sent through case auto-response rules don’t count toward your organization’s daily outbound email limit. That’s a meaningful distinction for high-volume support teams who need to preserve quota for actual rep-to-customer communication.
Setting Up Auto-Response Rules: Step by Step
The setup process has two distinct phases: creating the rule container, then building the rule entries that define what actually happens. Most configuration mistakes happen because admins conflate these two steps or skip the entry-level detail. Here’s how to do it right.
Step 1: Navigate to Auto-Response Rules in Setup
Go to Setup, type Auto-Response Rules in the Quick Find box, and select either Lead Auto-Response Rules or Case Auto-Response Rules depending on what you’re configuring. The interface is identical for both — same structure, same logic, different object.
You’ll land on a list view showing any existing rules and their active status. From here, click New to start building.
Step 2: Create the Rule Container
Give your rule a clear, descriptive name. This sounds trivial, but naming conventions matter when multiple admins are working in the same org. Names like “Case Auto-Response 2024” tell you nothing. Names like “Case-Support-AllChannels-Response” or “Lead-WebForm-Acknowledgment” communicate purpose immediately.
You’ll also see an Active checkbox. Here’s the critical thing: checking this box activates your new rule and automatically deactivates any previously active rule of the same type. If you have an existing active rule that’s currently working, activating a new one will turn it off. Plan this transition deliberately — don’t activate a new rule until it’s fully configured and tested.
Save the rule. Now you have a container. The actual logic lives in the rule entries you’ll add next.
Step 3: Add Rule Entries
From the rule detail page, click New in the Rule Entries section. Each rule entry defines a specific response scenario: what criteria trigger it, who the email comes from, and which template gets sent.
The first field is Sort Order. Enter a number that determines where this entry sits in the evaluation sequence. Salesforce evaluates entries from lowest to highest sort order and stops at the first match. This “first match wins” logic is the most important thing to understand about rule entry design.
The practical implication: put your most specific entries first. If you want premium customers to get a specialized response and everyone else to get a generic one, the premium customer entry goes at sort order 1. The generic catch-all entry goes at sort order 100 (or whatever comes last). If you flip that order, everyone gets the generic response because it matches first.
Step 4: Define Your Criteria
Salesforce gives you two ways to define when a rule entry fires:
- Criteria are met — a point-and-click filter interface where you specify field, operator, and value combinations. You can add up to 25 filter conditions. All conditions must be true for the entry to trigger (AND logic). Filter values must be entered in your organization’s default language — if you change your default language later, existing filters may stop working and need to be re-entered.
- Formula evaluates to true — write a custom formula that returns true or false. This unlocks more sophisticated logic than the point-and-click interface allows. For example: AND(ISPICKVAL(Priority,”High”),ISPICKVAL(Origin,”Email”)) triggers only for high-priority cases that came in via email. Useful when your response logic depends on combinations of conditions that the standard filter interface can’t express cleanly.
For most standard implementations, the criteria interface handles the job. Reach for formulas when you need conditional logic that crosses multiple fields or requires text pattern matching.
One practical tip: always add a catch-all entry at the end of your sort order with no criteria specified. This ensures every case or lead gets at least a generic acknowledgment, even if it doesn’t match any of your specific entries. Without a catch-all, records that don’t match any entry get no response at all — which defeats the purpose of the whole setup.
Step 5: Configure the Sender and Email Template
Every rule entry needs a sender name, a sender email address, and an email template.
The sender name is what appears in the customer’s inbox as the “From” display name — something like “Acme Support Team” or “Customer Success.” The sender email address has stricter requirements: it must be either a verified organization-wide email address or the email address on the Salesforce user profile of the admin creating the rule.
Organization-wide email addresses (OWEAs) are the better choice for most teams. They’re centralized, brand-aligned, and don’t break when individual users change roles or leave the organization. If you’re using an OWEA, make sure it’s been verified — unverified addresses will cause the rule entry to silently fail.
One address to avoid: don’t use your Email-to-Case routing address as the sender. Using the same address for both incoming case capture and outgoing auto-responses is a recipe for email loops.
You can also specify an optional Reply-To address — the address where customer replies will land. This is useful when you want acknowledgment emails to come from a branded address but replies to route to a shared support queue or inbox.
Finally, select your email template. For case auto-response rules, the template’s Related Entity Type must be set to “Case” so it can reference case-specific merge fields. Use the lookup field to find and select your template, and preview it before saving to confirm the merge fields populate correctly.
Step 6: Configure Email-to-Case-Specific Options
If you’re using Email-to-Case, you’ll see an additional option: Send response to all recipients. When enabled, the auto-response goes to everyone in the To and Cc fields of the original email, not just the primary sender. This can be useful when multiple stakeholders are copied on support requests, but use it carefully — you don’t want auto-responses firing to internal distribution lists or third-party addresses that happened to be CC’d.
Save the rule entry. Repeat the process for each additional scenario you need to handle, keeping sort order logic in mind as you go.
Auto-Response Rules vs. Workflow Email Alerts: Knowing Which to Use
This is one of the most common points of confusion for Salesforce admins, and it’s worth getting clear on because choosing the wrong mechanism creates real problems — either gaps in automation or over-engineered solutions that are harder to maintain.
Both features send emails automatically. But they’re built for fundamentally different purposes.
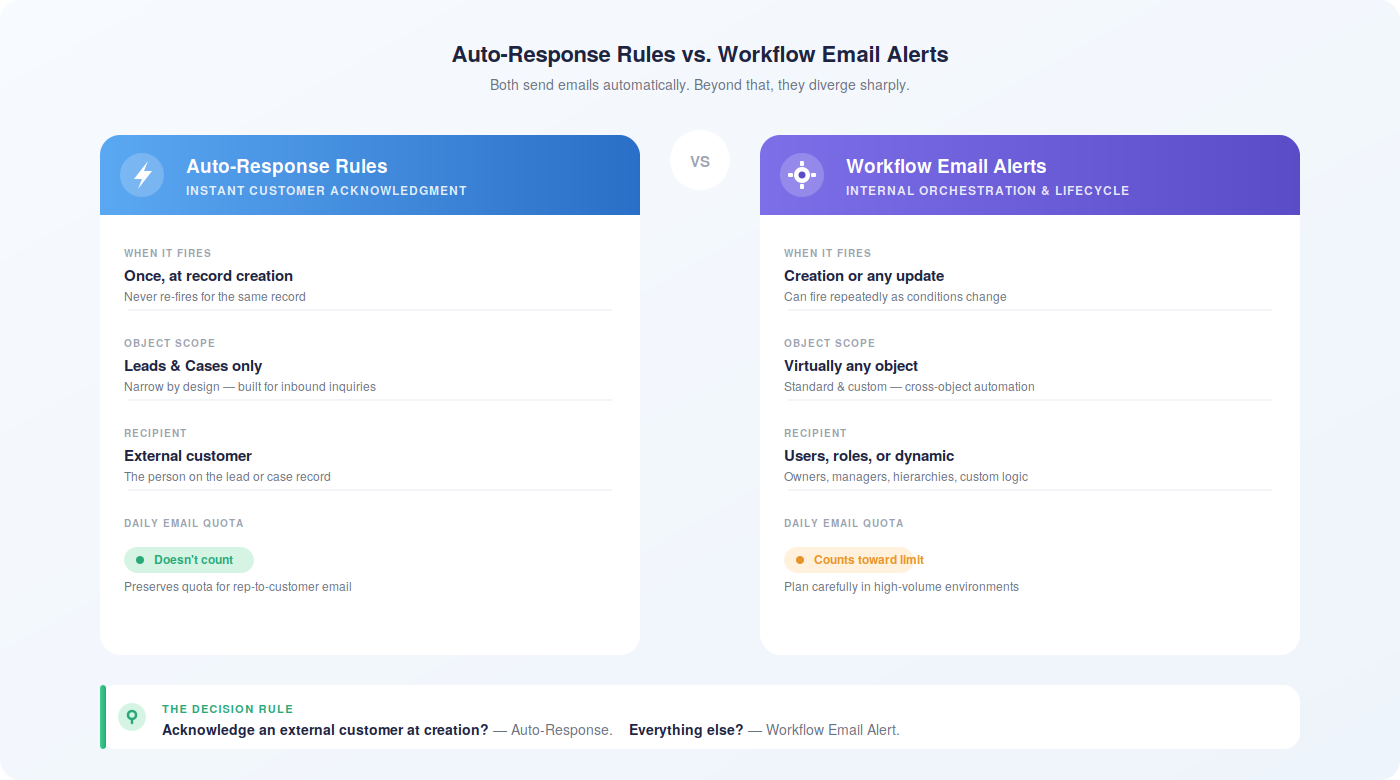
When Each One Fires
Auto-response rules fire once, at the moment a qualifying record is created. They evaluate the record’s fields at creation time, send the email if criteria match, and never fire again for that record — even if field values change later. This single-trigger model is intentional. Sending multiple acknowledgments for the same case would confuse customers and undermine the professional impression you’re trying to create.
Workflow email alerts operate differently. They’re part of Salesforce’s broader workflow automation framework and can trigger on record creation or on any subsequent record modification. A workflow alert can fire multiple times per record as conditions change — for example, sending an escalation email every time a case priority is upgraded, or sending a reminder three days after case creation if the case is still open. That time-based and modification-based flexibility is something auto-response rules simply don’t have.
What Objects They Work On
Auto-response rules work exclusively on leads and cases. That’s it. Their scope is deliberately narrow because their purpose is specific: acknowledging external inquiries at the moment they enter the system.
Workflow email alerts work across virtually any Salesforce object, including custom objects. Need to notify an account manager when an opportunity reaches a certain stage? Workflow alert. Need to email a manager when a custom record is modified? Workflow alert. The broader object scope makes workflow automation the right tool for internal notifications and cross-object process automation.
Who Receives the Email
Auto-response rules send to the external customer — the person whose email address is on the lead or case record. You can’t easily redirect auto-response emails to internal team members or configure complex recipient logic.
Workflow email alerts give you much more flexibility on recipients. You can send to specific users, roles, role hierarchies, record owners, related record owners, or even dynamically calculated email addresses. This makes workflow alerts the right choice when internal teams need to be notified of record events.
Email Quota Impact
Case auto-response emails don’t count toward your daily outbound email limit. Workflow email alerts do. For high-volume support environments, this distinction matters — workflow-heavy automation can consume quota that you need for rep-to-customer communication.
The Simple Decision Rule
Use auto-response rules when you need to acknowledge an external customer the moment their case or lead is created. Use workflow email alerts for everything else — internal notifications, modification-triggered emails, time-based follow-ups, and multi-object automation. Most mature support operations use both, with auto-response rules handling the initial customer acknowledgment and workflow alerts managing the internal coordination and escalation logic that follows.
Building Email Templates That Actually Work
The auto-response rule is the mechanism. The email template is what the customer actually sees. A well-configured rule firing a mediocre template still creates a mediocre customer experience. Get the template right.
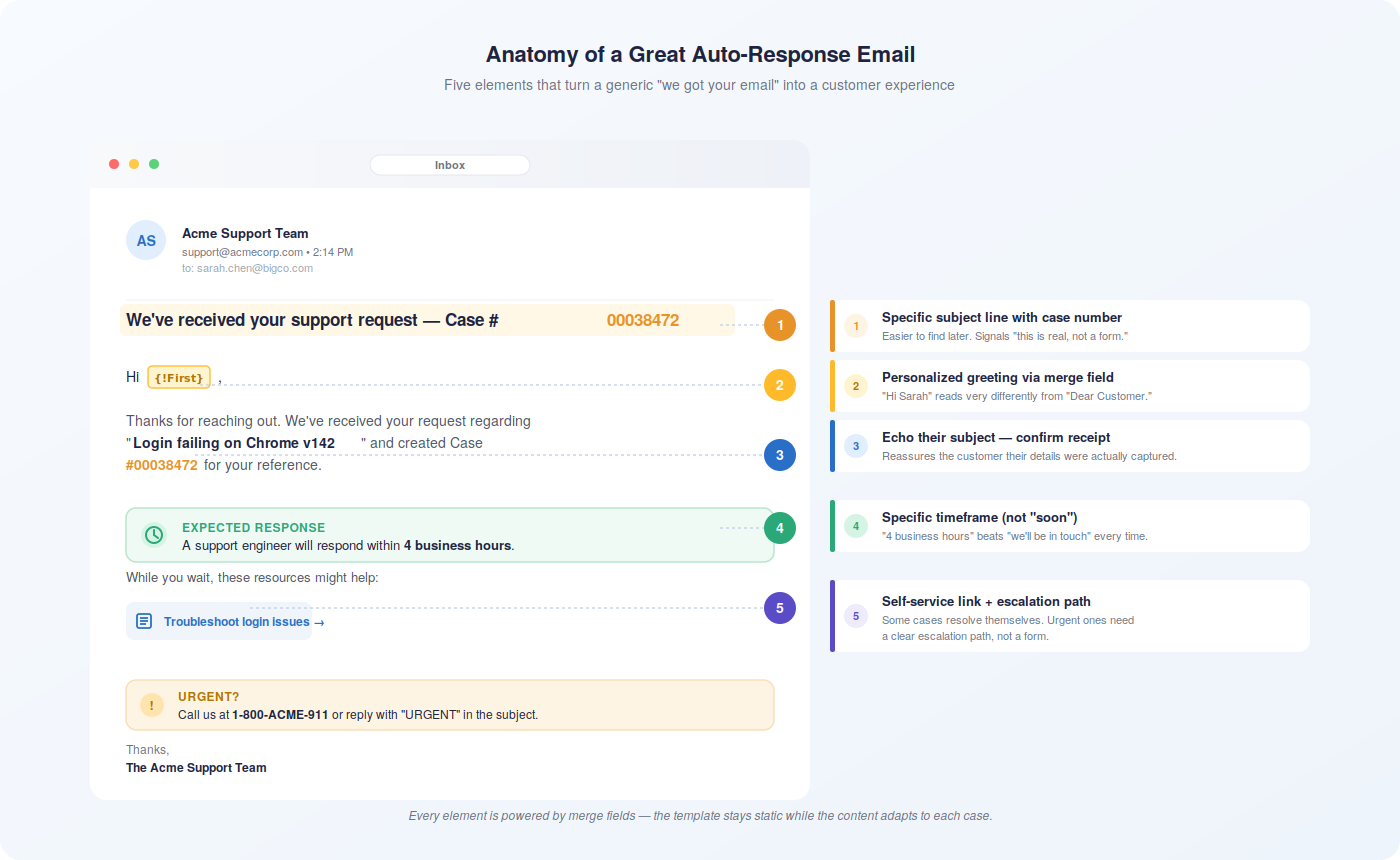
What Every Auto-Response Template Needs
The subject line sets the tone before the customer even opens the email. Make it clear and specific: “We’ve received your support request — Case #[CaseNumber]” beats “Thank you for contacting us” every time. Customers who are anxious about their issue want confirmation, not pleasantries.
The body should do four things, in this order:
- Confirm receipt — tell them their request came through and give them the case number for reference
- Set expectations — be specific about response timeframes (“our team will respond within 4 business hours”) rather than vague (“we’ll be in touch soon”)
- Offer self-service options — link to your knowledge base, FAQ, or community forum for customers who want to troubleshoot while they wait
- Provide a contact path — tell them what to do if their issue is urgent or if they need to add information to their case
Personalization matters. An opening like “Hi {!Contact.FirstName}, we’ve received your request about {!Case.Subject}” reads completely differently than “Dear Customer, your inquiry has been received.” The merge fields do the work — use them.
Key Merge Fields for Case Templates
Salesforce’s merge field library gives you a lot to work with. For case auto-response email templates, the most useful ones include:
- {!Case.CaseNumber} — the unique case identifier customers can reference in follow-ups
- {!Case.Subject} — the customer’s issue description, confirming you captured what they submitted
- {!Case.Priority} — useful for templates that communicate priority-specific response times
- {!Contact.FirstName} and {!Contact.LastName} — for personalized greetings
- {!Case.Description} — echoes back the full case description, reassuring customers their details were captured
- {!Case_OnlineCustomer_Name} and {!Case_OnlineCustomer_Email} — for Web-to-Case submissions where contact records may not yet exist
For more advanced templates, {!Case.Suggested_Solutions} can surface links to relevant knowledge articles directly in the acknowledgment email — a powerful self-service nudge that can resolve some cases before a rep ever gets involved.
Testing Before You Go Live
Use Salesforce’s Send Test and Verify Merge Fields function to preview your template against a real record before activating the rule. This catches merge field errors, formatting issues, and missing data problems that won’t surface until a real customer receives a broken email.
Also test across email clients. An HTML template that looks polished in Gmail may render poorly in Outlook. If your customer base uses a mix of email clients, keep template formatting simple and test broadly before deployment.
Naming conventions for templates matter too. “Auto-Response Template 1” is useless when you’re managing a library of a dozen templates. “Case-HighPriority-AutoResponse” or “Lead-WebForm-Acknowledgment” communicates purpose at a glance and makes maintenance far easier as your configuration grows.
Advanced Configuration: Getting More From Your Rules
Multi-Criteria Response Logic
Standard rule entries handle straightforward scenarios well. But support operations with tiered service levels, multiple product lines, or regional variations need more nuanced logic.
Formula-based criteria unlock that nuance. A formula like AND(ISPICKVAL(Case.Priority,”High”),ISPICKVAL(Case.Origin,”Email”)) triggers only for high-priority email-originated cases — not for high-priority web cases, and not for standard-priority email cases. You can layer in account fields, custom fields, or text pattern matching to create highly specific response scenarios.
For urgency detection, a formula like OR(CONTAINS(Case.Subject,”urgent”),CONTAINS(Case.Subject,”critical”),ISPICKVAL(Case.Priority,”High”)) catches cases where customers signal urgency through language even if they didn’t set the priority field explicitly. This kind of catch-all logic prevents urgent cases from slipping through with generic responses.
Multi-Language Response Strategies
If your support operation serves international customers, you can implement language-aware responses through rule entry criteria. Capture language or country information through custom fields on your case or lead records — either from web form inputs or from Email-to-Case header parsing — then build rule entries that trigger language-specific templates based on those fields.
One important constraint: rule entry criteria must be configured in your organization’s default language. Picklist values in filter criteria need to match the default language values, even if the template itself is in another language. Keep this in mind when building multilingual configurations, and re-verify filter criteria if you ever change your organization’s default language.
Preventing Email Loops
Email loops are a real risk in Email-to-Case implementations. The scenario: your auto-response fires, the customer’s email server sends an out-of-office reply, that reply hits your Email-to-Case routing address, creates a new case, triggers another auto-response, and the cycle continues.
Prevent this with a few deliberate configuration choices:
- Never use your Email-to-Case routing address as the auto-response sender address
- Add rule entry criteria that exclude emails with subject lines containing “Out of Office,” “OOO,” “Auto-Reply,” or “vacation”
- Exclude internal company email domains from triggering auto-responses (e.g., “Web Email does not contain @yourcompany.com”)
- Configure your Email-to-Case routing address to reject emails from the auto-response sender address
Loop prevention isn’t glamorous configuration work, but skipping it can create a cascade of phantom cases that pollutes your queue and confuses your team.
Integrating Auto-Responses With Your Broader Case Automation Stack
Auto-response rules work best as one layer in a coordinated automation stack, not as a standalone feature. The acknowledgment email sets customer expectations. Assignment rules determine which rep or queue receives the case. Escalation rules ensure unresolved cases get elevated before SLAs breach. Together, these mechanisms create a case lifecycle that’s responsive at every stage — not just at creation.
The critical alignment point: whatever your auto-response template promises, your downstream automation needs to deliver. If your acknowledgment email says “we’ll respond within 2 business hours,” your assignment rules need to route cases to available reps immediately, and your escalation rules need to fire before that 2-hour window closes. A well-written auto-response that sets expectations your team can’t meet creates more frustration than no auto-response at all.
For teams using Salesforce Inbox or other email management tools alongside case automation, ensuring that auto-response activity is visible across your communication stack prevents reps from sending duplicate acknowledgments when they pick up a case. The Email related list on the case record is your source of truth — make sure your team knows to check it.
Troubleshooting: When Auto-Responses Don’t Fire
Auto-response rules that appear correctly configured but don’t send emails are one of the most common Salesforce admin headaches. The failure is usually one of a handful of root causes. Work through this checklist systematically before escalating.
Verification Checklist
- Rule is active — Navigate to the Auto-Response Rules list and confirm your rule shows as Active. It’s easy to build and test a rule without ever activating it.
- Only one rule is active — If you activated a new rule, confirm that the previous rule was deactivated. Check the list view, not just the rule you think is active.
- Rule entry criteria match your test case — Trace through the sort order manually. Does your test case match the criteria in entry 1? If not, does it match entry 2? Walk through each entry in sequence to find where the match breaks.
- Sender email address is verified — If you’re using an organization-wide email address, confirm it has been verified through the verification email Salesforce sent to that address. Unverified OWEAs cause silent failures.
- Sender address isn’t the routing address — Confirm the “From” address in your rule entry doesn’t match your Email-to-Case routing address.
- Email template is correctly configured — Verify the template’s Related Entity Type is set to “Case” for case rules. Templates with the wrong entity type won’t populate merge fields correctly and may fail to send.
- Check the Email related list — If an email appears in the Email related list on the case but the customer didn’t receive it, the issue is delivery (spam filters, routing) rather than rule configuration. If no email appears, the rule criteria didn’t match.
- Case origin matches your criteria — A rule entry with “Origin equals Email” won’t fire for cases created through the Salesforce UI, Web-to-Case, or Customer Portal. Confirm the case origin field matches what your rule entry expects.
Merge Field Errors in Templates
Templates that reference fields on related records — like account fields accessed through a case — can fail when those relationships don’t exist. A template referencing {!Case.Account.Industry} will break for cases not linked to an account. Use the Send Test and Verify Merge Fields function against records that represent your edge cases, not just your typical cases, to surface these issues before they reach customers.
Picklist Value Mismatches
If your rule entry criteria reference picklist values and the rule never fires, check whether the picklist values in your filter conditions match your organization’s default language. This is a common issue in orgs that have changed their default language after initial configuration. Re-enter the filter values in the current default language to resolve it.
The Business Case: What Good Automation Actually Delivers
Auto-response rules aren’t just a convenience feature. They have measurable impact on the metrics that customer service managers actually care about.
Response Time and Customer Satisfaction
The moment between case submission and first acknowledgment is where customer anxiety peaks. A customer who submits a request and hears nothing for hours doesn’t know if their email bounced, if the form worked, or if anyone is paying attention. That uncertainty drives follow-up contacts — which add volume to your queue without adding value.
Immediate automated acknowledgment eliminates that uncertainty. The customer has a case number, knows their request was received, and has a timeframe for what comes next. That single interaction — which costs your team nothing in rep time — measurably reduces follow-up contact volume and improves satisfaction scores.
Teams that pair auto-response rules with well-designed assignment and escalation rules typically see first-contact resolution rates improve by 10–20%, because cases reach the right rep faster and reps have clearer context from the moment they open the record.
Rep Efficiency
Every minute a rep spends composing a “thanks for reaching out” email is a minute not spent solving the actual problem. Auto-response rules reclaim that time at scale. In a team handling 200 cases per day, eliminating manual acknowledgment emails can free up several hours of rep capacity daily — capacity that goes toward resolution, not administration.
There’s also a quality consistency benefit. Manual acknowledgment emails vary in tone, completeness, and professionalism depending on who writes them and when. Automated responses are identical every time — reviewed, approved, and on-brand regardless of which rep would have otherwise sent them.
Scalability Without Proportional Headcount Growth
Support volume doesn’t scale linearly with business growth — it spikes. Product launches, outages, and seasonal peaks can double or triple case volume overnight. Manual response processes break under that pressure. Automated responses don’t. A case created at 3 AM during a service incident gets the same immediate, professional acknowledgment as a case created at 10 AM on a Tuesday.
This scalability is particularly valuable for teams expanding into new time zones or markets. Customers in regions where your support team isn’t staffed during business hours still receive immediate acknowledgment, maintaining the service experience regardless of geography.
Compliance and Audit Trail
For organizations with SLA commitments that include acknowledgment timeframes, auto-response rules create a verifiable record. The timestamp on the auto-response email in the Email related list documents exactly when the customer was acknowledged. That documentation supports SLA reporting, dispute resolution, and compliance audits in ways that manual processes simply can’t match.
Teams using Salesforce Gmail integration, Outlook integration, or other connected communication tools benefit from having this audit trail centralized in Salesforce rather than scattered across individual inboxes — giving managers a complete view of every customer interaction from first contact through resolution.
Connecting Auto-Responses to Your Broader Salesforce Ecosystem
Auto-response rules don’t operate in isolation. The more connected they are to the rest of your Salesforce configuration, the more value they deliver.
Teams using Salesforce Engage for sales communication can align auto-response messaging with broader engagement sequences, ensuring that the tone and content of automated case acknowledgments matches the communication style customers experience across other touchpoints. Consistency across channels builds trust — and trust is what keeps customers engaged through the resolution process rather than escalating or churning.
For organizations with complex tech stacks, Salesforce integration with tools like Slack, Microsoft Teams, or Aircall means that case creation events can trigger internal notifications in parallel with customer-facing auto-responses. The customer gets acknowledged immediately. The rep gets notified in their collaboration tool simultaneously. Both sides of the interaction are covered without manual intervention.
On the lead side, pairing auto-response rules with a strong lead capture strategy ensures that every prospect who submits a form gets immediate acknowledgment while the lead routing logic runs in the background. That combination — instant acknowledgment plus intelligent routing — is what separates high-performing lead response processes from the average.
For teams managing document-heavy support workflows, DocuSign integration can complement auto-response rules by triggering document requests as part of the case acknowledgment flow. Similarly, SMS API integration can extend acknowledgment beyond email for customers who prefer text-based communication.
The point isn’t to use every integration available — it’s to recognize that auto-response rules are a starting point, not an endpoint. The teams that get the most from this feature are the ones who treat it as one layer in a coordinated automation strategy rather than a standalone checkbox.
That’s also where the limits of native Salesforce automation start to show. Auto-response rules handle the initial acknowledgment well. But managing the full case lifecycle — tracking whether responses actually led to resolution, identifying patterns in case volume, understanding which customers are at risk of churning based on their support history — requires visibility that goes beyond what native case automation provides.
Revenue Grid layers intelligence on top of your Salesforce case and communication data, giving customer service managers and sales leaders a real-time view of how automated workflows are performing and where manual intervention is needed. When auto-response rules are part of a broader, data-driven engagement strategy, the gap between acknowledgment and resolution closes faster — and the patterns that cause that gap become visible before they become problems.
Salesforce automated email responses are one of those configurations that look simple on the surface but reward careful, deliberate setup. The mechanics aren’t complicated. The nuance is in the details — sort order logic, sender address verification, template merge field accuracy, loop prevention, and alignment between what your auto-response promises and what your downstream automation delivers.
Get those details right, and you’ve built something that works around the clock, scales without additional headcount, and creates a consistently professional customer experience from the first moment of contact. That’s a meaningful operational advantage, and it compounds over time as case volume grows.
If you’re looking to go further — connecting your automated case workflows to broader revenue intelligence, understanding how customer support interactions influence retention and expansion, or getting visibility into where your automation is working and where it’s breaking down — that’s where Revenue Grid comes in.
Book a demo to see how Revenue Grid helps customer service and sales teams get more from their Salesforce automation — and build the kind of connected, data-driven workflows that turn good case management into a genuine competitive advantage.
How do I set up an auto-response rule in Salesforce?
Go to Setup, search for Auto-Response Rules in the Quick Find box, and select either Lead Auto-Response Rules or Case Auto-Response Rules. Click New to create a rule, give it a name, and check the Active box when you’re ready to deploy. Then add rule entries that define the criteria, sender details, and email template for each response scenario. Each rule entry needs a sort order, trigger criteria (either point-and-click filters or a formula), a verified sender email address, and a Salesforce email template with the correct Related Entity Type. Save each entry, and test by creating a qualifying record to confirm the email fires correctly.
What are the differences between auto-response rules and workflow email alerts in Salesforce?
Auto-response rules fire once at record creation, work only on leads and cases, send to the external customer, and don’t count toward your daily email quota. Workflow email alerts can trigger on creation or any record modification, work across virtually any Salesforce object, support complex recipient targeting including internal users and roles, and do count toward daily email limits. Use auto-response rules for immediate customer acknowledgment at case or lead creation. Use workflow alerts for internal notifications, modification-triggered emails, time-based follow-ups, and automation that spans multiple objects.
Can I customize the email templates used in auto-responses?
Yes – and you should. Salesforce email templates support HTML formatting, merge fields, and dynamic content that personalizes each auto-response with the customer’s name, case number, issue description, and more. For case auto-response rules, set the template’s Related Entity Type to “Case” so it can access case-specific merge fields. Use the Send Test and Verify Merge Fields function to preview how the template renders against a real record before activating the rule. Well-designed email templates that include case numbers, expected response times, and self-service links consistently outperform generic acknowledgment messages on customer satisfaction metrics.
How can auto-response rules improve customer satisfaction?
The biggest driver is eliminating the uncertainty customers feel after submitting a request. An immediate automated acknowledgment with a case number and expected response timeframe tells the customer their request was received, is being tracked, and will be addressed — before any rep has touched the record. That single interaction reduces follow-up contact volume, lowers customer anxiety, and sets clear expectations that reps can then meet. Teams that pair auto-response rules with coordinated assignment and escalation rules typically see measurable improvements in first-contact resolution rates and customer satisfaction scores because the entire case lifecycle becomes more predictable and responsive.
What should I do if my Salesforce auto-response is not working?
Work through this checklist in order:
- Confirm the rule is marked as Active in the Auto-Response Rules list view
- Verify only one rule of that type (lead or case) is active — activating a new rule deactivates the previous one
- Trace through your rule entries in sort order and confirm the test record actually matches the criteria in at least one entry
- Check that the sender email address is a verified organization-wide email address or a valid user profile email — unverified addresses cause silent failures
- Confirm the sender address doesn’t match your Email-to-Case routing address
- Check the Email related list on the case record — if an email appears there but the customer didn’t receive it, the issue is delivery (spam filters, routing), not rule configuration
- Use Send Test and Verify Merge Fields on your template to catch merge field errors that might be preventing the email from sending