RG Email Sidebar Customization Settings Explained
For users of the Email Sidebar on:


13 min read
Note
Some Customization features require adding certain auxiliary fields and classes to Salesforce objects; to get them added automatically ask your local Salesforce administrator to install the Revenue Grid managed package in your Org – it will enable the full scope of RGES features on Salesforce side
In the latest RGES updates Customization page was converted to a tab in Revenue Grid web platform; its look and functions remained the same.
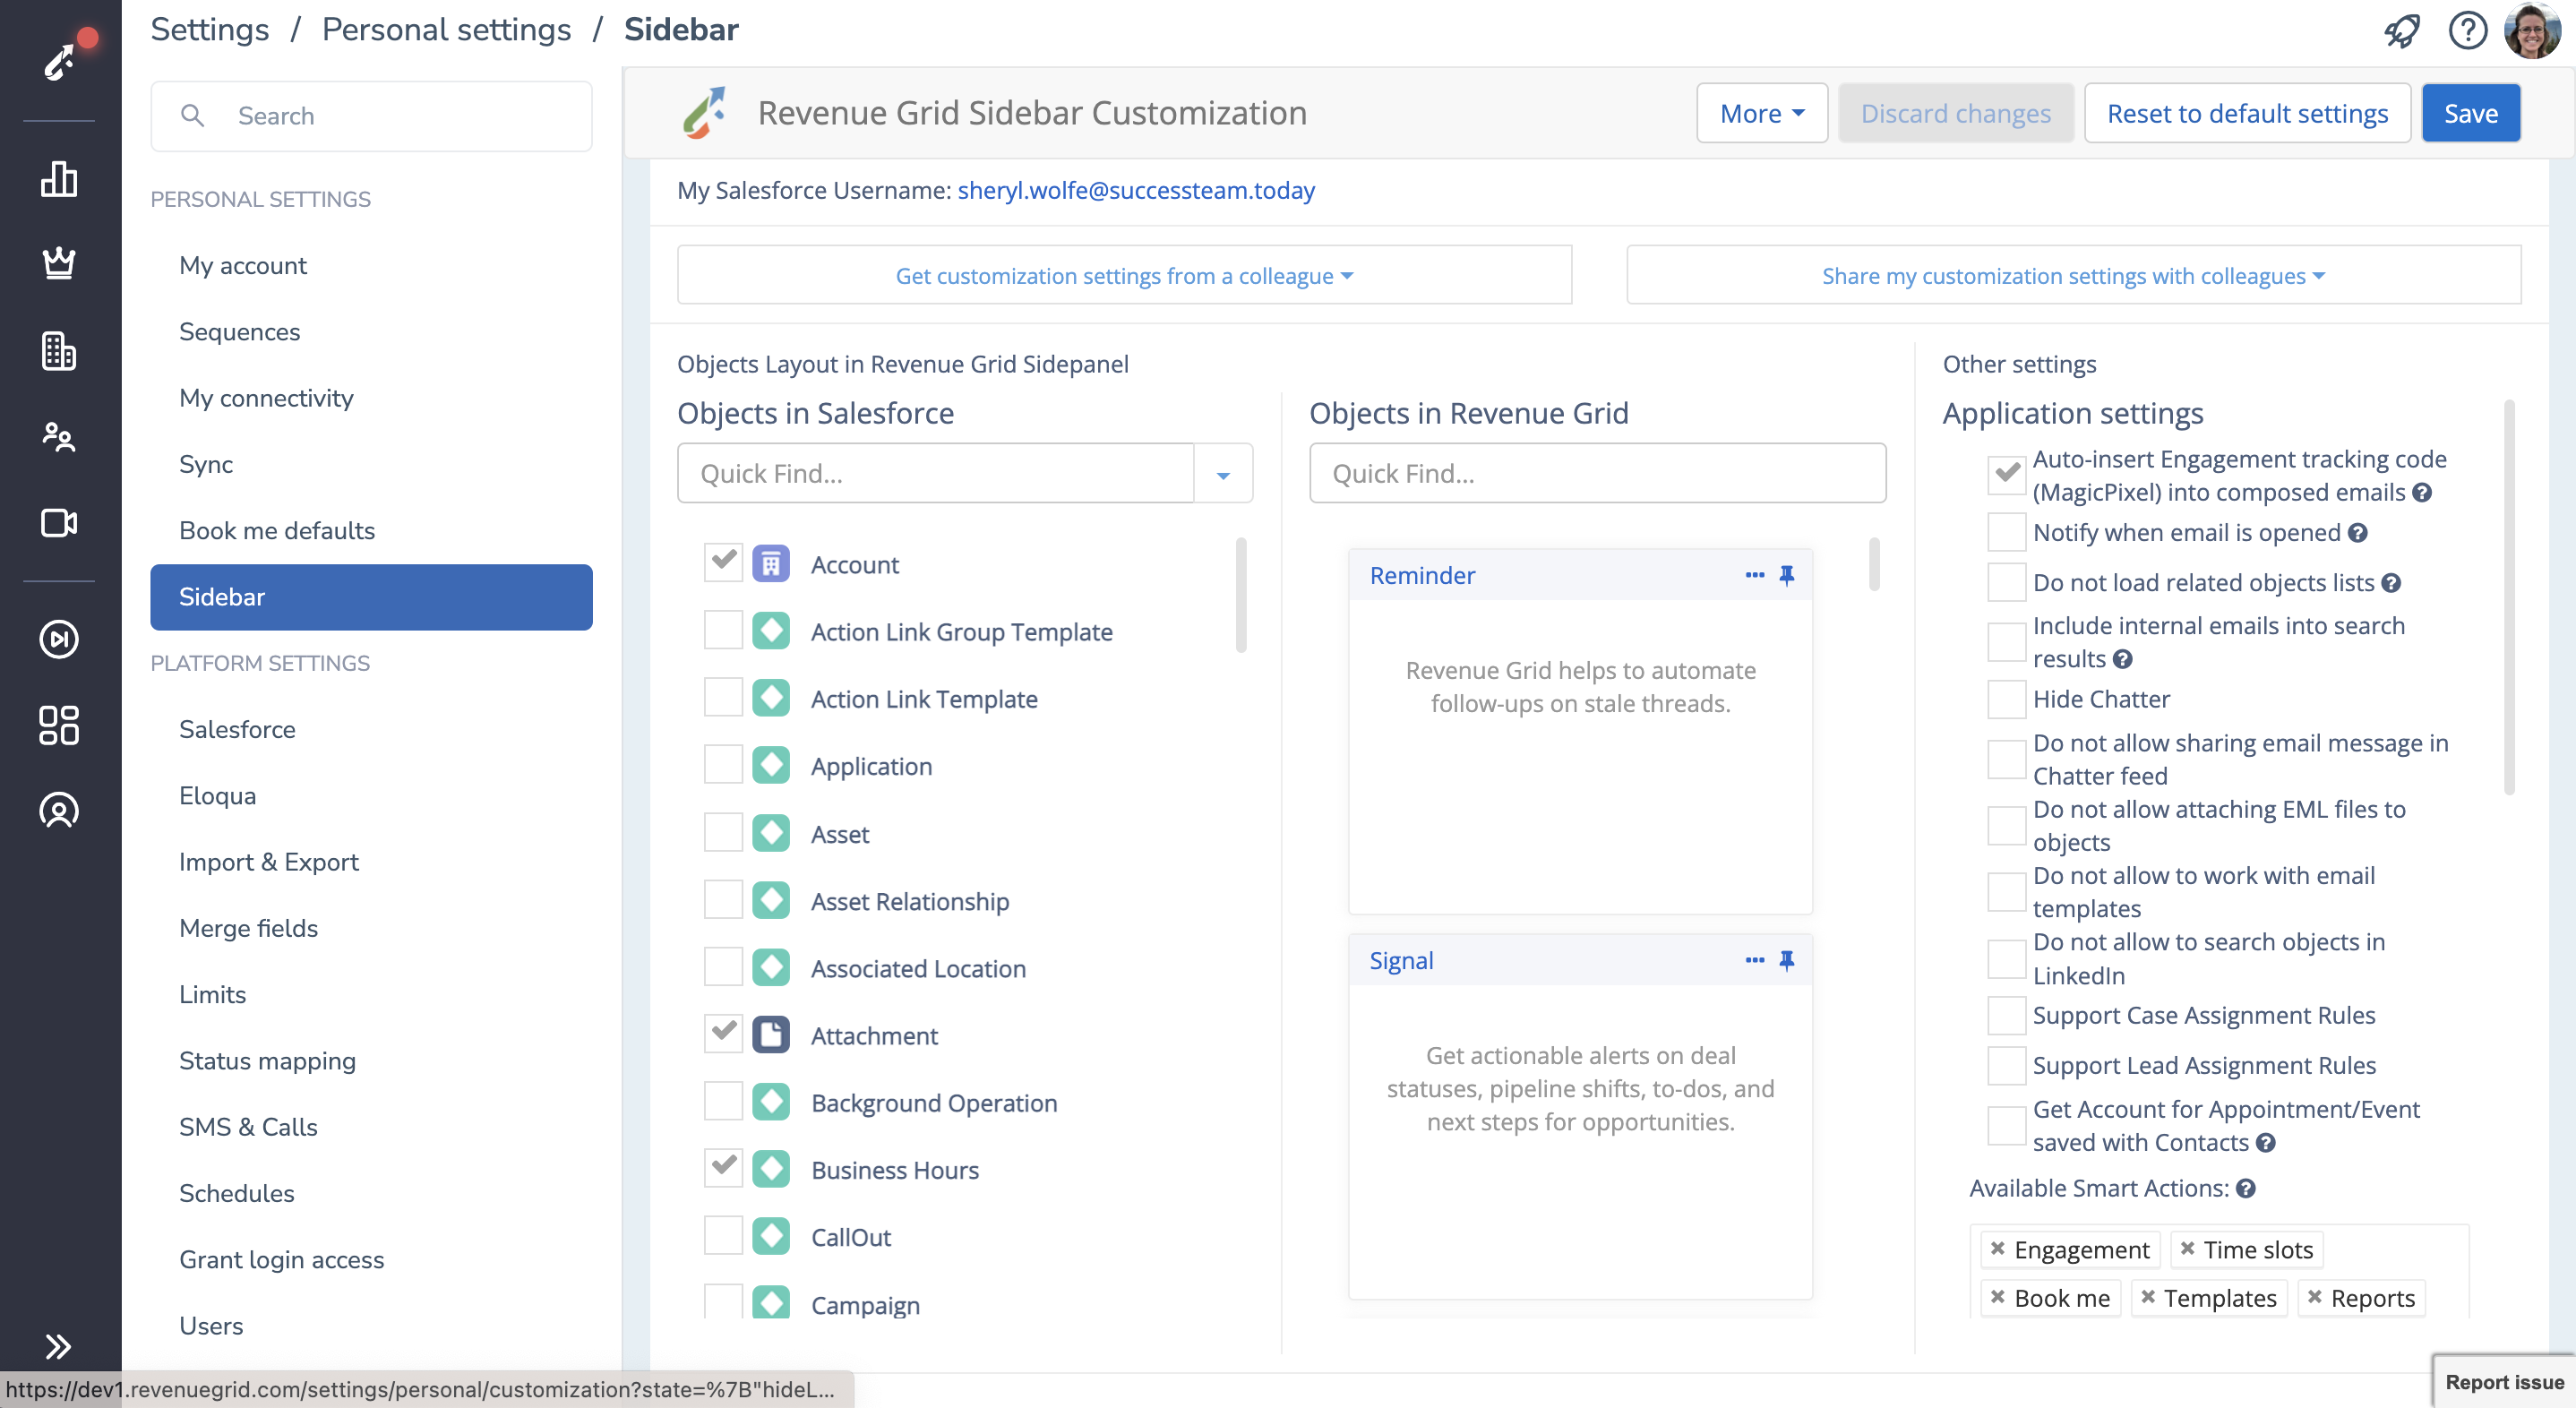
RG Email Sidebar Customization page allows the individual users to adjust various aspects of interaction between Salesforce and RGES Outlook Add-In / Chrome Extension. This includes viewing, processing, and search patterns for different types of objects and their fields, see the left and central panes of the page.
Also, here you can adjust the appearance and various functional settings of RG Email Sidebar for individual users, using the controls on the right pane of the page.
Tip
After adjusting customization settings make sure to click Save in the upper right corner of the page to apply the changes

Important
To discard any recent changes you made, you can click Discard changes. However, once an updated customization is saved by clicking the Save button, you can only Reset to default settings, so no other previous sets of settings can be restored
Note
Since some RGES Outlook Add-In features are not available in RGES Chrome Extension, their associated settings cannot be managed in RGES Customization settings of RGES implementation for Gmail
1. How to Open Customization Page
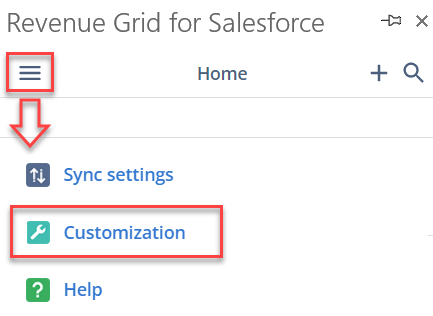
Click the ☰ (Menu) button in the header of RG Email Sidebar and then select Customization to open RG Email Sidebar Customization settings page in your web browser.
2. Application Settings
The controls in the right pane of Customization page enable you to adjust the range of settings defining various aspects of the Add-In’s / Chrome Extension’s behavior.
Refer to this article for complete information on Application Settings in RGES Customization Settings.
3. Duplicates for Objects Linking
Refer to this article for complete information on the Allow creating duplicated emails in Salesforce setting and the Allow creating email duplicates to be linked to these object types field which makes this setting more flexible.
Also see this article for information on objects linking mechanics.
Important
Please note that if you adjust the duplicate handling settings, for these changes to be applied you must log out from RG Email Sidebar Add-In and then re-log in
4. Defining Record Associations (Smart Linking)
In RGES Customization settings, you can adjust Add-In / Chrome Extension behavior when it processes new emails or events.
Refer to this article for complete information on Defining Record Associations.
5. Choosing a Set of Salesforce Objects to Display
Note
In case your Org uses custom object types, refer to this article to learn how to configure their handling in RG Email Sidebar
To change the set of Salesforce objects handled via RG Email Sidebar, by enabling object types in the left pane:
5.1. Use the Quick Find field to search for the needed Salesforce object
5.2. After an object is selected, its object card will appear in the central pane Objects in RG Email Sidebar. If necessary, adjust the fields and settings on the card to customize how this object will be handled
Important
To ensure the proper functioning of the RGES Add-In, at least one object should be selected in the Objects in Salesforce list. If no object is selected, the Save button in the Sidebar will grey out and become unclickable, and you will not be able to save any emails or events
6. Customizing Object Card Appearance and Behavior
You can set up how object cards appear and behave in RG Email Sidebar by making the following adjustments on the Customization page (the central column Objects in RG Email Sidebar). These settings are defined specifically for every object type enabled in RG Email Sidebar handling scope; note that some custom objects require additional configuring to be handled by RG Email Sidebar.
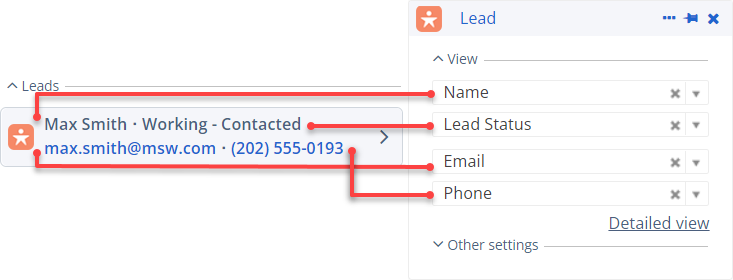
6.1. Selecting which fields to show
You can have up to four object fields shown on an unexpanded card. To define which fields to show, pick the needed field names in the list; to remove an unneeded field use the X icon.
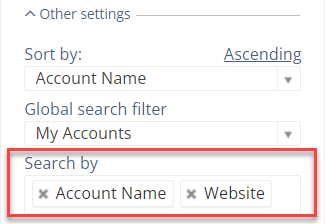
6.2. Specifying card sort order
Use the Sort by picklist to set the order in which object cards will appear on the Sidebar’s home screen or in search results.

6.3. Defining the search/view scope
To get focused results, RG Email Sidebar Add-in applies custom Salesforce views (filters) when searching for records, and you can specify which filter you want to be applied for every object type, by selecting them in the Global search filter picklist.
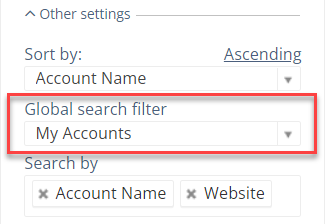
For example, if you want RG Email Sidebar to search only among the Accounts created by you, set My Accounts in the picklist opened for the Accounts type in Customization page’s central pane
Tip
Besides the pre-set views you can add your own custom created Salesforce views – RG Email Sidebar will automatically take up all custom list views you create in Salesforce
Besides this general scope focusing mechanism, you can also set additional filtering to be applied on handling of specific types of records in the Sidebar, using the Contextual search filter setting.
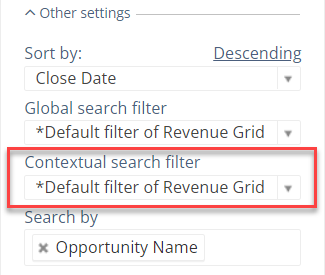
Contextual search filter also uses pre-set or custom created views, to focus Related and searched for records in the Sidebar, based on specific field values criteria, e.g. Status, Created date, Priority, etc. For example, if the Default RG Email Sidebar filter is set for Opportunity objects, only non-closed Opportunities are shown and handled by RGES, but if you want to make this scope focused according to your needs, you can create your own view according to your preferences and apply it.
The animation below demonstrates how to change the view filters for different object types
Default RG Email Sidebar filters
There is a selection of pre-set Global view filters available for every object type that suit various records filtering needs, most of them are the standard pre-set Salesforce views, but some are peculiar to RG Email Sidebar. In the latter case, to see a default filter’s criteria hover the mouse over it in the picklist.
Important
Note that the default RG Email Sidebar filters are not the same as the Default filters you use in Salesforce. In addition, for some types like Email messages or Tasks the default Contextual search selection is Do not search
The table of object type-specific Default RG Email Sidebar filters’ parameters for your reference:
| Object type | Default Global filter parameters | Default Contextual filter value |
|---|---|---|
| EmailMessage | All EmailMessages created no more than 100 days in the past | Do not search |
| Task | All Tasks created no more than 100 days in the past | Do not search |
| Event | All Events created no more than 365 in the past or scheduled within 100 days in the future | Do not search |
| Attachment | All Attachments | Do not search |
| Content document | All Content documents | Do not search |
| Account | All Accounts | n/a |
| Lead | All Leads not converted to Contacts | n/a |
| Contact | All Contacts | n/a |
| Case | Only non-closed Cases created no more than 90 days in the past | user defined |
| Opportunity | Only non-closed Opportunities whose Closing date is due no more than 365 days in the past or in the feature | user defined |
| User | Only Active users in the Org | n/a |
| Product | All Products | Do not search |
| Price book | All Price books | Do not search |
Important
Both user-initiated search and initial search results are affected by this filter. To avoid confusion, refer to this article for special considerations about using this filter
6.4. The Search by list
This customization setting allows to define what object fields are used both when RG Email Sidebar retrieves existing associated records and when you are searching for a certain record of this type. Refer to this article to learn how to use this setting.
6.5. Allow creating or updating records
Select the Allow create or Allow update checkboxes to allow selected card type objects to be created or updated, respectively, via record cards.
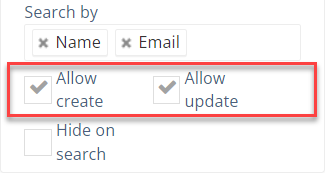
Important
This checkbox is completely unrelated to Salesforce permissions – it only adds an additional permissions level within RG Email Sidebar. For example, if a user is not allowed to create or update Lead records in Salesforce, one will not be able to create or update these records regardless of this setting’s status
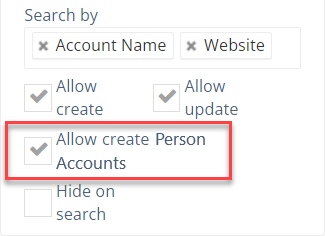
Note
The Account type opened in the central pane has an additional setting Allow create Person Accounts, which is displayed if Salesforce Person Accounts are enabled in your Org. When enabled, this setting allows Person Accounts to be created via RGES
6.6. Hiding record cards in search results (Hide on search)
You can select object types not to be displayed in RG Email Sidebar search results. Enabling this setting also removes selected object types from related records list.
7. Changing Card Order and Pinning Cards
You can adjust the cards’ order in the Sidebar by either dragging them in the list or by clicking the ••• (More) icon in a card’s upper right corner and moving the cards to the top or the bottom of the list.
Note
The category tabs (section, separators) order can also be adjusted directly on RG Email Sidebar’s Home screen: hover the mouse over an items category, e.g. Activity Timeline, then click the ••• (More) icon that appears on the right-hand side and then select either Move tab to Top or Move tab to Bottom
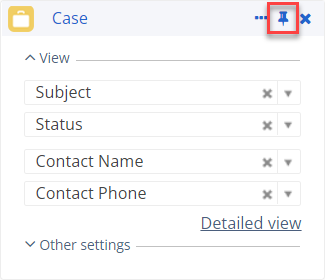
You can pin object type cards to keep their category tabs (sections, separators), including the Suggested New Records tab, constantly displayed in the Sidebar, even if RG Email Sidebar cannot retrieve related items of that type from Salesforce.
To do that, find the item type’s card in the central pane and toggle the 📌 (Pin) icon the card’s upper right corner.
Tip
The set of cards recommended for pinning pin besides all Salesforce record types handled in your company: Activity Timeline, Tasks, Events, Emails. That ensures that their category tabs (sections, separators) are available even for a new Salesforce account that contains no such records
For example, if the Case card is not pinned and no Case related to selected email or calendar item is found in Salesforce, this object category will not be displayed in the Sidebar.
8. Customizing Detailed Card View
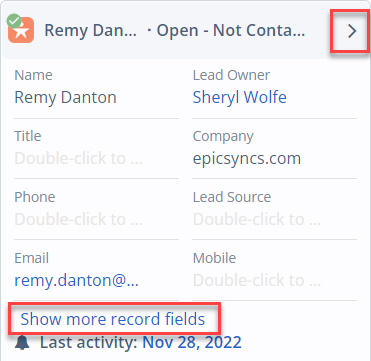
In addition, via the page’s central pane, you can define which record fields will be handled as Important. Important fields are listed for viewing and editing in an object’s card, as well as in the Create new {record type} dialog and the Save email / Save event dialog.
To expand all Important fields of the object, click Show more record fields below the showed fields. To display all record fields, click the > (Expand) icon in a record card’s header to open the detailed object card, where you also can view and edit all the fields.
Important
Please note that a field is also handled as Important if it is set to be auto-prefilled with data (when viewed in the create a new record in Salesforce dialog)
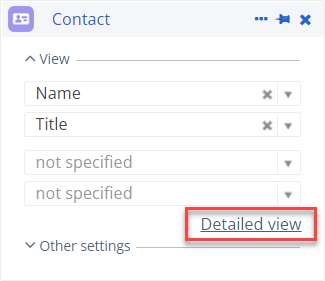
To customize the detailed view, do the following:
8.1. On the Customization page, click Detailed view for an object’s card.
8.2. Click the field you want to add to the card. You can use the Filter field to search for Salesforce fields that are not currently enabled in the Sidebar.
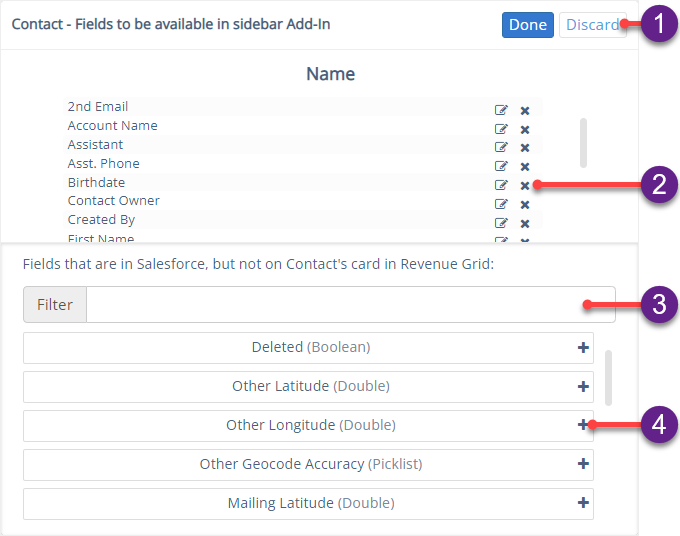
>>> Click to view details <<<
1. Save or Discard changes
2. Mark fields as Important, Force Required, or remove them from the list
3. Use Filter to find the necessary field
4. Click the + (add) button to add fields
Note
The order of fields placement on record cards cannot be adjusted in RGES settings, as RG Email Sidebar respects their order set in Salesforce; if you need to change it, make the corresponding updates in your Salesforce configuration
8.3. Click on the 🖉 (Edit) icon to adjust an object field’s special parameters; there, you can mark the field as Important or Force Required. These parameters are only used by RGES Add-In or Chrome Extension and have no ties in Salesforce of any kind.
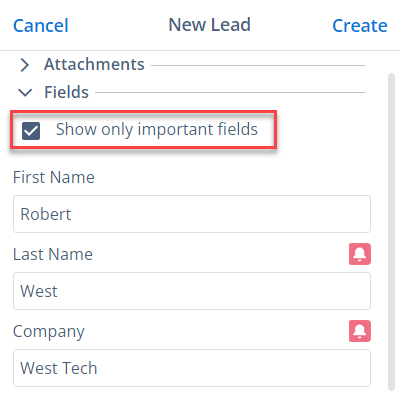
Marking Fields as Important
Important fields are prioritized for displaying when you create new records or view existing ones in the Sidebar. To display all fields, open the detailed object card or, if you are creating a new record, clear the Show only important fields checkbox.
Mark Fields as Force Required
To enhance fields filling flow via RGES, after the Autumn 2021 update RG Email Sidebar Customization includes a possibility to set specific fields of Salesforce objects processed or edited via RGES Add-In as Force Required. That implies specified fields’ filling becomes mandatory when a user creates or modifies an object that contains the field in the Sidebar.
Force Required is located in the same field parameters as Important (see above).
8.4. Click Done
Important
Please note that if you adjust objects’ or fields’ settings, for these changes to be applied you must log out from RG Email Sidebar Add-In and then re-log in
9. Configure Attachments Saving in Salesforce
Tip
Refer to this article for an overview of how files attached to emails/meetings are handled by RG Email Sidebar
Using the RGES Customization page, you can set up the preferred attachment saving in your Salesforce account.
Refer to this article for more information on Configuring Attachment Saving in Salesforce using RG Sidebar Customization Settings.
Attachments auto-selection
In RGES, end users can set how files attached to emails or calendar items should be handled by default, through auto-selection. This setting is located at the bottom of the right pane of Customization settings. The available options are:

- Autoselect only attached files > 100 KB – this option allows to prevent saving in Salesforce of small images or animations attached to an email/calendar item as part of the signature, for example; however, the users will be able to select them, if needed
- Preselect the attachment file type in Save dialog – only the specified file types will be autoselected for saving to Salesforce in the Add-In’s save dialog. After selecting this option, the box for specifying file types will appear underneath. Specify file types without any dots, e.g., txt
- Autoselect all attached files – all attached files will be autoselected to be saved in Salesforce; but the users will be able to unselect unneeded attachments
- Do not autoselect attached files – no attached files will be autoselected; but the users will be able to select needed files
10. Default Customization Settings
If you have changed some of the above described settings and the resulting Add-In / Chrome Extension behavior does not meet your preferences, you can always revert to the default behavior by clicking the button Reset to default settings at the top of Customization page. The default set of settings is defined specifically for your RG Email Sidebar implementation by Revenue Grid and your local assigned administrator; during a reset all object-specific and Add-In / Chrome Extension behavior settings are reverted to their default values except for the Use Adaptive view one. Please note that user-specified settings can be backed up and recovered from another user in the same organization using customization management mechanisms.
Setting the Default (Initial) Customization
In the latest RG Email Sidebar updates the default (initial) set of customization settings can be defined by local RG Email Sidebar Admin, to be applied right after the Solution is installed or after customization is reset to default by clicking the Reset to default settings button in Customization page header. This feature enables quick uniform management of settings for different user categories and facilitates restoring product functioning after unwanted adjustments were made in the settings.
Important
Since the March 2024 release of RG Email Sidebar, on resetting to default customization, the user’s customization settings include only customization fields (incl. reference fields) listed in the customization JSON file or Salesforce layouts.

We would love to hear from you!